Lightning Flash


Quick Start
Flash is a high-level deep learning framework for fast prototyping, baselining, finetuning and solving deep learning problems. It features a set of tasks for you to use for inference and finetuning out of the box, and an easy to implement API to customize every step of the process for full flexibility.
Flash is built for beginners with a simple API that requires very little deep learning background, and for data scientists, Kagglers, applied ML practitioners and deep learning researchers that want a quick way to get a deep learning baseline with advanced features PyTorch Lightning offers.
Why Flash?
For getting started with Deep Learning
Easy to learn
If you are just getting started with deep learning, Flash offers common deep learning tasks you can use out-of-the-box in a few lines of code, no math, fancy nn.Modules or research experience required!
Easy to scale
Flash is built on top of PyTorch Lightning, a powerful deep learning research framework for training models at scale. With the power of Lightning, you can train your flash tasks on any hardware: CPUs, GPUs or TPUs without any code changes.
Easy to upskill
If you want to create more complex and customized models, you can refactor any part of flash with PyTorch or PyTorch Lightning components to get all the flexibility you need. Lightning is just organized PyTorch with the unnecessary engineering details abstracted away.
Flash (high-level)
Lightning (mid-level)
PyTorch (low-level)
When you need more flexibility you can build your own tasks or simply use Lightning directly.
For Deep learning research
Quickest way to a baseline
PyTorch Lightning is designed to abstract away unnecessary boilerplate, while enabling maximal flexibility. In order to provide full flexibility, solving very common deep learning problems such as classification in Lightning still requires some boilerplate. It can still take quite some time to get a baseline model running on a new dataset or out of domain task. We created Flash to answer our users need for a super quick way to baseline for Lightning using proven backbones for common data patterns. Flash aims to be the easiest starting point for your research- start with a Flash Task to benchmark against, and override any part of flash with Lightning or PyTorch components on your way to SOTA research.
Flexibility where you want it
Flash tasks are essentially LightningModules, and the Flash Trainer is a thin wrapper for the Lightning Trainer. You can use your own LightningModule instead of the Flash task, the Lightning Trainer instead of the flash trainer, etc. Flash helps you focus even more only on your research, and less on anything else.
Standard best practices
Flash tasks implement the standard best practices for a variety of different models and domains, to save you time digging through different implementations. Flash abstracts even more details than Lightning, allowing deep learning experts to share their tips and tricks for solving scoped deep learning problems.
Tasks
Flash is comprised of a collection of Tasks. The Flash tasks are laser-focused objects designed to solve a well-defined type of problem, using state-of-the-art methods.
The Flash tasks contain all the relevant information to solve the task at hand- the number of class labels you want to predict, number of columns in your dataset, as well as details on the model architecture used such as loss function, optimizers, etc.
Here are examples of tasks:
from flash.text import TextClassifier
from flash.image import ImageClassifier
from flash.tabular import TabularClassifier
Note
Tasks are inflexible by definition! To get more flexibility, you can simply use LightningModule directly or modify an existing task in just a few lines.
Inference
Inference is the process of generating predictions from trained models. To use a task for inference:
Init your task with pretrained weights using a checkpoint (a checkpoint is simply a file that capture the exact value of all parameters used by a model). Local file or URL works.
Load your data into a
DataModuleand pass it toTrainer.predict.
Here’s an example of inference:
# import our libraries
from flash import Trainer
from flash.text import TextClassifier, TextClassificationData
# 1. Init the finetuned task from URL
model = TextClassifier.load_from_checkpoint("https://flash-weights.s3.amazonaws.com/0.7.0/text_classification_model.pt")
# 2. Perform inference from list of sequences
trainer = Trainer()
datamodule = TextClassificationData.from_lists(
predict_data=[
"Turgid dialogue, feeble characterization - Harvey Keitel a judge?.",
"The worst movie in the history of cinema.",
"This guy has done a great job with this movie!",
],
batch_size=4,
)
predictions = trainer.predict(model, datamodule=datamodule, output="labels")
print(predictions)
We get the following output:
[["negative", "negative", "positive"]]
Finetuning
Finetuning (or transfer-learning) is the process of tweaking a model trained on a large dataset, to your particular (likely much smaller) dataset. All Flash tasks have pre-trained backbones that are already trained on large datasets such as ImageNet. Finetuning on pretrained models decreases training time significantly.
To use a Task for finetuning:
Load your data and organize it using a DataModule customized for the task (example:
ImageClassificationData).Choose and initialize your Task which has state-of-the-art backbones built in (example:
ImageClassifier).Init a
flash.core.trainer.Trainer.Choose a finetune strategy (example: “freeze”) and call
flash.core.trainer.Trainer.finetune()with your data.Save your finetuned model.
Here’s an example of finetuning.
from pytorch_lightning import seed_everything
import flash
from flash.core.classification import LabelsOutput
from flash.core.data.utils import download_data
from flash.image import ImageClassificationData, ImageClassifier
# set the random seeds.
seed_everything(42)
# 1. Download and organize the data
download_data("https://pl-flash-data.s3.amazonaws.com/hymenoptera_data.zip", "data/")
datamodule = ImageClassificationData.from_folders(
train_folder="data/hymenoptera_data/train/",
val_folder="data/hymenoptera_data/val/",
test_folder="data/hymenoptera_data/test/",
batch_size=1,
)
# 2. Build the model using desired Task
model = ImageClassifier(backbone="resnet18", labels=datamodule.labels)
# 3. Create the trainer (run one epoch for demo)
trainer = flash.Trainer(max_epochs=1, gpus=torch.cuda.device_count())
# 4. Finetune the model
trainer.finetune(model, datamodule=datamodule, strategy="freeze")
# 5. Save the model!
trainer.save_checkpoint("image_classification_model.pt")
Using a finetuned model
Once you’ve finetuned, use the model to predict:
predict_datamodule = ImageClassificationData.from_files(
predict_files=[
"data/hymenoptera_data/val/bees/65038344_52a45d090d.jpg",
"data/hymenoptera_data/val/ants/2255445811_dabcdf7258.jpg",
],
batch_size=1,
)
predictions = trainer.predict(model, datamodule=predict_datamodule, output="labels")
print(predictions)
We get the following output:
[['bees', 'ants']]
Or you can use the saved model for prediction anywhere you want!
from flash import Trainer
from flash.image import ImageClassifier, ImageClassificationData
# load finetuned checkpoint
model = ImageClassifier.load_from_checkpoint("image_classification_model.pt")
trainer = Trainer()
datamodule = ImageClassificationData.from_files(predict_files=["path/to/your/own/image.png"])
predictions = trainer.predict(model, datamodule=datamodule)
Training
When you have enough data, you’re likely better off training from scratch instead of finetuning.
To train a task from scratch:
Load your data and organize it using a DataModule customized for the task (example:
ImageClassificationData).Choose and initialize your Task (setting
pretrained=False) which has state-of-the-art backbones built in (example:ImageClassifier).Init a
flash.core.trainer.Traineror apytorch_lightning.trainer.Trainer.Call
flash.core.trainer.Trainer.fit()with your data set.Save your trained model.
Here’s an example:
from pytorch_lightning import seed_everything
import flash
from flash.core.classification import LabelsOutput
from flash.core.data.utils import download_data
from flash.image import ImageClassificationData, ImageClassifier
# set the random seeds.
seed_everything(42)
# 1. Download and organize the data
download_data("https://pl-flash-data.s3.amazonaws.com/hymenoptera_data.zip", "data/")
datamodule = ImageClassificationData.from_folders(
train_folder="data/hymenoptera_data/train/",
val_folder="data/hymenoptera_data/val/",
test_folder="data/hymenoptera_data/test/",
batch_size=1,
)
# 2. Build the model using desired Task
model = ImageClassifier(backbone="resnet18", num_classes=datamodule.num_classes, pretrained=False)
# 3. Create the trainer (run one epoch for demo)
trainer = flash.Trainer(max_epochs=1, gpus=torch.cuda.device_count())
# 4. Train the model
trainer.fit(model, datamodule=datamodule)
# 5. Save the model!
trainer.save_checkpoint("image_classification_model.pt")
A few Built-in Tasks
More tasks coming soon!
Contribute a task
The lightning + Flash team is hard at work building more tasks for common deep-learning use cases. But we’re looking for incredible contributors like you to submit new tasks!
Join our Slack to get help becoming a contributor!
Installation & Troubleshooting
Installation options
Install with pip
pip install lightning-flash
Optionally, you can install Flash with extra packages for each domain.
For a single domain, use: pip install 'lightning-flash[{DOMAIN}]'.
pip install 'lightning-flash[image]'
pip install 'lightning-flash[tabular]'
pip install 'lightning-flash[text]'
...
For multiple domains, use: pip install 'lightning-flash[{DOMAIN_1, DOMAIN_2, ...}]'.
pip install 'lightning-flash[audio,image]'
...
For contributors, please install Flash with packages for testing Flash and building docs.
# Clone Flash repository locally
git clone https://github.com/[your username]/lightning-flash.git
cd lightning-flash
# Install Flash in editable mode with extra packages for development
pip install -e '.[dev]'
Install with conda
Flash is available via conda forge. Install it with:
conda install -c conda-forge lightning-flash
Install from source
You can install Flash from source without any domain specific dependencies with:
pip install 'git+https://github.com/PyTorchLightning/lightning-flash.git'
To install Flash with domain dependencies, use:
pip install 'git+https://github.com/PyTorchLightning/lightning-flash.git#egg=lightning-flash[image]'
You can again install dependencies for multiple domains by separating them with commas as above.
Troubleshooting
Torchtext incompatibility
If you install Flash in an environment that already has a version of torchtext installed, you may see an error like this when you try to import it:
ImportError: /usr/local/lib/python3.7/dist-packages/torchtext/_torchtext.so: undefined symbol: _ZN2at6detail10noopDeleteEPv
The workaround is to uninstall torchtext before installing Flash, like this:
pip uninstall -y torchtext
pip install lightning-flash[...]
FiftyOne incompatibility on Google Colab
When installing Flash (or PyTorch Lightning) alongside FiftyOne in a Google Colab environment, you may get the following error when importing FiftyOne:
ServiceListenTimeout: fiftyone.core.service.DatabaseService failed to bind to port
There is no known workaround for this issue at the time of writing, but you can view the latest updates on the associated github issue.
Flash Zero
Flash Zero is a zero-code machine learning platform. Here’s an image classification example to illustrate with one of the dozens tasks available.
Flash Zero in 3 steps
1. Select your task
flash {TASK_NAME}
Here is the list of currently supported tasks.
audio_classification Classify audio spectrograms.
graph_classification Classify graphs.
image_classification Classify images.
instance_segmentation Segment object instances in images.
keypoint_detection Detect keypoints in images.
object_detection Detect objects in images.
pointcloud_detection Detect objects in point clouds.
pointcloud_segmentation Segment objects in point clouds.
question_answering Extractive Question Answering.
semantic_segmentation Segment objects in images.
speech_recognition Speech recognition.
style_transfer Image style transfer.
summarization Summarize text.
tabular_classification Classify tabular data.
text_classification Classify text.
translation Translate text.
video_classification Classify videos.
2. Pass in your own data
flash image_classification from_folders --train_folder data/hymenoptera_data/train
3. Modify the model and training parameters
flash image_classification --trainer.max_epochs 10 --model.backbone resnet50 from_folders --train_folder data/hymenoptera_data/train
Note
The trainer and model arguments should be placed before the source subcommand. Here it is from_folders.
Other Examples
Image Object Detection
To train an Object Detector on COCO 2017 dataset, you could use the following command:
flash object_detection from_coco --train_folder data/coco128/images/train2017/ --train_ann_file data/coco128/annotations/instances_train2017.json --val_split .3 --batch_size 8 --num_workers 4
Image Object Segmentation
To train an Image Segmenter on CARLA driving simulator dataset
flash semantic_segmentation from_folders --train_folder data/CameraRGB --train_target_folder data/CameraSeg --num_classes 21
Below is an example where the head, the backbone and its pretrained weights are customized.
flash semantic_segmentation --model.head fpn --model.backbone efficientnet-b0 --model.pretrained advprop from_folders --train_folder data/CameraRGB --train_target_folder data/CameraSeg --num_classes 21
Video Classification
To train an Video Classifier on the Kinetics dataset, you could use the following command:
flash video_classification from_folders --train_folder data/kinetics/train/ --clip_duration 1 --num_workers 0
CLI options
Flash Zero is built on top of the lightning CLI, so the trainer and model arguments can be configured either from the command line or from a config file. For example, to run the image classifier for 10 epochs with a resnet50 backbone you can use:
flash image_classification --trainer.max_epochs 10 --model.backbone resnet50
To view all of the available options for a task, run:
flash image_classification --help
Using Your Own Data
Flash Zero works with your own data through subcommands. The available subcommands for each task are given at the bottom
of their help pages (e.g. when running flash image-classification --help). You can then use the required
subcommand to train on your own data. Let’s look at an example using the Hymenoptera data from the
Image Classification guide. First, download and unzip your data:
curl https://pl-flash-data.s3.amazonaws.com/hymenoptera_data.zip -o hymenoptera_data
unzip hymenoptera_data.zip
Now train with Flash Zero:
flash image_classification from_folders --train_folder ./hymenoptera_data/train
Getting Help
To find all available tasks, you can run:
flash --help
This will output the following:
Commands:
audio_classification Classify audio spectrograms.
graph_classification Classify graphs.
image_classification Classify images.
instance_segmentation Segment object instances in images.
keypoint_detection Detect keypoints in images.
object_detection Detect objects in images.
pointcloud_detection Detect objects in point clouds.
pointcloud_segmentation Segment objects in point clouds.
question_answering Extractive Question Answering.
semantic_segmentation Segment objects in images.
speech_recognition Speech recognition.
style_transfer Image style transfer.
summarization Summarize text.
tabular_classification Classify tabular data.
text_classification Classify text.
translation Translate text.
video_classification Classify videos.
To get more information about a specific task, you can do the following:
flash image_classification --help
You can view the help page for each subcommand. For example, to view the options for training an image classifier from folders, you can run:
flash image_classification from_folders --help
Finally, you can generate a config.yaml file from the client to ease parameters modification by running:
flash image_classification --print_config > config.yaml
Flash in Production
Flash Serve
Flash Serve makes model deployment simple.
Server Side
from flash.image import SemanticSegmentation
from flash.image.segmentation.output import SegmentationLabelsOutput
model = SemanticSegmentation.load_from_checkpoint(
"https://flash-weights.s3.amazonaws.com/0.7.0/semantic_segmentation_model.pt"
)
model.output = SegmentationLabelsOutput(visualize=False)
model.serve()
Client Side
import base64
from pathlib import Path
import requests
import flash
with (Path(flash.ASSETS_ROOT) / "road.png").open("rb") as f:
imgstr = base64.b64encode(f.read()).decode("UTF-8")
body = {"session": "UUID", "payload": {"inputs": {"data": imgstr}}}
resp = requests.post("http://127.0.0.1:8000/predict", json=body)
print(resp.json())
Credits to @rlizzo, @hhsecond, @lantiga, @luiscape for building the Flash Serve Engine. Read all about it here.
Electricity Price Forecasting with N-BEATS
Author: Ethan Harris (ethan@pytorchlightning.ai)
License: CC BY-SA
Generated: 2021-12-16T15:28:35.615042
This tutorial covers using Lightning Flash and it’s integration with PyTorch Forecasting to train an autoregressive model (N-BEATS) on hourly electricity pricing data. We show how the built-in interpretability tools from PyTorch Forecasting can be used with Flash to plot the trend and daily seasonality in our data discovered by the model. We also cover how features from PyTorch Lightning such as the learning rate finder can be used easily with Flash. As a bonus, we show hat we can resample daily observations from the data to discover weekly trends instead.
Open in 
Give us a ⭐ on Github | Check out the documentation | Join us on Slack
Setup
This notebook requires some packages besides pytorch-lightning.
[1]:
! pip install --quiet "pytorch-lightning>=1.3" "ipython[notebook]" "torch>=1.6, <1.9" "pandas==1.1.5" "torchmetrics>=0.3" "lightning-flash[tabular]>=0.6.0"
In this tutorial we’ll look at using Lightning Flash and it’s integration with PyTorch Forecasting for autoregressive modelling of electricity prices using the N-BEATS model. We’ll start by using N-BEATS to uncover daily patterns (seasonality) from hourly observations and then show how we can resample daily averages to uncover weekly patterns too.
Along the way, we’ll see how the built-in tools from PyTorch Lightning, like the learning rate finder, can be used seamlessly with Flash to help make the process of putting a model together as smooth as possible.
[2]:
import os
from typing import Any, Dict
import flash
import matplotlib.pyplot as plt
import pandas as pd
import torch
from flash.core.data.utils import download_data
from flash.core.integrations.pytorch_forecasting import convert_predictions
from flash.tabular.forecasting import TabularForecaster, TabularForecastingData
DATASET_PATH = os.environ.get("PATH_DATASETS", "data/")
Loading the data
We’ll use the Spanish hourly energy demand generation and weather data set from Kaggle: https://www.kaggle.com/nicholasjhana/energy-consumption-generation-prices-and-weather
First, download the data:
[3]:
download_data("https://pl-flash-data.s3.amazonaws.com/kaggle_electricity.zip", DATASET_PATH)
/usr/local/lib/python3.9/dist-packages/urllib3/connectionpool.py:1013: InsecureRequestWarning: Unverified HTTPS request is being made to host 'pl-flash-data.s3.amazonaws.com'. Adding certificate verification is strongly advised. See: https://urllib3.readthedocs.io/en/1.26.x/advanced-usage.html#ssl-warnings
warnings.warn(
Data loading
To load the data, we start by loading the CSV file into a pandas DataFrame:
[4]:
df_energy_hourly = pd.read_csv(f"{DATASET_PATH}/energy_dataset.csv", parse_dates=["time"])
Before we can load the data into Flash, there are a few preprocessing steps we need to take. The first preprocessing step is to set the time field as the index (formatted as a datetime). The second step is to resample the data to the desired frequency in case it is different from the desired observation frequency. Since we are performing autoregressive modelling, we can remove all columns except for "price actual".
For the third preprocessing step, we need to create a “time_idx” column. The “time_idx” column should contain integers corresponding to the observation index (e.g. in our case the difference between two “time_idx” values is the number of hours between the observations). To do this we convert the datetime to an index by taking the nanoseconds value and dividing by the number of nanoseconds in a single unit of our chosen frequency. We then subtract the minimum value so it starts at zero (although it would still work without this step).
The Flash TabularForecastingData (which uses the TimeSeriesDataSet from PyTorch Forecasting internally) also supports loading data from multiple time series (e.g. you may have electricity data from multiple countries). To indicate that our data is all from the same series, we add a constant column with a constant value of zero.
Here’s the full preprocessing function:
[5]:
def preprocess(df: pd.DataFrame, frequency: str = "1H") -> pd.DataFrame:
df["time"] = pd.to_datetime(df["time"], utc=True, infer_datetime_format=True)
df.set_index("time", inplace=True)
df = df.resample(frequency).mean()
df = df.filter(["price actual"])
df["time_idx"] = (df.index.view(int) / pd.Timedelta(frequency).value).astype(int)
df["time_idx"] -= df["time_idx"].min()
df["constant"] = 0
return df
df_energy_hourly = preprocess(df_energy_hourly)
Creating the Flash DataModule
Now, we can create a TabularForecastingData. The role of the TabularForecastingData is to split up our time series into windows which include a region to encode (of size max_encoder_length) and a region to predict (of size max_prediction_length) which will be used to compute the loss. The size of the prediction window should be chosen depending on the kinds of trends we would like our model to uncover. In our case, we are interested in how electricity prices change throughout the
day, so a one day prediction window (max_prediction_length = 24) makes sense here. The size of the encoding window can vary, however, in the N-BEATS paper the authors suggest using an encoder length of between two and ten times the prediction length. We therefore choose two days (max_encoder_length = 48) as the encoder length.
[6]:
max_prediction_length = 24
max_encoder_length = 24 * 2
training_cutoff = df_energy_hourly["time_idx"].max() - max_prediction_length
datamodule = TabularForecastingData.from_data_frame(
time_idx="time_idx",
target="price actual",
group_ids=["constant"],
max_encoder_length=max_encoder_length,
max_prediction_length=max_prediction_length,
time_varying_unknown_reals=["price actual"],
train_data_frame=df_energy_hourly[df_energy_hourly["time_idx"] <= training_cutoff],
val_data_frame=df_energy_hourly,
batch_size=256,
)
/home/AzDevOps_azpcontainer/.local/lib/python3.9/site-packages/pytorch_lightning/core/datamodule.py:73: LightningDeprecationWarning: DataModule property `train_transforms` was deprecated in v1.5 and will be removed in v1.7.
rank_zero_deprecation(
Creating the Flash Task
Now, we’re ready to create a TabularForecaster. The N-BEATS model has two primary hyper-parameters:"widths", and "backcast_loss_ratio". In the PyTorch Forecasting Documentation, the authors recommend using "widths" of [32, 512]. In order to prevent overfitting with smaller datasets, a good rule of thumb is to limit the number of parameters of your model. For this
reason, we use "widths" of [16, 256].
To understand the "backcast_loss_ratio", let’s take a look at this diagram of the model taken from the arXiv paper:

Each ‘block’ within the N-BEATS architecture includes a forecast output and a backcast which can each yield their own loss. The "backcast_loss_ratio" is the ratio of the backcast loss to the forecast loss. A value of 1.0 means that the loss function is simply the sum of the forecast and backcast losses.
[7]:
model = TabularForecaster(
datamodule.parameters, backbone="n_beats", backbone_kwargs={"widths": [16, 256], "backcast_loss_ratio": 1.0}
)
/usr/local/lib/python3.9/dist-packages/numpy/lib/nanfunctions.py:1119: RuntimeWarning: All-NaN slice encountered
r, k = function_base._ureduce(a, func=_nanmedian, axis=axis, out=out,
Using 'n_beats' provided by jdb78/PyTorch-Forecasting (https://github.com/jdb78/pytorch-forecasting).
Finding the learning rate
Tabular models can be particularly sensitive to the choice of learning rate. Helpfully, PyTorch Lightning provides a built-in learning rate finder that suggests a suitable learning rate automatically. To use it, we first create our Trainer. We apply gradient clipping (a common technique for tabular tasks) with gradient_clip_val=0.01 in order to help prevent our model from over-fitting. Here’s how to find the learning rate:
[8]:
trainer = flash.Trainer(
max_epochs=3,
gpus=int(torch.cuda.is_available()),
gradient_clip_val=0.01,
)
res = trainer.tuner.lr_find(model, datamodule=datamodule, min_lr=1e-5)
print(f"Suggested learning rate: {res.suggestion()}")
res.plot(show=True, suggest=True).show()
GPU available: True, used: True
TPU available: False, using: 0 TPU cores
IPU available: False, using: 0 IPUs
LOCAL_RANK: 0 - CUDA_VISIBLE_DEVICES: [0,1]
/home/AzDevOps_azpcontainer/.local/lib/python3.9/site-packages/pytorch_lightning/trainer/data_loading.py:116: UserWarning: The dataloader, val_dataloader 0, does not have many workers which may be a bottleneck. Consider increasing the value of the `num_workers` argument` (try 12 which is the number of cpus on this machine) in the `DataLoader` init to improve performance.
rank_zero_warn(
/home/AzDevOps_azpcontainer/.local/lib/python3.9/site-packages/pytorch_lightning/trainer/data_loading.py:116: UserWarning: The dataloader, train_dataloader, does not have many workers which may be a bottleneck. Consider increasing the value of the `num_workers` argument` (try 12 which is the number of cpus on this machine) in the `DataLoader` init to improve performance.
rank_zero_warn(
/home/AzDevOps_azpcontainer/.local/lib/python3.9/site-packages/pytorch_lightning/utilities/data.py:59: UserWarning: Trying to infer the `batch_size` from an ambiguous collection. The batch size we found is 256. To avoid any miscalculations, use `self.log(..., batch_size=batch_size)`.
warning_cache.warn(
LR finder stopped early after 81 steps due to diverging loss.
Restoring states from the checkpoint path at /__w/1/s/lr_find_temp_model_18513590-95dc-42e0-874c-d3607a3fe945.ckpt
Suggested learning rate: 0.0007079457843841378

Once the suggest learning rate has been found, we can update our model with it:
[9]:
model.learning_rate = res.suggestion()
Training the model
Now all we have to do is train the model!
[10]:
trainer.fit(model, datamodule=datamodule)
/home/AzDevOps_azpcontainer/.local/lib/python3.9/site-packages/pytorch_lightning/core/datamodule.py:469: LightningDeprecationWarning: DataModule.setup has already been called, so it will not be called again. In v1.6 this behavior will change to always call DataModule.setup.
rank_zero_deprecation(
LOCAL_RANK: 0 - CUDA_VISIBLE_DEVICES: [0,1]
| Name | Type | Params
------------------------------------------------------------
0 | train_metrics | ModuleDict | 0
1 | val_metrics | ModuleDict | 0
2 | test_metrics | ModuleDict | 0
3 | adapter | PyTorchForecastingAdapter | 454 K
------------------------------------------------------------
454 K Trainable params
0 Non-trainable params
454 K Total params
1.820 Total estimated model params size (MB)
/home/AzDevOps_azpcontainer/.local/lib/python3.9/site-packages/pytorch_lightning/core/datamodule.py:469: LightningDeprecationWarning: DataModule.teardown has already been called, so it will not be called again. In v1.6 this behavior will change to always call DataModule.teardown.
rank_zero_deprecation(
Plot the interpretation
An important feature of the N-BEATS model is that it can be configured to produce an interpretable prediction that is split into both a low frequency (trend) component and a high frequency (seasonality) component. For hourly observations, we might expect the trend component to show us how electricity prices are changing from one day to the next (for example, whether prices were generally higher or lower than yesterday). In contrast, the seasonality component would be expected to show us the general pattern in prices through the day (for example, if there is typically a peak in price around lunch time or a drop at night).
It is often useful to visualize this decomposition and the TabularForecaster makes it simple. First, we load the best model from our training run and generate some predictions. Next, we convert the predictions to the format expected by PyTorch Forecasting using the convert_predictions utility function. Finally, we plot the interpretation using the pytorch_forecasting_model attribute. Here’s the full function:
[11]:
def plot_interpretation(model_path: str, predict_df: pd.DataFrame, parameters: Dict[str, Any]):
model = TabularForecaster.load_from_checkpoint(model_path)
datamodule = TabularForecastingData.from_data_frame(
parameters=parameters,
predict_data_frame=predict_df,
batch_size=256,
)
trainer = flash.Trainer(gpus=int(torch.cuda.is_available()))
predictions = trainer.predict(model, datamodule=datamodule)
predictions, inputs = convert_predictions(predictions)
model.pytorch_forecasting_model.plot_interpretation(inputs, predictions, idx=0)
plt.show()
And now we run the function to plot the trend and seasonality curves:
[12]:
plot_interpretation(trainer.checkpoint_callback.best_model_path, df_energy_hourly, datamodule.parameters)
/usr/local/lib/python3.9/dist-packages/numpy/lib/nanfunctions.py:1119: RuntimeWarning: All-NaN slice encountered
r, k = function_base._ureduce(a, func=_nanmedian, axis=axis, out=out,
Using 'n_beats' provided by jdb78/PyTorch-Forecasting (https://github.com/jdb78/pytorch-forecasting).
/home/AzDevOps_azpcontainer/.local/lib/python3.9/site-packages/pytorch_lightning/core/datamodule.py:73: LightningDeprecationWarning: DataModule property `train_transforms` was deprecated in v1.5 and will be removed in v1.7.
rank_zero_deprecation(
GPU available: True, used: True
TPU available: False, using: 0 TPU cores
IPU available: False, using: 0 IPUs
LOCAL_RANK: 0 - CUDA_VISIBLE_DEVICES: [0,1]
/home/AzDevOps_azpcontainer/.local/lib/python3.9/site-packages/pytorch_lightning/trainer/data_loading.py:116: UserWarning: The dataloader, predict_dataloader 0, does not have many workers which may be a bottleneck. Consider increasing the value of the `num_workers` argument` (try 12 which is the number of cpus on this machine) in the `DataLoader` init to improve performance.
rank_zero_warn(
/home/AzDevOps_azpcontainer/.local/lib/python3.9/site-packages/pytorch_lightning/loops/epoch/prediction_epoch_loop.py:172: UserWarning: Lightning couldn't infer the indices fetched for your dataloader.
warning_cache.warn("Lightning couldn't infer the indices fetched for your dataloader.")

It worked! The plot shows that the TabularForecaster does a reasonable job of modelling the time series and also breaks it down into a trend component and a seasonality component (in this case showing daily fluctuations in electricity prices).
Bonus: Weekly trends
The type of seasonality that the model learns to detect is dictated by the frequency of observations and the length of the encoding / prediction window. We might imagine that our pipeline could be changed to instead uncover weekly trends if we resample daily observations from our data instead of hourly.
We can use our preprocessing function to do this. First, we load the data as before then preprocess it (this time setting frequency = "1D").
[13]:
df_energy_daily = pd.read_csv(f"{DATASET_PATH}/energy_dataset.csv", parse_dates=["time"])
df_energy_daily = preprocess(df_energy_daily, frequency="1D")
Now let’s create our TabularForecastingData as before, this time with a four week encoding window and a one week prediction window.
[14]:
max_prediction_length = 1 * 7
max_encoder_length = 4 * 7
training_cutoff = df_energy_daily["time_idx"].max() - max_prediction_length
datamodule = TabularForecastingData.from_data_frame(
time_idx="time_idx",
target="price actual",
group_ids=["constant"],
max_encoder_length=max_encoder_length,
max_prediction_length=max_prediction_length,
time_varying_unknown_reals=["price actual"],
train_data_frame=df_energy_daily[df_energy_daily["time_idx"] <= training_cutoff],
val_data_frame=df_energy_daily,
batch_size=256,
)
/home/AzDevOps_azpcontainer/.local/lib/python3.9/site-packages/pytorch_lightning/core/datamodule.py:73: LightningDeprecationWarning: DataModule property `train_transforms` was deprecated in v1.5 and will be removed in v1.7.
rank_zero_deprecation(
Now it’s time to create a new model and trainer. We run for 24 times the number of epochs this time as we now have around 1/24th of the number of observations. This time, instead of using the learning rate finder we just set the learning rate manually:
[15]:
model = TabularForecaster(
datamodule.parameters,
backbone="n_beats",
backbone_kwargs={"widths": [16, 256], "backcast_loss_ratio": 1.0},
learning_rate=5e-4,
)
trainer = flash.Trainer(
max_epochs=3 * 24,
check_val_every_n_epoch=24,
gpus=int(torch.cuda.is_available()),
gradient_clip_val=0.01,
)
/usr/local/lib/python3.9/dist-packages/numpy/lib/nanfunctions.py:1119: RuntimeWarning: All-NaN slice encountered
r, k = function_base._ureduce(a, func=_nanmedian, axis=axis, out=out,
Using 'n_beats' provided by jdb78/PyTorch-Forecasting (https://github.com/jdb78/pytorch-forecasting).
GPU available: True, used: True
TPU available: False, using: 0 TPU cores
IPU available: False, using: 0 IPUs
Finally, we train the new model:
[16]:
trainer.fit(model, datamodule=datamodule)
LOCAL_RANK: 0 - CUDA_VISIBLE_DEVICES: [0,1]
| Name | Type | Params
------------------------------------------------------------
0 | train_metrics | ModuleDict | 0
1 | val_metrics | ModuleDict | 0
2 | test_metrics | ModuleDict | 0
3 | adapter | PyTorchForecastingAdapter | 425 K
------------------------------------------------------------
425 K Trainable params
0 Non-trainable params
425 K Total params
1.702 Total estimated model params size (MB)
/home/AzDevOps_azpcontainer/.local/lib/python3.9/site-packages/pytorch_lightning/trainer/data_loading.py:116: UserWarning: The dataloader, val_dataloader 0, does not have many workers which may be a bottleneck. Consider increasing the value of the `num_workers` argument` (try 12 which is the number of cpus on this machine) in the `DataLoader` init to improve performance.
rank_zero_warn(
/home/AzDevOps_azpcontainer/.local/lib/python3.9/site-packages/pytorch_lightning/trainer/data_loading.py:116: UserWarning: The dataloader, train_dataloader, does not have many workers which may be a bottleneck. Consider increasing the value of the `num_workers` argument` (try 12 which is the number of cpus on this machine) in the `DataLoader` init to improve performance.
rank_zero_warn(
/home/AzDevOps_azpcontainer/.local/lib/python3.9/site-packages/pytorch_lightning/trainer/data_loading.py:412: UserWarning: The number of training samples (5) is smaller than the logging interval Trainer(log_every_n_steps=50). Set a lower value for log_every_n_steps if you want to see logs for the training epoch.
rank_zero_warn(
Now let’s look at what it learned:
[17]:
plot_interpretation(trainer.checkpoint_callback.best_model_path, df_energy_daily, datamodule.parameters)
/usr/local/lib/python3.9/dist-packages/numpy/lib/nanfunctions.py:1119: RuntimeWarning: All-NaN slice encountered
r, k = function_base._ureduce(a, func=_nanmedian, axis=axis, out=out,
Using 'n_beats' provided by jdb78/PyTorch-Forecasting (https://github.com/jdb78/pytorch-forecasting).
/home/AzDevOps_azpcontainer/.local/lib/python3.9/site-packages/pytorch_lightning/core/datamodule.py:73: LightningDeprecationWarning: DataModule property `train_transforms` was deprecated in v1.5 and will be removed in v1.7.
rank_zero_deprecation(
GPU available: True, used: True
TPU available: False, using: 0 TPU cores
IPU available: False, using: 0 IPUs
LOCAL_RANK: 0 - CUDA_VISIBLE_DEVICES: [0,1]
/home/AzDevOps_azpcontainer/.local/lib/python3.9/site-packages/pytorch_lightning/trainer/data_loading.py:116: UserWarning: The dataloader, predict_dataloader 0, does not have many workers which may be a bottleneck. Consider increasing the value of the `num_workers` argument` (try 12 which is the number of cpus on this machine) in the `DataLoader` init to improve performance.
rank_zero_warn(

Success! We can now also see weekly trends / seasonality uncovered by our new model.
Closing thoughts and next steps!
This tutorial has shown how Flash and PyTorch Forecasting can be used to train state-of-the-art auto-regressive forecasting models (such as N-BEATS). We’ve seen how we can influence the kinds of trends and patterns uncovered by the model by resampling the data and changing the hyper-parameters.
There are plenty of ways you could take this tutorial further. For example, you could try a more complex model, such as the temporal fusion transformer, which can handle additional inputs (the kaggle data set we used also includes weather data).
Alternatively, if you want to be a bit more adventurous, you could look at some of the other problems that can solved with Lightning Flash.
Congratulations - Time to Join the Community!
Congratulations on completing this notebook tutorial! If you enjoyed this and would like to join the Lightning movement, you can do so in the following ways!
Star Lightning on GitHub
The easiest way to help our community is just by starring the GitHub repos! This helps raise awareness of the cool tools we’re building.
Join our Slack!
The best way to keep up to date on the latest advancements is to join our community! Make sure to introduce yourself and share your interests in #general channel
Contributions !
The best way to contribute to our community is to become a code contributor! At any time you can go to Lightning or Bolt GitHub Issues page and filter for “good first issue”.
You can also contribute your own notebooks with useful examples !
Great thanks from the entire Pytorch Lightning Team for your interest !

Training from scratch
Some Flash tasks have been pretrained on large data sets.
To accelerate your training, calling the finetune() method using a pretrained backbone will fine-tune the backbone to generate a model customized to your data set and desired task.
From the Quick Start guide.
To train a task from scratch:
Load your data and organize it using a DataModule customized for the task (example:
ImageClassificationData).Choose and initialize your Task (setting
pretrained=False) which has state-of-the-art backbones built in (example:ImageClassifier).Init a
flash.core.trainer.Traineror apytorch_lightning.trainer.Trainer.Call
flash.core.trainer.Trainer.fit()with your data set.Save your trained model.
Here’s an example:
from pytorch_lightning import seed_everything
import flash
from flash.core.classification import LabelsOutput
from flash.core.data.utils import download_data
from flash.image import ImageClassificationData, ImageClassifier
# set the random seeds.
seed_everything(42)
# 1. Download and organize the data
download_data("https://pl-flash-data.s3.amazonaws.com/hymenoptera_data.zip", "data/")
datamodule = ImageClassificationData.from_folders(
train_folder="data/hymenoptera_data/train/",
val_folder="data/hymenoptera_data/val/",
test_folder="data/hymenoptera_data/test/",
batch_size=1,
)
# 2. Build the model using desired Task
model = ImageClassifier(backbone="resnet18", num_classes=datamodule.num_classes, pretrained=False)
# 3. Create the trainer (run one epoch for demo)
trainer = flash.Trainer(max_epochs=1, gpus=torch.cuda.device_count())
# 4. Train the model
trainer.fit(model, datamodule=datamodule)
# 5. Save the model!
trainer.save_checkpoint("image_classification_model.pt")
Training options
Flash tasks supports many advanced training functionalities out-of-the-box, such as:
limit number of epochs
# train for 10 epochs
flash.Trainer(max_epochs=10)
Training on GPUs
# train on 1 GPU
flash.Trainer(gpus=1)
Training on multiple GPUs
# train on multiple GPUs
flash.Trainer(gpus=4)
# train on gpu 1, 3, 5 (3 gpus total)
flash.Trainer(gpus=[1, 3, 5])
Using mixed precision training
# Multi GPU with mixed precision
flash.Trainer(gpus=2, precision=16)
Training on TPUs
# Train on TPUs
flash.Trainer(tpu_cores=8)
You can add to the flash Trainer any argument from the Lightning trainer! Learn more about the Lightning Trainer here.
Finetuning
Finetuning (or transfer-learning) is the process of tweaking a model trained on a large dataset, to your particular (likely much smaller) dataset.
Terminology
Here are common terms you need to be familiar with:
Term |
Definition |
|---|---|
Finetuning |
The process of tweaking a model trained on a large dataset, to your particular (likely much smaller) dataset |
Transfer learning |
The common name for finetuning |
Backbone |
The neural network that was pretrained on a different dataset |
Head |
Another neural network (usually smaller) that maps the backbone to your particular dataset |
Freeze |
Disabling gradient updates to a model (ie: not learning) |
Unfreeze |
Enabling gradient updates to a model |
Finetuning in Flash
From the Quick Start guide.
To use a Task for finetuning:
Load your data and organize it using a DataModule customized for the task (example:
ImageClassificationData).Choose and initialize your Task which has state-of-the-art backbones built in (example:
ImageClassifier).Init a
flash.core.trainer.Trainer.Choose a finetune strategy (example: “freeze”) and call
flash.core.trainer.Trainer.finetune()with your data.Save your finetuned model.
Here’s an example of finetuning.
from pytorch_lightning import seed_everything
import flash
from flash.core.classification import LabelsOutput
from flash.core.data.utils import download_data
from flash.image import ImageClassificationData, ImageClassifier
# set the random seeds.
seed_everything(42)
# 1. Download and organize the data
download_data("https://pl-flash-data.s3.amazonaws.com/hymenoptera_data.zip", "data/")
datamodule = ImageClassificationData.from_folders(
train_folder="data/hymenoptera_data/train/",
val_folder="data/hymenoptera_data/val/",
test_folder="data/hymenoptera_data/test/",
batch_size=1,
)
# 2. Build the model using desired Task
model = ImageClassifier(backbone="resnet18", labels=datamodule.labels)
# 3. Create the trainer (run one epoch for demo)
trainer = flash.Trainer(max_epochs=1, gpus=torch.cuda.device_count())
# 4. Finetune the model
trainer.finetune(model, datamodule=datamodule, strategy="freeze")
# 5. Save the model!
trainer.save_checkpoint("image_classification_model.pt")
Using a finetuned model
Once you’ve finetuned, use the model to predict:
predict_datamodule = ImageClassificationData.from_files(
predict_files=[
"data/hymenoptera_data/val/bees/65038344_52a45d090d.jpg",
"data/hymenoptera_data/val/ants/2255445811_dabcdf7258.jpg",
],
batch_size=1,
)
predictions = trainer.predict(model, datamodule=predict_datamodule, output="labels")
print(predictions)
We get the following output:
[['bees', 'ants']]
Or you can use the saved model for prediction anywhere you want!
from flash import Trainer
from flash.image import ImageClassifier, ImageClassificationData
# load finetuned checkpoint
model = ImageClassifier.load_from_checkpoint("image_classification_model.pt")
trainer = Trainer()
datamodule = ImageClassificationData.from_files(predict_files=["path/to/your/own/image.png"])
predictions = trainer.predict(model, datamodule=datamodule)
Finetune strategies
Finetuning is very task specific. Each task encodes the best finetuning practices for that task. However, Flash gives you a few default strategies for finetuning.
Finetuning operates on two things, the model backbone and the head. The backbone is the neural network that was pre-trained. The head is another neural network that bridges between the backbone and your particular dataset.
no_freeze
In this strategy, the backbone and the head are unfrozen from the beginning.
trainer.finetune(model, datamodule, strategy="no_freeze")
In pseudocode, this looks like:
backbone = Resnet50()
head = nn.Linear(...)
backbone.unfreeze()
head.unfreeze()
train(backbone, head)
freeze
The freeze strategy keeps the backbone frozen throughout.
trainer.finetune(model, datamodule, strategy="freeze")
The pseudocode looks like:
backbone = Resnet50()
head = nn.Linear(...)
# freeze backbone
backbone.freeze()
head.unfreeze()
train(backbone, head)
Advanced strategies
Every finetune strategy can also be customized.
freeze_unfreeze
The freeze_unfreeze strategy keeps the backbone frozen until a certain epoch (provided in a tuple to the strategy argument) after which the backbone will be unfrozen.
For example, to unfreeze after epoch 7:
trainer.finetune(model, datamodule, strategy=("freeze_unfreeze", 7))
Under the hood, the pseudocode looks like:
backbone = Resnet50()
head = nn.Linear(...)
# freeze backbone
backbone.freeze()
head.unfreeze()
train(backbone, head, epochs=10)
# unfreeze after 7 epochs
backbone.unfreeze()
train(backbone, head)
unfreeze_milestones
This strategy allows you to unfreeze part of the backbone at predetermined intervals.
Here’s an example where:
backbone starts frozen
at epoch 3 the last 2 layers unfreeze
at epoch 8 the full backbone unfreezes
trainer.finetune(model, datamodule, strategy=("unfreeze_milestones", ((3, 8), 2)))
Under the hood, the pseudocode looks like:
backbone = Resnet50()
head = nn.Linear(...)
# freeze backbone
backbone.freeze()
head.unfreeze()
train(backbone, head, epochs=3)
# unfreeze last 2 layers at epoch 3
backbone.unfreeze_last_layers(2)
train(backbone, head, epochs=8)
# unfreeze the full backbone
backbone.unfreeze()
Custom Strategy
For even more customization, create your own finetuning callback. Learn more about callbacks here.
from flash.core.finetuning import FlashBaseFinetuning
# Create a finetuning callback
class FeatureExtractorFreezeUnfreeze(FlashBaseFinetuning):
def __init__(self, unfreeze_epoch: int = 5, train_bn: bool = True):
# this will set self.attr_names as ["backbone"]
super().__init__("backbone", train_bn)
self._unfreeze_epoch = unfreeze_epoch
def finetune_function(self, pl_module, current_epoch, optimizer, opt_idx):
# unfreeze any module you want by overriding this function
# When ``current_epoch`` is 5, backbone will start to be trained.
if current_epoch == self._unfreeze_epoch:
self.unfreeze_and_add_param_group(
pl_module.backbone,
optimizer,
)
# Pass the callback to trainer.finetune
trainer.finetune(model, datamodule, strategy=FeatureExtractorFreezeUnfreeze(unfreeze_epoch=5))
Predictions (inference)
You can use Flash to get predictions on pretrained or finetuned models.
First create a DataModule with some predict data, then pass it to the Trainer.predict method.
from flash import Trainer
from flash.core.data.utils import download_data
from flash.image import ImageClassifier, ImageClassificationData
# 1. Download the data set
download_data("https://pl-flash-data.s3.amazonaws.com/hymenoptera_data.zip", "data/")
# 2. Load the model from a checkpoint
model = ImageClassifier.load_from_checkpoint(
"https://flash-weights.s3.amazonaws.com/0.7.0/image_classification_model.pt"
)
# 3. Predict whether the image contains an ant or a bee
trainer = Trainer()
datamodule = ImageClassificationData.from_files(
predict_files=["data/hymenoptera_data/val/bees/65038344_52a45d090d.jpg"]
)
predictions = trainer.predict(model, datamodule=datamodule)
print(predictions)
# out: [["bees"]]
Serializing predictions
To change the output format of predictions you can attach an Output to your
Task. For example, you can choose to output probabilities (for more options see the API
reference below).
from flash.core.classification import ProbabilitiesOutput
from flash.core.data.utils import download_data
from flash.image import ImageClassifier
# 1. Download the data set
download_data("https://pl-flash-data.s3.amazonaws.com/hymenoptera_data.zip", "data/")
# 2. Load the model from a checkpoint
model = ImageClassifier.load_from_checkpoint(
"https://flash-weights.s3.amazonaws.com/0.7.0/image_classification_model.pt"
)
# 3. Attach the Output
model.output = ProbabilitiesOutput()
# 4. Predict whether the image contains an ant or a bee
trainer = Trainer()
datamodule = ImageClassificationData.from_files(
predict_files=["data/hymenoptera_data/val/bees/65038344_52a45d090d.jpg"]
)
predictions = trainer.predict(model, datamodule=datamodule)
print(predictions)
# out: [[[0.5926494598388672, 0.40735048055648804]]]
Note
PyTorch Lightning does not return predictions directly from predict when using a multi-GPU configuration (DDP). Instead you should use a pytorch_lightning.callbacks.BasePredictionWriter.
TorchScript JIT Support
We test all of our tasks for compatibility with torch.jit.
This table gives a breakdown of the supported features.
Task |
|||
|---|---|---|---|
Yes |
Yes |
Yes |
|
Yes |
No |
Yes |
|
Yes |
Yes |
Yes |
|
No |
Yes |
Yes |
|
No |
Yes |
Yes |
|
No |
Yes |
No |
|
No |
Yes * |
Yes |
|
No |
Yes |
Yes |
|
No |
Yes |
Yes |
|
No |
Yes |
Yes |
* with strict=False
Data
Note
The contents of this page are currently being updated. Stay tuned!
Registry
Available Registries
Registries are Flash internal key-value database to store a mapping between a name and a function.
In simple words, they are just advanced dictionary storing a function from a key string.
Registries help organize code and make the functions accessible all across the Flash codebase.
Each Flash Task can have several registries as static attributes.
Currently, Flash uses internally registries only for backbones, but more components will be added.
1. Imports
from functools import partial
from flash import Task
from flash.core.registry import FlashRegistry
2. Init a Registry
It is good practice to associate one or multiple registry to a Task as follow:
# creating a custom `Task` with its own registry
class MyImageClassifier(Task):
backbones = FlashRegistry("backbones")
def __init__(
self,
backbone: str = "resnet18",
pretrained: bool = True,
):
...
self.backbone, self.num_features = self.backbones.get(backbone)(pretrained=pretrained)
3. Adding new functions
Your custom functions can be registered within a FlashRegistry as a decorator or directly.
# Option 1: Used with partial.
def fn(backbone: str, pretrained: bool = True):
# Create backbone and backbone output dimension (`num_features`)
backbone, num_features = None, None
return backbone, num_features
# HINT 1: Use `from functools import partial` if you want to store some arguments.
MyImageClassifier.backbones(fn=partial(fn, backbone="my_backbone"), name="username/partial_backbone")
# Option 2: Using decorator.
@MyImageClassifier.backbones(name="username/decorated_backbone")
def fn(pretrained: bool = True):
# Create backbone and backbone output dimension (`num_features`)
backbone, num_features = None, None
return backbone, num_features
4. Accessing registered functions
You can now access your function from your task!
# 3.b Optional: List available backbones
print(MyImageClassifier.available_backbones())
# 4. Build the model
model = MyImageClassifier(backbone="username/decorated_backbone")
Here’s the output:
['username/decorated_backbone', 'username/partial_backbone']
5. Pre-registered backbones
Flash provides populated registries containing lots of available backbones.
Example:
from flash.image.backbones import OBJ_DETECTION_BACKBONES
from flash.image.classification.backbones import IMAGE_CLASSIFIER_BACKBONES
print(IMAGE_CLASSIFIER_BACKBONES.available_keys())
""" out:
['adv_inception_v3', 'cspdarknet53', 'cspdarknet53_iabn', 430+.., 'xception71']
"""
Flash Serve
Flash Serve is a library to easily serve models in production.
Terminology
Here are common terms you need to be familiar with:
Term |
Definition |
|---|---|
de-serialization |
Transform data encoded as text into tensors |
inference function |
A function taking the decoded tensors and forward them through the model to produce predictions. |
serialization |
Transform the predictions tensors back to a text encoding. |
|
The |
|
The |
|
The |
The |
Example
In this tutorial, we will serve a Resnet18 from the PyTorchVision library in 3 steps.
The entire tutorial can be found under flash_examples/serve/generic.
Introduction
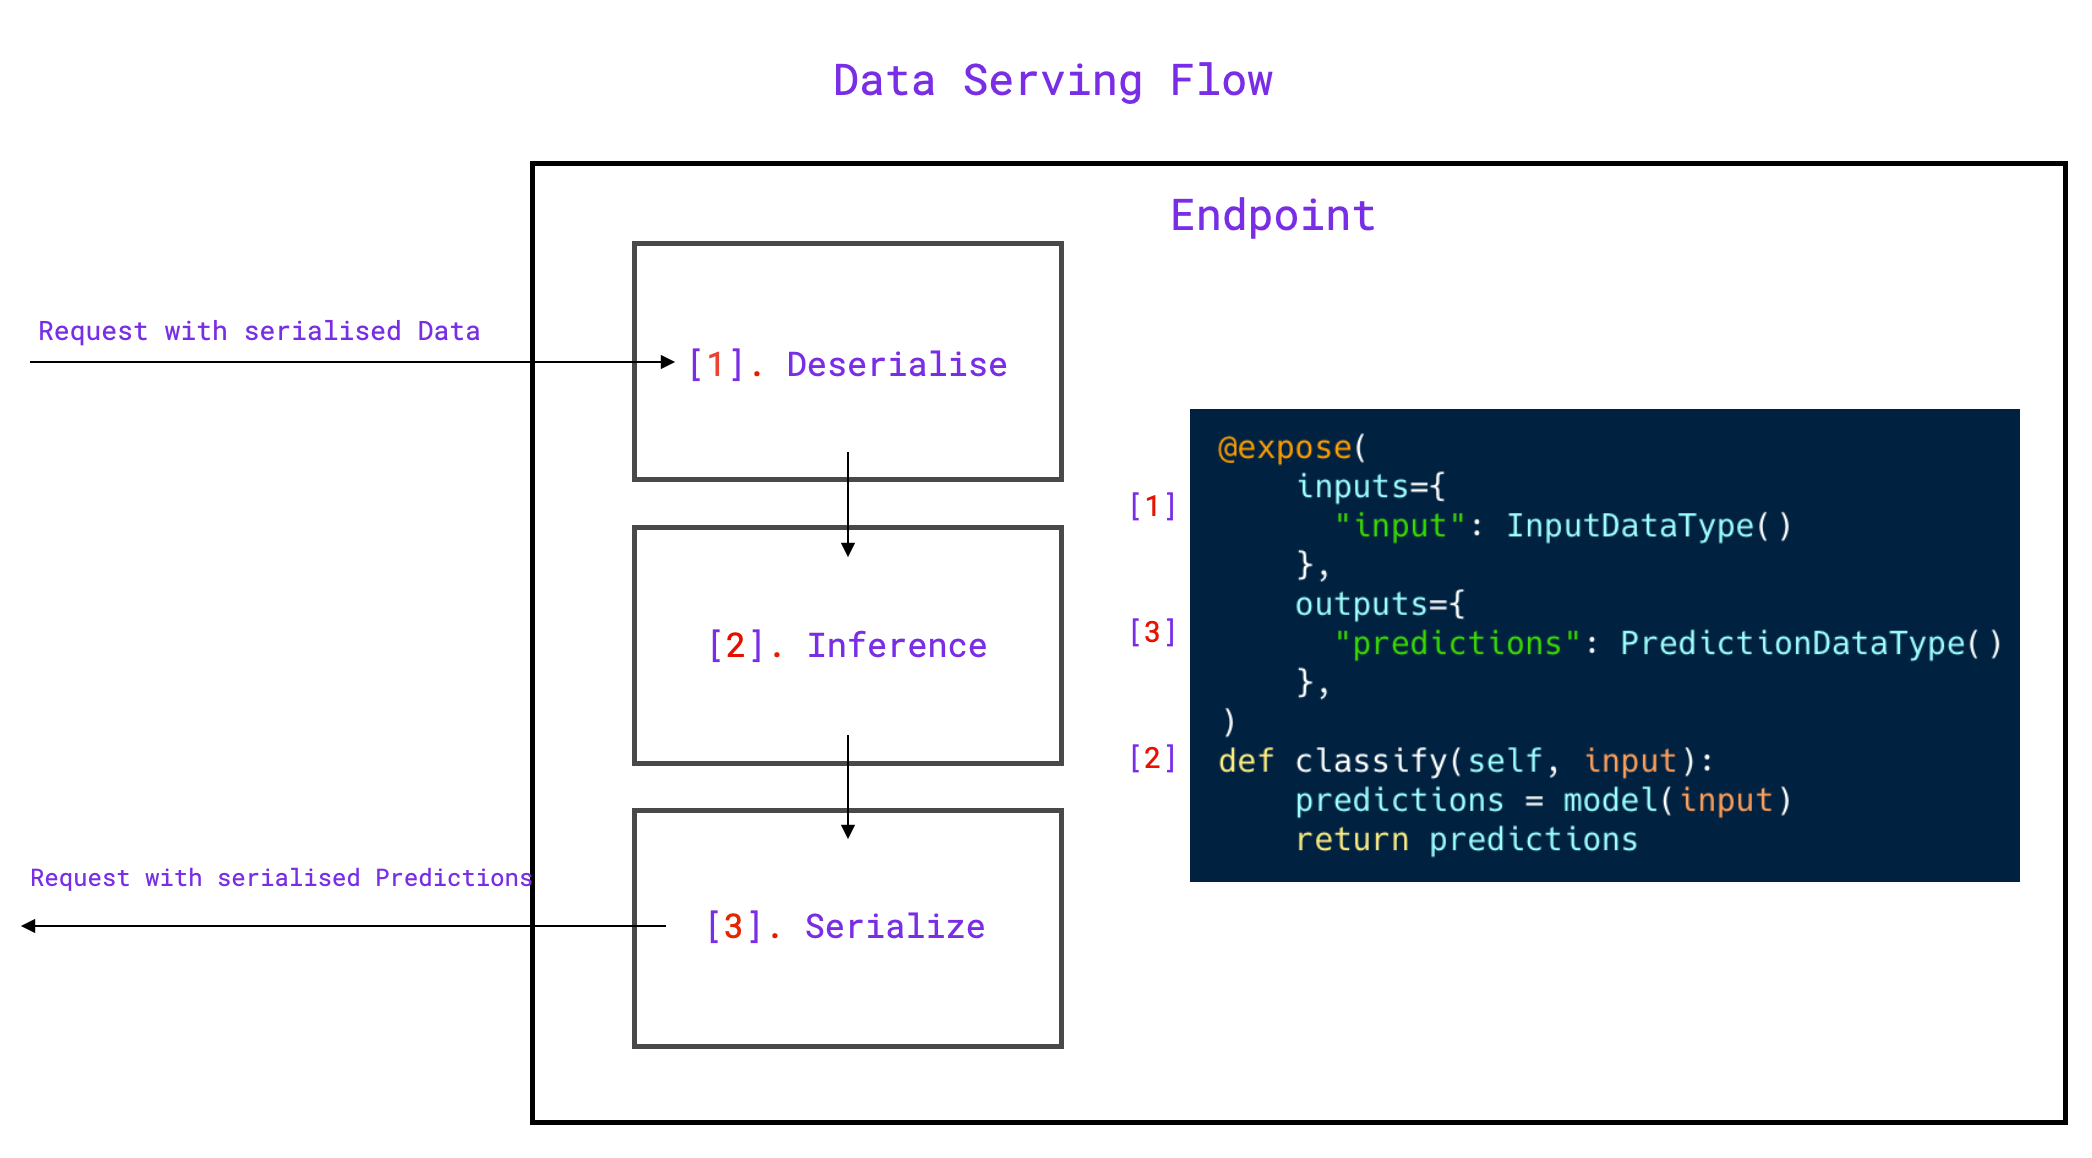
Traditionally, an inference pipeline is made out of 3 steps:
de-serialization: Transform data encoded as text into tensors.inference function: A function taking the decoded tensors and forward them through the model to produce predictions.serialization: Transform the predictions tensors back as text.
In this example, we will implement only the inference function as Flash Serve already provides some built-in de-serialization and serialization functions with Image
Step 1 - Create a ModelComponent
Inside inference_serve.py,
we will implement a ClassificationInference class, which overrides ModelComponent.
First, we need make the following imports:
import torch
import torchvision
from flash.core.serve import Composition, Servable, ModelComponent, expose
from flash.core.serve.types import Image, Label
To implement ClassificationInference, we need to implement a method responsible for inference function and decorated with the expose() function.
The name of the inference method isn’t constrained, but we will use classify as appropriate in this example.
Our classify function will take a tensor image, apply some normalization on it, and forward it through the model.
def classify(img):
img = img.float() / 255
mean = torch.tensor([[[0.485, 0.456, 0.406]]]).float()
std = torch.tensor([[[0.229, 0.224, 0.225]]]).float()
img = (img - mean) / std
img = img.permute(0, 3, 2, 1)
out = self.model(img)
return out.argmax()
The expose() is a python decorator extending the decorated function with the de-serialization, serialization steps.
Note
Flash Serve was designed this way to enable several models to be chained together by removing the decorator.
The expose() function takes 2 arguments:
inputs: Dictionary mapping the decorated function inputs toBaseTypeobjects.outputs: Dictionary mapping the decorated function outputs toBaseTypeobjects.
A BaseType is a python dataclass
which implements a serialize and deserialize function.
Note
Flash Serve has already several BaseType built-in such as Image or Text.
class ClassificationInference(ModelComponent):
def __init__(self, model: Servable):
self.model = model
@expose(
inputs={"img": Image()},
outputs={"prediction": Label(path="imagenet_labels.txt")},
)
def classify(self, img):
img = img.float() / 255
mean = torch.tensor([[[0.485, 0.456, 0.406]]]).float()
std = torch.tensor([[[0.229, 0.224, 0.225]]]).float()
img = (img - mean) / std
img = img.permute(0, 3, 2, 1)
out = self.model(img)
return out.argmax()
Step 2 - Create a scripted Model
Using the PyTorchVision library, we create a resnet18 and use torch.jit.script to script the model.
Note
TorchScript is a way to create serializable and optimizable models from PyTorch code. Any TorchScript program can be saved from a Python process and loaded in a process where there is no Python dependency.
model = torchvision.models.resnet18(pretrained=True).eval()
torch.jit.script(model).save("resnet.pt")
Step 3 - Serve the model
The Servable takes as argument the path to the TorchScripted model and then will be passed to our ClassificationInference class.
The ClassificationInference instance will be passed as argument to a Composition class.
Once the Composition class is instantiated, just call its serve() method.
resnet = Servable("resnet.pt")
comp = ClassificationInference(resnet)
composition = Composition(classification=comp)
composition.serve()
Launching the server.
In Terminal 1
Just run:
python inference_server.py
And you should see this in your terminal

You should also see an Swagger UI already built for you at http://127.0.0.1:8000/docs

In Terminal 2
Run this script from another terminal:
import base64
from pathlib import Path
import requests
with Path("fish.jpg").open("rb") as f:
imgstr = base64.b64encode(f.read()).decode("UTF-8")
body = {"session": "UUID", "payload": {"img": {"data": imgstr}}}
resp = requests.post("http://127.0.0.1:8000/predict", json=body)
print(resp.json())
# {'session': 'UUID', 'result': {'prediction': 'goldfish, Carassius auratus'}}
Credits to @rlizzo, @hhsecond, @lantiga, @luiscape for building Flash Serve Engine.
Backbones and Heads
Backbones are the pre trained models that can be used with a task.
The backbones or heads that are available can be found by using the available_backbones and available_heads methods.
To get the available backbones for a task like ImageClassifier, run:
from flash.image import ImageClassifier
# get the backbones available for ImageClassifier
backbones = ImageClassifier.available_backbones()
# print the backbones
print(backbones)
To get the available heads for a task like SemanticSegmentation, run:
from flash.image import SemanticSegmentation
# get the heads available for SemanticSegmentation
heads = SemanticSegmentation.available_heads()
# print the heads
print(heads)
Optimization (Optimizers and Schedulers)
Using optimizers and learning rate schedulers with Flash has become easier and cleaner than ever.
With the use of Registry, instantiation of an optimzer or a learning rate scheduler can done with just a string.
Setting an optimizer to a task
Each task has a built-in method available_optimizers() which will list all the optimizers
registered with Flash.
>>> from flash.core.classification import ClassificationTask
>>> ClassificationTask.available_optimizers()
[...'adadelta', ..., 'sgd'...]
To train / finetune a Task of your choice, just pass on a string.
>>> from flash.image import ImageClassifier
>>> model = ImageClassifier(num_classes=10, backbone="resnet18", optimizer="Adam", learning_rate=1e-4)
>>> model.configure_optimizers()
Adam ...
In order to customize specific parameters of the Optimizer, pass along a dictionary of kwargs with the string as a tuple.
>>> from flash.image import ImageClassifier
>>> model = ImageClassifier(num_classes=10, backbone="resnet18", optimizer=("Adam", {"amsgrad": True}), learning_rate=1e-4)
>>> model.configure_optimizers()
Adam ( ... amsgrad: True ...)
An alternative to customizing an optimizer using a tuple is to pass it as a callable.
>>> from functools import partial
>>> from torch.optim import Adam
>>> from flash.image import ImageClassifier
>>> model = ImageClassifier(num_classes=10, backbone="resnet18", optimizer=partial(Adam, amsgrad=True), learning_rate=1e-4)
>>> model.configure_optimizers()
Adam ( ... amsgrad: True ...)
Setting a Learning Rate Scheduler
Each task has a built-in method available_lr_schedulers() which will list all the learning
rate schedulers registered with Flash.
>>> from flash.core.classification import ClassificationTask
>>> ClassificationTask.available_lr_schedulers()
[...'cosineannealingwarmrestarts', ..., 'lambdalr'...]
To train / finetune a Task with a scheduler of your choice, just pass in the name:
>>> from flash.image import ImageClassifier
>>> model = ImageClassifier(
... num_classes=10, backbone="resnet18", optimizer="Adam", learning_rate=1e-4, lr_scheduler="constant_schedule"
... )
>>> model.configure_optimizers()
([Adam ...], [{'scheduler': ...}])
Note
"constant_schedule" and a few other lr schedulers will be available only if you have installed the transformers library from Hugging Face.
In order to customize specific parameters of the LR Scheduler, pass along a dictionary of kwargs with the string as a tuple.
>>> from flash.image import ImageClassifier
>>> model = ImageClassifier(
... num_classes=10,
... backbone="resnet18",
... optimizer="Adam",
... learning_rate=1e-4,
... lr_scheduler=("StepLR", {"step_size": 10}),
... )
>>> scheduler = model.configure_optimizers()[1][0]["scheduler"]
>>> scheduler.step_size
10
An alternative to customizing the LR Scheduler using a tuple is to pass it as a callable.
>>> from functools import partial
>>> from torch.optim.lr_scheduler import CyclicLR
>>> from flash.image import ImageClassifier
>>> model = ImageClassifier(
... num_classes=10,
... backbone="resnet18",
... optimizer="SGD",
... learning_rate=1e-4,
... lr_scheduler=partial(CyclicLR, base_lr=0.001, max_lr=0.1, mode="exp_range", gamma=0.5),
... )
>>> scheduler = model.configure_optimizers()[1][0]["scheduler"]
>>> (scheduler.mode, scheduler.gamma)
('exp_range', 0.5)
Additionally, the lr_scheduler parameter also accepts the Lightning Scheduler configuration which can be passed on using a tuple.
The Lightning Scheduler configuration is a dictionary which contains the scheduler and its associated configuration. The default configuration is shown below.
lr_scheduler_config = {
# REQUIRED: The scheduler instance
"scheduler": lr_scheduler,
# The unit of the scheduler's step size, could also be 'step'.
# 'epoch' updates the scheduler on epoch end whereas 'step'
# updates it after a optimizer update.
"interval": "epoch",
# How many epochs/steps should pass between calls to
# `scheduler.step()`. 1 corresponds to updating the learning
# rate after every epoch/step.
"frequency": 1,
# Metric to to monitor for schedulers like `ReduceLROnPlateau`
"monitor": "val_loss",
# If set to `True`, will enforce that the value specified 'monitor'
# is available when the scheduler is updated, thus stopping
# training if not found. If set to `False`, it will only produce a warning
"strict": True,
# If using the `LearningRateMonitor` callback to monitor the
# learning rate progress, this keyword can be used to specify
# a custom logged name
"name": None,
}
When there are schedulers in which the .step() method is conditioned on a value, such as the torch.optim.lr_scheduler.ReduceLROnPlateau scheduler,
Flash requires that the Lightning Scheduler configuration contains the keyword "monitor" set to the metric name that the scheduler should be conditioned on.
Below is an example for this:
>>> from flash.image import ImageClassifier
>>> model = ImageClassifier(
... num_classes=10,
... backbone="resnet18",
... optimizer="Adam",
... learning_rate=1e-4,
... lr_scheduler=("reducelronplateau", {"mode": "max"}, {"monitor": "val_accuracy"}),
... )
>>> model.configure_optimizers()
([Adam ...], [{'scheduler': ..., 'monitor': 'val_accuracy', ...}])
Note
Do not set the "scheduler" key in the Lightning Scheduler configuration, it will overridden with an instance of the provided scheduler key.
Pre-Registering optimizers and scheduler recipes
Flash registry also provides the flexiblty of registering functions. This feature is also provided in the Optimizer and Scheduler registry.
Using the optimizers and lr_schedulers decorator pertaining to each Task, custom optimizer and LR scheduler recipes can be pre-registered.
>>> import torch
>>> from flash.image import ImageClassifier
>>> @ImageClassifier.lr_schedulers
... def my_flash_steplr_recipe(optimizer):
... return torch.optim.lr_scheduler.StepLR(optimizer, step_size=10)
...
>>> model = ImageClassifier(backbone="resnet18", num_classes=2, optimizer="Adam", lr_scheduler="my_flash_steplr_recipe")
>>> scheduler = model.configure_optimizers()[1][0]["scheduler"]
>>> scheduler.step_size
10
Provider specific requirements
Schedulers
Certain LR Schedulers provided by Hugging Face require both num_training_steps and num_warmup_steps.
In order to use them in Flash, just provide num_warmup_steps as float between 0 and 1 which indicates the fraction of the training steps
that will be used as warmup steps. Flash’s Trainer will take care of computing the number of training steps and
number of warmup steps based on the flags that are set in the Trainer.
>>> from flash import Trainer
>>> from flash.image import ImageClassifier, ImageClassificationData
>>> datamodule = ImageClassificationData.from_files(
... train_files=["image_1.png", "image_2.png", "image_3.png"],
... train_targets=["cat", "dog", "cat"],
... predict_files=["predict_image_1.png", "predict_image_2.png", "predict_image_3.png"],
... transform_kwargs=dict(image_size=(128, 128)),
... batch_size=2,
... )
>>> model = ImageClassifier(
... backbone="resnet18",
... num_classes=datamodule.num_classes,
... optimizer="Adam",
... lr_scheduler=("cosine_schedule_with_warmup", {"num_warmup_steps": 0.1}),
... )
>>> trainer = Trainer(fast_dev_run=True)
>>> trainer.fit(model, datamodule=datamodule)
Training...
>>> trainer.predict(model, datamodule=datamodule)
Predicting...
Formatting Classification Targets
This guide details the different target formats supported by classification tasks in Flash.
By default, the target format and any additional metadata (labels, num_classes, multi_label) will be inferred from your training data.
You can override this behaviour by passing your own TargetFormatter using the target_formatter argument.
Single Label
Classification targets are described as single label (DataModule.multi_label = False) if each data sample corresponds to a single class.
Class Indexes
Targets formatted as class indexes are represented by a single number, e.g. train_targets = [0, 1, 0].
No labels will be inferred.
The inferred num_classes is the maximum index plus one (we assume that class indexes are zero-based).
Here’s an example:
>>> from flash import Trainer
>>> from flash.image import ImageClassifier, ImageClassificationData
>>> datamodule = ImageClassificationData.from_files(
... train_files=["image_1.png", "image_2.png", "image_3.png"],
... train_targets=[0, 1, 0],
... transform_kwargs=dict(image_size=(128, 128)),
... batch_size=2,
... )
>>> datamodule.num_classes
2
>>> datamodule.labels is None
True
>>> datamodule.multi_label
False
Alternatively, you can provide a SingleNumericTargetFormatter to override the behaviour.
Here’s an example:
>>> from flash import Trainer
>>> from flash.image import ImageClassifier, ImageClassificationData
>>> from flash.core.data.utilities.classification import SingleNumericTargetFormatter
>>> datamodule = ImageClassificationData.from_files(
... train_files=["image_1.png", "image_2.png", "image_3.png"],
... train_targets=[0, 1, 0],
... target_formatter=SingleNumericTargetFormatter(labels=["dog", "cat", "rabbit"]),
... transform_kwargs=dict(image_size=(128, 128)),
... batch_size=2,
... )
>>> datamodule.num_classes
3
>>> datamodule.labels
['dog', 'cat', 'rabbit']
>>> datamodule.multi_label
False
Labels
Targets formatted as labels are represented by a single string, e.g. train_targets = ["cat", "dog", "cat"].
The inferred labels will be the unique labels in the train targets sorted alphanumerically.
The inferred num_classes is the number of labels.
Here’s an example:
>>> from flash import Trainer
>>> from flash.image import ImageClassifier, ImageClassificationData
>>> datamodule = ImageClassificationData.from_files(
... train_files=["image_1.png", "image_2.png", "image_3.png"],
... train_targets=["cat", "dog", "cat"],
... transform_kwargs=dict(image_size=(128, 128)),
... batch_size=2,
... )
>>> datamodule.num_classes
2
>>> datamodule.labels
['cat', 'dog']
>>> datamodule.multi_label
False
Alternatively, you can provide a SingleLabelTargetFormatter to override the behaviour.
Here’s an example:
>>> from flash import Trainer
>>> from flash.image import ImageClassifier, ImageClassificationData
>>> from flash.core.data.utilities.classification import SingleLabelTargetFormatter
>>> datamodule = ImageClassificationData.from_files(
... train_files=["image_1.png", "image_2.png", "image_3.png"],
... train_targets=["cat", "dog", "cat"],
... target_formatter=SingleLabelTargetFormatter(labels=["dog", "cat", "rabbit"]),
... transform_kwargs=dict(image_size=(128, 128)),
... batch_size=2,
... )
>>> datamodule.num_classes
3
>>> datamodule.labels
['dog', 'cat', 'rabbit']
>>> datamodule.multi_label
False
One-hot Binaries
Targets formatted as one-hot binaries are represented by a binary list with a single index (the target class index) set to 1, e.g. train_targets = [[1, 0], [0, 1], [1, 0]].
No labels will be inferred.
The inferred num_classes is the length of the binary list.
Here’s an example:
>>> from flash import Trainer
>>> from flash.image import ImageClassifier, ImageClassificationData
>>> datamodule = ImageClassificationData.from_files(
... train_files=["image_1.png", "image_2.png", "image_3.png"],
... train_targets=[[1, 0], [0, 1], [1, 0]],
... transform_kwargs=dict(image_size=(128, 128)),
... batch_size=2,
... )
>>> datamodule.num_classes
2
>>> datamodule.labels is None
True
>>> datamodule.multi_label
False
Alternatively, you can provide a SingleBinaryTargetFormatter to override the behaviour.
Here’s an example:
>>> from flash import Trainer
>>> from flash.image import ImageClassifier, ImageClassificationData
>>> from flash.core.data.utilities.classification import SingleBinaryTargetFormatter
>>> datamodule = ImageClassificationData.from_files(
... train_files=["image_1.png", "image_2.png", "image_3.png"],
... train_targets=[[1, 0], [0, 1], [1, 0]],
... target_formatter=SingleLabelTargetFormatter(labels=["dog", "cat"]),
... transform_kwargs=dict(image_size=(128, 128)),
... batch_size=2,
... )
>>> datamodule.num_classes
2
>>> datamodule.labels
['dog', 'cat']
>>> datamodule.multi_label
False
Multi Label
Classification targets are described as multi label (DataModule.multi_label = True) if each data sample corresponds to zero or more (and perhaps many) classes.
Class Indexes
Targets formatted as multi label class indexes are represented by a list of class indexes, e.g. train_targets = [[0], [0, 1], [1, 2]].
No labels will be inferred.
The inferred num_classes is the maximum target value plus one (we assume that targets are zero-based).
Here’s an example:
>>> from flash import Trainer
>>> from flash.image import ImageClassifier, ImageClassificationData
>>> datamodule = ImageClassificationData.from_files(
... train_files=["image_1.png", "image_2.png", "image_3.png"],
... train_targets=[[0], [0, 1], [1, 2]],
... transform_kwargs=dict(image_size=(128, 128)),
... batch_size=2,
... )
>>> datamodule.num_classes
3
>>> datamodule.labels is None
True
>>> datamodule.multi_label
True
Alternatively, you can provide a MultiNumericTargetFormatter to override the behaviour.
Here’s an example:
>>> from flash import Trainer
>>> from flash.image import ImageClassifier, ImageClassificationData
>>> from flash.core.data.utilities.classification import MultiNumericTargetFormatter
>>> datamodule = ImageClassificationData.from_files(
... train_files=["image_1.png", "image_2.png", "image_3.png"],
... train_targets=[[0], [0, 1], [1, 2]],
... target_formatter=MultiNumericTargetFormatter(labels=["dog", "cat", "rabbit"]),
... transform_kwargs=dict(image_size=(128, 128)),
... batch_size=2,
... )
>>> datamodule.num_classes
3
>>> datamodule.labels
['dog', 'cat', 'rabbit']
>>> datamodule.multi_label
True
Labels
Targets formatted as multi label are represented by a list of strings, e.g. train_targets = [["cat"], ["cat", "dog"], ["dog", "rabbit"]].
The inferred labels will be the unique labels in the train targets sorted alphanumerically.
The inferred num_classes is the number of labels.
Here’s an example:
>>> from flash import Trainer
>>> from flash.image import ImageClassifier, ImageClassificationData
>>> datamodule = ImageClassificationData.from_files(
... train_files=["image_1.png", "image_2.png", "image_3.png"],
... train_targets=[["cat"], ["cat", "dog"], ["dog", "rabbit"]],
... transform_kwargs=dict(image_size=(128, 128)),
... batch_size=2,
... )
>>> datamodule.num_classes
3
>>> datamodule.labels
['cat', 'dog', 'rabbit']
>>> datamodule.multi_label
True
Alternatively, you can provide a MultiLabelTargetFormatter to override the behaviour.
Here’s an example:
>>> from flash import Trainer
>>> from flash.image import ImageClassifier, ImageClassificationData
>>> from flash.core.data.utilities.classification import MultiLabelTargetFormatter
>>> datamodule = ImageClassificationData.from_files(
... train_files=["image_1.png", "image_2.png", "image_3.png"],
... train_targets=[["cat"], ["cat", "dog"], ["dog", "rabbit"]],
... target_formatter=MultiLabelTargetFormatter(labels=["dog", "cat", "rabbit"]),
... transform_kwargs=dict(image_size=(128, 128)),
... batch_size=2,
... )
>>> datamodule.num_classes
3
>>> datamodule.labels
['dog', 'cat', 'rabbit']
>>> datamodule.multi_label
True
Comma Delimited
Targets formatted as comma delimited mutli label are given as comma delimited strings, e.g. train_targets = ["cat", "cat,dog", "dog,rabbit"].
The inferred labels will be the unique labels in the train targets sorted alphanumerically.
The inferred num_classes is the number of labels.
Here’s an example:
>>> from flash import Trainer
>>> from flash.image import ImageClassifier, ImageClassificationData
>>> datamodule = ImageClassificationData.from_files(
... train_files=["image_1.png", "image_2.png", "image_3.png"],
... train_targets=["cat", "cat,dog", "dog,rabbit"],
... transform_kwargs=dict(image_size=(128, 128)),
... batch_size=2,
... )
>>> datamodule.num_classes
3
>>> datamodule.labels
['cat', 'dog', 'rabbit']
>>> datamodule.multi_label
True
Alternatively, you can provide a CommaDelimitedMultiLabelTargetFormatter to override the behaviour.
Here’s an example:
>>> from flash import Trainer
>>> from flash.image import ImageClassifier, ImageClassificationData
>>> from flash.core.data.utilities.classification import CommaDelimitedMultiLabelTargetFormatter
>>> datamodule = ImageClassificationData.from_files(
... train_files=["image_1.png", "image_2.png", "image_3.png"],
... train_targets=["cat", "cat,dog", "dog,rabbit"],
... target_formatter=CommaDelimitedMultiLabelTargetFormatter(labels=["dog", "cat", "rabbit"]),
... transform_kwargs=dict(image_size=(128, 128)),
... batch_size=2,
... )
>>> datamodule.num_classes
3
>>> datamodule.labels
['dog', 'cat', 'rabbit']
>>> datamodule.multi_label
True
Space Delimited
Targets formatted as space delimited mutli label are given as space delimited strings, e.g. train_targets = ["cat", "cat dog", "dog rabbit"].
The inferred labels will be the unique labels in the train targets sorted alphanumerically.
The inferred num_classes is the number of labels.
Here’s an example:
>>> from flash import Trainer
>>> from flash.image import ImageClassifier, ImageClassificationData
>>> datamodule = ImageClassificationData.from_files(
... train_files=["image_1.png", "image_2.png", "image_3.png"],
... train_targets=["cat", "cat dog", "dog rabbit"],
... transform_kwargs=dict(image_size=(128, 128)),
... batch_size=2,
... )
>>> datamodule.num_classes
3
>>> datamodule.labels
['cat', 'dog', 'rabbit']
>>> datamodule.multi_label
True
Alternatively, you can provide a SpaceDelimitedTargetFormatter to override the behaviour.
Here’s an example:
>>> from flash import Trainer
>>> from flash.image import ImageClassifier, ImageClassificationData
>>> from flash.core.data.utilities.classification import SpaceDelimitedTargetFormatter
>>> datamodule = ImageClassificationData.from_files(
... train_files=["image_1.png", "image_2.png", "image_3.png"],
... train_targets=["cat", "cat dog", "dog rabbit"],
... target_formatter=SpaceDelimitedTargetFormatter(labels=["dog", "cat", "rabbit"]),
... transform_kwargs=dict(image_size=(128, 128)),
... batch_size=2,
... )
>>> datamodule.num_classes
3
>>> datamodule.labels
['dog', 'cat', 'rabbit']
>>> datamodule.multi_label
True
Multi-hot Binaries
Targets formatted as one-hot binaries are represented by a binary list with a zero or more indices (the target class indices) set to 1, e.g. train_targets = [[1, 0, 0], [1, 1, 0], [0, 1, 1]].
No labels will be inferred.
The inferred num_classes is the length of the binary list.
Here’s an example:
>>> from flash import Trainer
>>> from flash.image import ImageClassifier, ImageClassificationData
>>> datamodule = ImageClassificationData.from_files(
... train_files=["image_1.png", "image_2.png", "image_3.png"],
... train_targets=[[1, 0, 0], [1, 1, 0], [0, 1, 1]],
... transform_kwargs=dict(image_size=(128, 128)),
... batch_size=2,
... )
>>> datamodule.num_classes
3
>>> datamodule.labels is None
True
>>> datamodule.multi_label
True
Alternatively, you can provide a MultiBinaryTargetFormatter to override the behaviour.
Here’s an example:
>>> from flash import Trainer
>>> from flash.image import ImageClassifier, ImageClassificationData
>>> from flash.core.data.utilities.classification import MultiBinaryTargetFormatter
>>> datamodule = ImageClassificationData.from_files(
... train_files=["image_1.png", "image_2.png", "image_3.png"],
... train_targets=[[1, 0, 0], [1, 1, 0], [0, 1, 1]],
... target_formatter=MultiBinaryTargetFormatter(labels=["dog", "cat", "rabbit"]),
... transform_kwargs=dict(image_size=(128, 128)),
... batch_size=2,
... )
>>> datamodule.num_classes
3
>>> datamodule.labels
['dog', 'cat', 'rabbit']
>>> datamodule.multi_label
True
Customizing Transforms
Note
The contents of this page are currently being updated. Stay tuned!
Image Classification
The Task
The task of identifying what is in an image is called image classification. Typically, Image Classification is used to identify images containing a single object. The task predicts which ‘class’ the image most likely belongs to with a degree of certainty. A class is a label that describes what is in an image, such as ‘car’, ‘house’, ‘cat’ etc.
Example
Let’s look at the task of predicting whether images contain Ants or Bees using the hymenoptera dataset.
The dataset contains train and validation folders, and then each folder contains a bees folder, with pictures of bees, and an ants folder with images of, you guessed it, ants.
hymenoptera_data
├── train
│ ├── ants
│ │ ├── 0013035.jpg
│ │ ├── 1030023514_aad5c608f9.jpg
│ │ ...
│ └── bees
│ ├── 1092977343_cb42b38d62.jpg
│ ├── 1093831624_fb5fbe2308.jpg
│ ...
└── val
├── ants
│ ├── 10308379_1b6c72e180.jpg
│ ├── 1053149811_f62a3410d3.jpg
│ ...
└── bees
├── 1032546534_06907fe3b3.jpg
├── 10870992_eebeeb3a12.jpg
...
Once we’ve downloaded the data using download_data(), we create the ImageClassificationData.
We select a pre-trained backbone to use for our ImageClassifier and fine-tune on the hymenoptera data.
We then use the trained ImageClassifier for inference.
Finally, we save the model.
Here’s the full example:
import torch
import flash
from flash.core.data.utils import download_data
from flash.image import ImageClassificationData, ImageClassifier
# 1. Create the DataModule
download_data("https://pl-flash-data.s3.amazonaws.com/hymenoptera_data.zip", "./data")
datamodule = ImageClassificationData.from_folders(
train_folder="data/hymenoptera_data/train/",
val_folder="data/hymenoptera_data/val/",
batch_size=4,
transform_kwargs={"image_size": (196, 196), "mean": (0.485, 0.456, 0.406), "std": (0.229, 0.224, 0.225)},
)
# 2. Build the task
model = ImageClassifier(backbone="resnet18", labels=datamodule.labels)
# 3. Create the trainer and finetune the model
trainer = flash.Trainer(max_epochs=3, gpus=torch.cuda.device_count())
trainer.finetune(model, datamodule=datamodule, strategy="freeze")
# 4. Predict what's on a few images! ants or bees?
datamodule = ImageClassificationData.from_files(
predict_files=[
"data/hymenoptera_data/val/bees/65038344_52a45d090d.jpg",
"data/hymenoptera_data/val/bees/590318879_68cf112861.jpg",
"data/hymenoptera_data/val/ants/540543309_ddbb193ee5.jpg",
],
batch_size=3,
)
predictions = trainer.predict(model, datamodule=datamodule, output="labels")
print(predictions)
# 5. Save the model!
trainer.save_checkpoint("image_classification_model.pt")
To learn how to view the available backbones / heads for this task, see Backbones and Heads. Benchmarks for backbones provided by PyTorch Image Models (TIMM) can be found here: https://github.com/rwightman/pytorch-image-models/blob/master/results/results-imagenet-real.csv
Flash Zero
The image classifier can be used directly from the command line with zero code using Flash Zero. You can run the hymenoptera example with:
flash image_classification
To view configuration options and options for running the image classifier with your own data, use:
flash image_classification --help
Custom Transformations
Flash automatically applies some default image transformations and augmentations, but you may wish to customize these for your own use case.
The base InputTransform defines 7 hooks for different stages in the data loading pipeline.
To apply custom image augmentations you can create your own InputTransform.
Here’s an example:
from torchvision import transforms as T
from typing import Callable, Tuple, Union
import flash
from flash.image import ImageClassificationData, ImageClassifier
from flash.core.data.io.input_transform import InputTransform
from dataclasses import dataclass
@dataclass
class ImageClassificationInputTransform(InputTransform):
image_size: Tuple[int, int] = (196, 196)
mean: Union[float, Tuple[float, float, float]] = (0.485, 0.456, 0.406)
std: Union[float, Tuple[float, float, float]] = (0.229, 0.224, 0.225)
def input_per_sample_transform(self):
return T.Compose([T.ToTensor(), T.Resize(self.image_size), T.Normalize(self.mean, self.std)])
def train_input_per_sample_transform(self):
return T.Compose(
[
T.ToTensor(),
T.Resize(self.image_size),
T.Normalize(self.mean, self.std),
T.RandomHorizontalFlip(),
T.ColorJitter(),
T.RandomAutocontrast(),
T.RandomPerspective(),
]
)
def target_per_sample_transform(self) -> Callable:
return torch.as_tensor
datamodule = ImageClassificationData.from_folders(
train_folder="data/hymenoptera_data/train/",
val_folder="data/hymenoptera_data/val/",
train_transform=ImageClassificationInputTransform,
transform_kwargs=dict(image_size=(128, 128)),
batch_size=1,
)
model = ImageClassifier(backbone="resnet18", num_classes=datamodule.num_classes)
trainer = flash.Trainer(max_epochs=1)
trainer.finetune(model, datamodule=datamodule, strategy="freeze")
Serving
The ImageClassifier is servable.
This means you can call .serve to serve your Task.
Here’s an example:
from flash.image import ImageClassifier
model = ImageClassifier.load_from_checkpoint(
"https://flash-weights.s3.amazonaws.com/0.7.0/image_classification_model.pt"
)
model.serve(output="labels")
You can now perform inference from your client like this:
import base64
from pathlib import Path
import requests
import flash
with (Path(flash.ASSETS_ROOT) / "fish.jpg").open("rb") as f:
imgstr = base64.b64encode(f.read()).decode("UTF-8")
body = {"session": "UUID", "payload": {"inputs": {"data": imgstr}}}
resp = requests.post("http://127.0.0.1:8000/predict", json=body)
print(resp.json())
Multi-label Image Classification
The Task
Multi-label classification is the task of assigning a number of labels from a fixed set to each data point, which can be in any modality (images in this case).
Multi-label image classification is supported by the ImageClassifier via the multi-label argument.
Example
Let’s look at the task of trying to predict the movie genres from an image of the movie poster.
The data we will use is a subset of the awesome movie poster genre prediction data set from the paper “Movie Genre Classification based on Poster Images with Deep Neural Networks” by Wei-Ta Chu and Hung-Jui Guo, resized to 128 by 128.
Take a look at their paper (and please consider citing their paper if you use the data) here: www.cs.ccu.edu.tw/~wtchu/projects/MoviePoster/.
The data set contains train and validation folders, and then each folder contains images and a metadata.csv which stores the labels.
Here’s an overview:
movie_posters
├── train
│ ├── metadata.csv
│ ├── tt0084058.jpg
│ ├── tt0084867.jpg
│ ...
└── val
├── metadata.csv
├── tt0200465.jpg
├── tt0326965.jpg
...
Once we’ve downloaded the data using download_data(), we need to create the ImageClassificationData.
We first create a function (load_data) to extract the list of images and associated labels which can then be passed to from_files().
We select a pre-trained backbone to use for our ImageClassifier and fine-tune on the posters data.
We then use the trained ImageClassifier for inference.
Finally, we save the model.
Here’s the full example:
import os
import torch
import flash
from flash.core.data.utils import download_data
from flash.image import ImageClassificationData, ImageClassifier
# 1. Create the DataModule
# Data set from the paper "Movie Genre Classification based on Poster Images with Deep Neural Networks".
# More info here: https://www.cs.ccu.edu.tw/~wtchu/projects/MoviePoster/
download_data("https://pl-flash-data.s3.amazonaws.com/movie_posters.zip")
def resolver(root, file_id):
return os.path.join(root, f"{file_id}.jpg")
datamodule = ImageClassificationData.from_csv(
"Id",
["Action", "Romance", "Crime", "Thriller", "Adventure"],
train_file="data/movie_posters/train/metadata.csv",
train_resolver=resolver,
val_file="data/movie_posters/val/metadata.csv",
val_resolver=resolver,
transform_kwargs={"image_size": (128, 128)},
batch_size=1,
)
# 2. Build the task
model = ImageClassifier(backbone="resnet18", labels=datamodule.labels, multi_label=datamodule.multi_label)
# 3. Create the trainer and finetune the model
trainer = flash.Trainer(max_epochs=3, gpus=torch.cuda.device_count())
trainer.finetune(model, datamodule=datamodule, strategy="freeze")
# 4. Predict the genre of a few movies!
datamodule = ImageClassificationData.from_files(
predict_files=[
"data/movie_posters/predict/tt0085318.jpg",
"data/movie_posters/predict/tt0089461.jpg",
"data/movie_posters/predict/tt0097179.jpg",
],
batch_size=3,
)
predictions = trainer.predict(model, datamodule=datamodule, output="labels")
print(predictions)
# 5. Save the model!
trainer.save_checkpoint("image_classification_multi_label_model.pt")
To learn how to view the available backbones / heads for this task, see Backbones and Heads.
Flash Zero
The multi-label image classifier can be used directly from the command line with zero code using Flash Zero. You can run the movie posters example with:
flash image_classification from_movie_posters
To view configuration options and options for running the image classifier with your own data, use:
flash image_classification --help
Serving
The ImageClassifier is servable.
For more information, see Image Classification.
Warning
Multi-gpu training is not currently supported by the ImageEmbedder task.
Image Embedder
The Task
Image embedding encodes an image into a vector of features which can be used for a downstream task. This could include: clustering, similarity search, or classification.
The Flash ImageEmbedder can be trained with Self Supervised Learning (SSL) to improve the quality of the embeddings it produces for your data.
The ImageEmbedder internally relies on VISSL.
You can read more about our integration with VISSL here: VISSL.
Example
Let’s see how to configure a training strategy for the ImageEmbedder task.
First we create an ImageClassificationData object using a Dataset from torchvision.
Next, we configure the ImageEmbedder task with training_strategy, backbone, head and pretraining_transform.
Finally, we construct a Trainer and call fit().
Here’s the full example:
import torch
from torchvision.datasets import CIFAR10
import flash
from flash.core.data.utils import download_data
from flash.image import ImageClassificationData, ImageEmbedder
# 1. Download the data and prepare the datamodule
datamodule = ImageClassificationData.from_datasets(
train_dataset=CIFAR10(".", download=True),
batch_size=4,
)
# 2. Build the task
embedder = ImageEmbedder(
backbone="vision_transformer",
training_strategy="barlow_twins",
head="barlow_twins_head",
pretraining_transform="barlow_twins_transform",
training_strategy_kwargs={"latent_embedding_dim": 128},
pretraining_transform_kwargs={"size_crops": [32]},
)
# 3. Create the trainer and pre-train the encoder
trainer = flash.Trainer(max_epochs=1, gpus=torch.cuda.device_count())
trainer.fit(embedder, datamodule=datamodule)
# 4. Save the model!
trainer.save_checkpoint("image_embedder_model.pt")
# 5. Download the downstream prediction dataset and generate embeddings
download_data("https://pl-flash-data.s3.amazonaws.com/hymenoptera_data.zip", "data/")
datamodule = ImageClassificationData.from_files(
predict_files=[
"data/hymenoptera_data/predict/153783656_85f9c3ac70.jpg",
"data/hymenoptera_data/predict/2039585088_c6f47c592e.jpg",
],
batch_size=3,
)
embeddings = trainer.predict(embedder, datamodule=datamodule)
# list of embeddings for images sent to the predict function
print(embeddings)
To learn how to view the available backbones / heads for this task, see Backbones and Heads.
You can view the available training strategies with the available_training_strategies() method.
Note
The "dino" training strategy only supports single GPU training with strategy="ddp".
The head and pretraining_transform arguments should match the choice of training_strategy following this table:
|
|
|
|---|---|---|
|
|
|
|
|
|
|
|
|
|
|
|
Object Detection
The Task
Object detection is the task of identifying objects in images and their associated classes and bounding boxes.
The ObjectDetector and ObjectDetectionData classes internally rely on IceVision.
Example
Let’s look at object detection with the COCO 128 data set, which contains 80 object classes. This is a subset of COCO train2017 with only 128 images. The data set is organized following the COCO format. Here’s an outline:
coco128
├── annotations
│ └── instances_train2017.json
├── images
│ └── train2017
│ ├── 000000000009.jpg
│ ├── 000000000025.jpg
│ ...
└── labels
└── train2017
├── 000000000009.txt
├── 000000000025.txt
...
Once we’ve downloaded the data using download_data(), we can create the ObjectDetectionData.
We select a pre-trained EfficientDet to use for our ObjectDetector and fine-tune on the COCO 128 data.
We then use the trained ObjectDetector for inference.
Finally, we save the model.
Here’s the full example:
import flash
from flash.core.data.utils import download_data
from flash.image import ObjectDetectionData, ObjectDetector
# 1. Create the DataModule
# Dataset Credit: https://www.kaggle.com/ultralytics/coco128
download_data("https://github.com/zhiqwang/yolov5-rt-stack/releases/download/v0.3.0/coco128.zip", "data/")
datamodule = ObjectDetectionData.from_coco(
train_folder="data/coco128/images/train2017/",
train_ann_file="data/coco128/annotations/instances_train2017.json",
val_split=0.1,
transform_kwargs={"image_size": 512},
batch_size=4,
)
# 2. Build the task
model = ObjectDetector(head="efficientdet", backbone="d0", num_classes=datamodule.num_classes, image_size=512)
# 3. Create the trainer and finetune the model
trainer = flash.Trainer(max_epochs=1)
trainer.finetune(model, datamodule=datamodule, strategy="freeze")
# 4. Detect objects in a few images!
datamodule = ObjectDetectionData.from_files(
predict_files=[
"data/coco128/images/train2017/000000000625.jpg",
"data/coco128/images/train2017/000000000626.jpg",
"data/coco128/images/train2017/000000000629.jpg",
],
transform_kwargs={"image_size": 512},
batch_size=4,
)
predictions = trainer.predict(model, datamodule=datamodule)
print(predictions)
# 5. Save the model!
trainer.save_checkpoint("object_detection_model.pt")
To learn how to view the available backbones / heads for this task, see Backbones and Heads.
Flash Zero
The object detector can be used directly from the command line with zero code using Flash Zero. You can run the above example with:
flash object_detection
To view configuration options and options for running the object detector with your own data, use:
flash object_detection --help
Custom Transformations
Flash automatically applies some default image / mask transformations and augmentations, but you may wish to customize these for your own use case.
The base InputTransform defines 7 hooks for different stages in the data loading pipeline.
For object-detection tasks, you can leverage the transformations from Albumentations with the IceVisionTransformAdapter,
creating a subclass of InputTransform
from dataclasses import dataclass
import albumentations as alb
from icevision.tfms import A
from flash import InputTransform
from flash.core.integrations.icevision.transforms import IceVisionTransformAdapter
from flash.image import ObjectDetectionData
@dataclass
class BrightnessContrastTransform(InputTransform):
image_size: int = 128
def per_sample_transform(self):
return IceVisionTransformAdapter(
[*A.aug_tfms(size=self.image_size), A.Normalize(), alb.RandomBrightnessContrast()]
)
datamodule = ObjectDetectionData.from_coco(
train_folder="data/coco128/images/train2017/",
train_ann_file="data/coco128/annotations/instances_train2017.json",
val_split=0.1,
train_transform=BrightnessContrastTransform,
batch_size=4,
)
Keypoint Detection
The Task
Keypoint detection is the task of identifying keypoints in images and their associated classes.
The KeypointDetector and KeypointDetectionData classes internally rely on IceVision.
Example
Let’s look at keypoint detection with BIWI Sample Keypoints (center of face) from IceData.
Once we’ve downloaded the data, we can create the KeypointDetectionData.
We select a keypoint_rcnn with a resnet18_fpn backbone to use for our KeypointDetector and fine-tune on the BIWI data.
We then use the trained KeypointDetector for inference.
Finally, we save the model.
Here’s the full example:
import flash
from flash.core.utilities.imports import example_requires
from flash.image import KeypointDetectionData, KeypointDetector
example_requires("image")
import icedata # noqa: E402
# 1. Create the DataModule
data_dir = icedata.biwi.load_data()
datamodule = KeypointDetectionData.from_icedata(
train_folder=data_dir,
val_split=0.1,
parser=icedata.biwi.parser,
batch_size=4,
)
# 2. Build the task
model = KeypointDetector(
head="keypoint_rcnn",
backbone="resnet18_fpn",
num_keypoints=1,
num_classes=datamodule.num_classes,
)
# 3. Create the trainer and finetune the model
trainer = flash.Trainer(max_epochs=1)
trainer.finetune(model, datamodule=datamodule, strategy="freeze")
# 4. Detect objects in a few images!
datamodule = KeypointDetectionData.from_files(
predict_files=[
str(data_dir / "biwi_sample/images/0.jpg"),
str(data_dir / "biwi_sample/images/1.jpg"),
str(data_dir / "biwi_sample/images/10.jpg"),
],
batch_size=4,
)
predictions = trainer.predict(model, datamodule=datamodule)
print(predictions)
# 5. Save the model!
trainer.save_checkpoint("keypoint_detection_model.pt")
To learn how to view the available backbones / heads for this task, see Backbones and Heads.
Flash Zero
The keypoint detector can be used directly from the command line with zero code using Flash Zero. You can run the above example with:
flash keypoint_detection
To view configuration options and options for running the keypoint detector with your own data, use:
flash keypoint_detection --help
Instance Segmentation
The Task
Instance segmentation is the task of segmenting objects images and determining their associated classes.
The InstanceSegmentation and InstanceSegmentationData classes internally rely on IceVision.
Example
Let’s look at instance segmentation with The Oxford-IIIT Pet Dataset from IceData.
Once we’ve downloaded the data, we can create the InstanceSegmentationData.
We select a mask_rcnn with a resnet18_fpn backbone to use for our InstanceSegmentation and fine-tune on the pets data.
We then use the trained InstanceSegmentation for inference.
Finally, we save the model.
Here’s the full example:
from functools import partial
import flash
from flash.core.utilities.imports import example_requires
from flash.image import InstanceSegmentation, InstanceSegmentationData
example_requires("image")
import icedata # noqa: E402
# 1. Create the DataModule
data_dir = icedata.pets.load_data()
datamodule = InstanceSegmentationData.from_icedata(
train_folder=data_dir,
val_split=0.1,
parser=partial(icedata.pets.parser, mask=True),
batch_size=4,
)
# 2. Build the task
model = InstanceSegmentation(
head="mask_rcnn",
backbone="resnet18_fpn",
num_classes=datamodule.num_classes,
)
# 3. Create the trainer and finetune the model
trainer = flash.Trainer(max_epochs=1)
trainer.finetune(model, datamodule=datamodule, strategy="freeze")
# 4. Detect objects in a few images!
datamodule = InstanceSegmentationData.from_files(
predict_files=[
str(data_dir / "images/yorkshire_terrier_9.jpg"),
str(data_dir / "images/yorkshire_terrier_12.jpg"),
str(data_dir / "images/yorkshire_terrier_13.jpg"),
],
batch_size=4,
)
predictions = trainer.predict(model, datamodule=datamodule)
print(predictions)
# 5. Save the model!
trainer.save_checkpoint("instance_segmentation_model.pt")
To learn how to view the available backbones / heads for this task, see Backbones and Heads.
Flash Zero
The instance segmentation task can be used directly from the command line with zero code using Flash Zero. You can run the above example with:
flash instance_segmentation
To view configuration options and options for running the instance segmentation task with your own data, use:
flash instance_segmentation --help
Semantic Segmentation
The Task
Semantic Segmentation, or image segmentation, is the task of performing classification at a pixel-level, meaning each pixel will associated to a given class. See more: https://paperswithcode.com/task/semantic-segmentation
Example
Let’s look at an example using a data set generated with the CARLA driving simulator. The data was generated as part of the Kaggle Lyft Udacity Challenge. The data contains one folder of images and another folder with the corresponding segmentation masks. Here’s the structure:
data
├── CameraRGB
│ ├── F61-1.png
│ ├── F61-2.png
│ ...
└── CameraSeg
├── F61-1.png
├── F61-2.png
...
Once we’ve downloaded the data using download_data(), we create the SemanticSegmentationData.
We select a pre-trained mobilenet_v3_large backbone with an fpn head to use for our SemanticSegmentation task and fine-tune on the CARLA data.
We then use the trained SemanticSegmentation for inference. You can check the available pretrained weights for the backbones like this SemanticSegmentation.available_pretrained_weights(“resnet18”).
Finally, we save the model.
Here’s the full example:
import torch
import flash
from flash.core.data.utils import download_data
from flash.image import SemanticSegmentation, SemanticSegmentationData
# 1. Create the DataModule
# The data was generated with the CARLA self-driving simulator as part of the Kaggle Lyft Udacity Challenge.
# More info here: https://www.kaggle.com/kumaresanmanickavelu/lyft-udacity-challenge
download_data(
"https://github.com/ongchinkiat/LyftPerceptionChallenge/releases/download/v0.1/carla-capture-20180513A.zip",
"./data",
)
datamodule = SemanticSegmentationData.from_folders(
train_folder="data/CameraRGB",
train_target_folder="data/CameraSeg",
val_split=0.1,
transform_kwargs=dict(image_size=(256, 256)),
num_classes=21,
batch_size=4,
)
# 2. Build the task
model = SemanticSegmentation(
backbone="mobilenetv3_large_100",
head="fpn",
num_classes=datamodule.num_classes,
)
# 3. Create the trainer and finetune the model
trainer = flash.Trainer(max_epochs=3, gpus=torch.cuda.device_count())
trainer.finetune(model, datamodule=datamodule, strategy="freeze")
# 4. Segment a few images!
datamodule = SemanticSegmentationData.from_files(
predict_files=[
"data/CameraRGB/F61-1.png",
"data/CameraRGB/F62-1.png",
"data/CameraRGB/F63-1.png",
],
batch_size=3,
)
predictions = trainer.predict(model, datamodule=datamodule)
print(predictions)
# 5. Save the model!
trainer.save_checkpoint("semantic_segmentation_model.pt")
To learn how to view the available backbones / heads for this task, see Backbones and Heads.
Flash Zero
The semantic segmentation task can be used directly from the command line with zero code using Flash Zero. You can run the above example with:
flash semantic_segmentation
To view configuration options and options for running the semantic segmentation task with your own data, use:
flash semantic_segmentation --help
Serving
The SemanticSegmentation task is servable.
This means you can call .serve to serve your Task.
Here’s an example:
from flash.image import SemanticSegmentation
from flash.image.segmentation.output import SegmentationLabelsOutput
model = SemanticSegmentation.load_from_checkpoint(
"https://flash-weights.s3.amazonaws.com/0.7.0/semantic_segmentation_model.pt"
)
model.output = SegmentationLabelsOutput(visualize=False)
model.serve()
You can now perform inference from your client like this:
import base64
from pathlib import Path
import requests
import flash
with (Path(flash.ASSETS_ROOT) / "road.png").open("rb") as f:
imgstr = base64.b64encode(f.read()).decode("UTF-8")
body = {"session": "UUID", "payload": {"inputs": {"data": imgstr}}}
resp = requests.post("http://127.0.0.1:8000/predict", json=body)
print(resp.json())
Style Transfer
The Task
The Neural Style Transfer Task is an optimization method which extract the style from an image and apply it another image while preserving its content. The goal is that the output image looks like the content image, but “painted” in the style of the style reference image.

The StyleTransfer and StyleTransferData classes internally rely on pystiche.
Example
Let’s look at transferring the style from The Starry Night onto the images from the COCO 128 data set from the Object Detection Guide.
Once we’ve downloaded the data using download_data(), we create the StyleTransferData.
Next, we create our StyleTransfer task with the desired style image and fit on the COCO 128 images.
We then use the trained StyleTransfer for inference.
Finally, we save the model.
Here’s the full example:
import os
import torch
import flash
from flash.core.data.utils import download_data
from flash.image.style_transfer import StyleTransfer, StyleTransferData
# 1. Create the DataModule
download_data("https://github.com/zhiqwang/yolov5-rt-stack/releases/download/v0.3.0/coco128.zip", "./data")
datamodule = StyleTransferData.from_folders(train_folder="data/coco128/images/train2017", batch_size=1)
# 2. Build the task
model = StyleTransfer(os.path.join(flash.ASSETS_ROOT, "starry_night.jpg"))
# 3. Create the trainer and train the model
trainer = flash.Trainer(max_epochs=3, gpus=torch.cuda.device_count())
trainer.fit(model, datamodule=datamodule)
# 4. Apply style transfer to a few images!
datamodule = StyleTransferData.from_files(
predict_files=[
"data/coco128/images/train2017/000000000625.jpg",
"data/coco128/images/train2017/000000000626.jpg",
"data/coco128/images/train2017/000000000629.jpg",
],
batch_size=3,
)
predictions = trainer.predict(model, datamodule=datamodule)
print(predictions)
# 5. Save the model!
trainer.save_checkpoint("style_transfer_model.pt")
To learn how to view the available backbones / heads for this task, see Backbones and Heads.
Flash Zero
The style transfer task can be used directly from the command line with zero code using Flash Zero. You can run the above example with:
flash style_transfer
To view configuration options and options for running the style transfer task with your own data, use:
flash style_transfer --help
Video Classification
The Task
Typically, Video Classification refers to the task of producing a label for actions identified in a given video. The task is to predict which class the video clip belongs to.
Lightning Flash VideoClassifier and VideoClassificationData classes internally rely on PyTorchVideo.
Example
Let’s develop a model to classifying video clips of Humans performing actions (such as: archery , bowling, etc.). We’ll use data from the Kinetics dataset. Here’s an outline of the folder structure:
video_dataset
├── train
│ ├── archery
│ │ ├── -1q7jA3DXQM_000005_000015.mp4
│ │ ├── -5NN5hdIwTc_000036_000046.mp4
│ │ ...
│ ├── bowling
│ │ ├── -5ExwuF5IUI_000030_000040.mp4
│ │ ├── -7sTNNI1Bcg_000075_000085.mp4
│ ... ...
└── val
├── archery
│ ├── 0S-P4lr_c7s_000022_000032.mp4
│ ├── 2x1lIrgKxYo_000589_000599.mp4
│ ...
├── bowling
│ ├── 1W7HNDBA4pA_000002_000012.mp4
│ ├── 4JxH3S5JwMs_000003_000013.mp4
... ...
Once we’ve downloaded the data using download_data(), we create the VideoClassificationData.
We select a pre-trained backbone to use for our VideoClassifier and fine-tune on the Kinetics data.
The backbone can be any model from the PyTorchVideo Model Zoo.
We then use the trained VideoClassifier for inference.
Finally, we save the model.
Here’s the full example:
import torch
import flash
from flash.core.data.utils import download_data
from flash.video import VideoClassificationData, VideoClassifier
# 1. Create the DataModule
# Find more datasets at https://pytorchvideo.readthedocs.io/en/latest/data.html
download_data("https://pl-flash-data.s3.amazonaws.com/kinetics.zip", "./data")
datamodule = VideoClassificationData.from_folders(
train_folder="data/kinetics/train",
val_folder="data/kinetics/val",
clip_sampler="uniform",
clip_duration=1,
decode_audio=False,
batch_size=1,
)
# 2. Build the task
model = VideoClassifier(backbone="x3d_xs", labels=datamodule.labels, pretrained=False)
# 3. Create the trainer and finetune the model
trainer = flash.Trainer(
max_epochs=1, gpus=torch.cuda.device_count(), strategy="ddp" if torch.cuda.device_count() > 1 else None
)
trainer.finetune(model, datamodule=datamodule, strategy="freeze")
# 4. Make a prediction
datamodule = VideoClassificationData.from_folders(predict_folder="data/kinetics/predict", batch_size=1)
predictions = trainer.predict(model, datamodule=datamodule, output="labels")
print(predictions)
# 5. Save the model!
trainer.save_checkpoint("video_classification.pt")
To learn how to view the available backbones / heads for this task, see Backbones and Heads.
Flash Zero
The video classifier can be used directly from the command line with zero code using Flash Zero. You can run the above example with:
flash video_classification
To view configuration options and options for running the video classifier with your own data, use:
flash video_classification --help
Audio Classification
The Task
The task of identifying what is in an audio file is called audio classification. Typically, Audio Classification is used to identify audio files containing sounds or words. The task predicts which ‘class’ the sound or words most likely belongs to with a degree of certainty. A class is a label that describes the sounds in an audio file, such as ‘children_playing’, ‘jackhammer’, ‘siren’ etc.
Example
Let’s look at the task of predicting whether audio file contains sounds of an airconditioner, carhorn, childrenplaying, dogbark, drilling, engingeidling, gunshot, jackhammer, siren, or street_music using the UrbanSound8k spectrogram images dataset.
The dataset contains train, val and test folders, and then each folder contains a airconditioner folder, with spectrograms generated from air-conditioner sounds, siren folder with spectrograms generated from siren sounds and the same goes for the other classes.
urban8k_images
├── train
│ ├── air_conditioner
│ ├── car_horn
│ ├── children_playing
│ ├── dog_bark
│ ├── drilling
│ ├── engine_idling
│ ├── gun_shot
│ ├── jackhammer
│ ├── siren
│ └── street_music
├── test
│ ├── air_conditioner
│ ├── car_horn
│ ├── children_playing
│ ├── dog_bark
│ ├── drilling
│ ├── engine_idling
│ ├── gun_shot
│ ├── jackhammer
│ ├── siren
│ └── street_music
└── val
├── air_conditioner
├── car_horn
├── children_playing
├── dog_bark
├── drilling
├── engine_idling
├── gun_shot
├── jackhammer
├── siren
└── street_music
...
Once we’ve downloaded the data using download_data(), we create the AudioClassificationData.
We select a pre-trained backbone to use for our ImageClassifier and fine-tune on the UrbanSound8k spectrogram images data.
We then use the trained ImageClassifier for inference.
Finally, we save the model.
Here’s the full example:
import torch
import flash
from flash.audio import AudioClassificationData
from flash.core.data.utils import download_data
from flash.image import ImageClassifier
# 1. Create the DataModule
download_data("https://pl-flash-data.s3.amazonaws.com/urban8k_images.zip", "./data")
datamodule = AudioClassificationData.from_folders(
train_folder="data/urban8k_images/train",
val_folder="data/urban8k_images/val",
transform_kwargs=dict(spectrogram_size=(64, 64)),
batch_size=4,
)
# 2. Build the model.
model = ImageClassifier(backbone="resnet18", labels=datamodule.labels)
# 3. Create the trainer and finetune the model
trainer = flash.Trainer(max_epochs=3, gpus=torch.cuda.device_count())
trainer.finetune(model, datamodule=datamodule, strategy=("freeze_unfreeze", 1))
# 4. Predict what's on few images! air_conditioner, children_playing, siren etc.
datamodule = AudioClassificationData.from_files(
predict_files=[
"data/urban8k_images/test/air_conditioner/13230-0-0-5.wav.jpg",
"data/urban8k_images/test/children_playing/9223-2-0-15.wav.jpg",
"data/urban8k_images/test/jackhammer/22883-7-10-0.wav.jpg",
],
batch_size=3,
)
predictions = trainer.predict(model, datamodule=datamodule, output="labels")
print(predictions)
# 5. Save the model!
trainer.save_checkpoint("audio_classification_model.pt")
To learn how to view the available backbones / heads for this task, see Backbones and Heads.
Flash Zero
The audio classifier can be used directly from the command line with zero code using Flash Zero. You can run the above example with:
flash audio_classification
To view configuration options and options for running the audio classifier with your own data, use:
flash audio_classification --help
Speech Recognition
The Task
Speech recognition is the task of classifying audio into a text transcription. We rely on Wav2Vec as our backbone, fine-tuned on labeled transcriptions for speech to text. Wav2Vec is pre-trained on thousand of hours of unlabeled audio, providing a strong baseline when fine-tuning to downstream tasks such as Speech Recognition.
Example
Let’s fine-tune the model onto our own labeled audio transcription data:
Here’s the structure our CSV file:
file,text
"/path/to/file_1.wav","what was said in file 1."
"/path/to/file_2.wav","what was said in file 2."
"/path/to/file_3.wav","what was said in file 3."
...
Alternatively, here is the structure of our JSON file:
{"file": "/path/to/file_1.wav", "text": "what was said in file 1."}
{"file": "/path/to/file_2.wav", "text": "what was said in file 2."}
{"file": "/path/to/file_3.wav", "text": "what was said in file 3."}
Once we’ve downloaded the data using download_data(), we create the SpeechRecognitionData.
We select a pre-trained Wav2Vec backbone to use for our SpeechRecognition and finetune on a subset of the TIMIT corpus.
The backbone can be any Wav2Vec model from HuggingFace transformers.
Next, we use the trained SpeechRecognition for inference and save the model.
Here’s the full example:
import torch
import flash
from flash.audio import SpeechRecognition, SpeechRecognitionData
from flash.core.data.utils import download_data
# 1. Create the DataModule
download_data("https://pl-flash-data.s3.amazonaws.com/timit_data.zip", "./data")
datamodule = SpeechRecognitionData.from_json(
"file",
"text",
train_file="data/timit/train.json",
test_file="data/timit/test.json",
batch_size=4,
)
# 2. Build the task
model = SpeechRecognition(backbone="facebook/wav2vec2-base-960h")
# 3. Create the trainer and finetune the model
trainer = flash.Trainer(max_epochs=1, gpus=torch.cuda.device_count())
trainer.finetune(model, datamodule=datamodule, strategy="freeze")
# 4. Predict on audio files!
datamodule = SpeechRecognitionData.from_files(predict_files=["data/timit/example.wav"], batch_size=4)
predictions = trainer.predict(model, datamodule=datamodule)
print(predictions)
# 5. Save the model!
trainer.save_checkpoint("speech_recognition_model.pt")
To learn how to view the available backbones / heads for this task, see Backbones and Heads.
Flash Zero
The speech recognition task can be used directly from the command line with zero code using Flash Zero. You can run the above example with:
flash speech_recognition
To view configuration options and options for running the speech recognition task with your own data, use:
flash speech_recognition --help
Serving
The SpeechRecognition is servable.
This means you can call .serve to serve your Task.
Here’s an example:
from flash.audio import SpeechRecognition
model = SpeechRecognition.load_from_checkpoint(
"https://flash-weights.s3.amazonaws.com/0.7.0/speech_recognition_model.pt"
)
model.serve()
You can now perform inference from your client like this:
import base64
from pathlib import Path
import requests
import flash
with (Path(flash.ASSETS_ROOT) / "example.wav").open("rb") as f:
audio_str = base64.b64encode(f.read()).decode("UTF-8")
body = {"session": "UUID", "payload": {"inputs": {"data": audio_str}}}
resp = requests.post("http://127.0.0.1:8000/predict", json=body)
print(resp.json())
Tabular Classification
The Task
Tabular classification is the task of assigning a class to samples of structured or relational data.
The TabularClassifier task can be used for classification of samples in more than two classes (multi-class classification).
Example
Let’s look at training a model to predict if passenger survival on the Titanic using the classic Kaggle data set. The data is provided in CSV files that look like this:
PassengerId,Survived,Pclass,Name,Sex,Age,SibSp,Parch,Ticket,Fare,Cabin,Embarked
1,0,3,"Braund, Mr. Owen Harris",male,22,1,0,A/5 21171,7.25,,S
3,1,3,"Heikkinen, Miss. Laina",female,26,0,0,STON/O2. 3101282,7.925,,S
5,0,3,"Allen, Mr. William Henry",male,35,0,0,373450,8.05,,S
6,0,3,"Moran, Mr. James",male,,0,0,330877,8.4583,,Q
...
Once we’ve downloaded the data using download_data(), we can create the TabularData from our CSV files using the from_csv() method.
From the API reference, we need to provide:
cat_cols- A list of the names of columns that contain categorical data (strings or integers).
num_cols- A list of the names of columns that contain numerical continuous data (floats).
target- The name of the column we want to predict.
train_csv- A CSV file containing the training data converted to a Pandas DataFrame
Next, we create the TabularClassifier and finetune on the Titanic data.
We then use the trained TabularClassifier for inference.
Finally, we save the model.
Here’s the full example:
import torch
import flash
from flash.core.data.utils import download_data
from flash.tabular import TabularClassificationData, TabularClassifier
# 1. Create the DataModule
download_data("https://pl-flash-data.s3.amazonaws.com/titanic.zip", "./data")
datamodule = TabularClassificationData.from_csv(
categorical_fields=["Sex", "Age", "SibSp", "Parch", "Ticket", "Cabin", "Embarked"],
numerical_fields="Fare",
target_fields="Survived",
train_file="data/titanic/titanic.csv",
val_split=0.1,
batch_size=8,
)
# 2. Build the task
model = TabularClassifier.from_data(datamodule, backbone="fttransformer")
# 3. Create the trainer and train the model
trainer = flash.Trainer(max_epochs=3, gpus=torch.cuda.device_count())
trainer.fit(model, datamodule=datamodule)
# 4. Generate predictions from a CSV
datamodule = TabularClassificationData.from_csv(
predict_file="data/titanic/titanic.csv",
parameters=datamodule.parameters,
batch_size=8,
)
predictions = trainer.predict(model, datamodule=datamodule, output="classes")
print(predictions)
# 5. Save the model!
trainer.save_checkpoint("tabular_classification_model.pt")
To learn how to view the available backbones / heads for this task, see Backbones and Heads.
Flash Zero
The tabular classifier can be used directly from the command line with zero code using Flash Zero. You can run the above example with:
flash tabular_classifier
To view configuration options and options for running the tabular classifier with your own data, use:
flash tabular_classifier --help
Serving
The TabularClassifier is servable.
This means you can call .serve to serve your Task.
Here’s an example:
from flash.core.classification import LabelsOutput
from flash.tabular import TabularClassifier
model = TabularClassifier.load_from_checkpoint(
"https://flash-weights.s3.amazonaws.com/0.7.0/tabular_classification_model.pt"
)
model.output = LabelsOutput(["Did not survive", "Survived"])
model.serve()
You can now perform inference from your client like this:
import pandas as pd
import requests
from flash.core.data.utils import download_data
# 1. Download the data
download_data("https://pl-flash-data.s3.amazonaws.com/titanic.zip", "data/")
df = pd.read_csv("./data/titanic/predict.csv")
text = str(df.to_csv())
body = {"session": "UUID", "payload": {"inputs": {"data": text}}}
resp = requests.post("http://127.0.0.1:8000/predict", json=body)
print(resp.json())
Tabular Forecasting
The Task
Tabular (or timeseries) forecasting is the task of using historical data to predict future trends in a time varying quantity such as: stock prices, temperature, etc.
The TabularForecaster and TabularForecastingData enable timeseries forecasting in Flash using PyTorch Forecasting.
Example
Let’s look at training the NBeats model on some synthetic data with seasonal changes. The data could represent many naturally occurring timeseries such as energy demand which fluctuates throughout the day but is also expected to change with the season. This example is a reimplementation of the NBeats tutorial from the PyTorch Forecasting docs in Flash. The NBeats model takes no additional inputs unlike other more complex models such as the Temporal Fusion Transformer.
Once we’ve created, we can create the TabularData from our DataFrame using the from_data_frame() method.
To this method, we provide any configuration arguments that should be used when internally constructing the TimeSeriesDataSet.
Next, we create the TabularForecaster and train on the data.
We then use the trained TabularForecaster for inference.
Finally, we save the model.
Here’s the full example:
import torch
import flash
from flash.core.utilities.imports import example_requires
from flash.tabular.forecasting import TabularForecaster, TabularForecastingData
example_requires("tabular")
import pandas as pd # noqa: E402
from pytorch_forecasting.data import NaNLabelEncoder # noqa: E402
from pytorch_forecasting.data.examples import generate_ar_data # noqa: E402
# Example based on this tutorial: https://pytorch-forecasting.readthedocs.io/en/latest/tutorials/ar.html
# 1. Create the DataModule
data = generate_ar_data(seasonality=10.0, timesteps=400, n_series=100, seed=42)
data["date"] = pd.Timestamp("2020-01-01") + pd.to_timedelta(data.time_idx, "D")
max_encoder_length = 60
max_prediction_length = 20
training_cutoff = data["time_idx"].max() - max_prediction_length
datamodule = TabularForecastingData.from_data_frame(
time_idx="time_idx",
target="value",
categorical_encoders={"series": NaNLabelEncoder().fit(data.series)},
group_ids=["series"],
# only unknown variable is "value" - and N-Beats can also not take any additional variables
time_varying_unknown_reals=["value"],
max_encoder_length=max_encoder_length,
max_prediction_length=max_prediction_length,
train_data_frame=data[lambda x: x.time_idx <= training_cutoff],
# validate on the last sequence
val_data_frame=data[lambda x: x.time_idx > training_cutoff - max_encoder_length],
batch_size=32,
)
# 2. Build the task
model = TabularForecaster(
datamodule.parameters,
backbone="n_beats",
backbone_kwargs={"widths": [32, 512], "backcast_loss_ratio": 0.1},
)
# 3. Create the trainer and train the model
trainer = flash.Trainer(max_epochs=1, gpus=torch.cuda.device_count(), gradient_clip_val=0.01)
trainer.fit(model, datamodule=datamodule)
# 4. Generate predictions
datamodule = TabularForecastingData.from_data_frame(
predict_data_frame=data[lambda x: x.time_idx > training_cutoff - max_encoder_length],
parameters=datamodule.parameters,
batch_size=32,
)
predictions = trainer.predict(model, datamodule=datamodule)
print(predictions)
# 5. Save the model!
trainer.save_checkpoint("tabular_forecasting_model.pt")
To learn how to view the available backbones / heads for this task, see Backbones and Heads.
Note
Read more about our integration with PyTorch Forecasting to see how to use your Flash model with their built-in plotting capabilities.
Text Classification
The Task
Text classification is the task of assigning a piece of text (word, sentence or document) an appropriate class, or category. The categories depend on the chosen data set and can range from topics.
Example
Let’s train a model to classify text as expressing either positive or negative sentiment.
We will be using the IMDB data set, that contains a train.csv and valid.csv.
Here’s the structure:
review,sentiment
"Japanese indie film with humor ... ",positive
"Isaac Florentine has made some ...",negative
"After seeing the low-budget ...",negative
"I've seen the original English version ...",positive
"Hunters chase what they think is a man through ...",negative
...
Once we’ve downloaded the data using download_data(), we create the TextClassificationData.
We select a pre-trained backbone to use for our TextClassifier and finetune on the IMDB data.
The backbone can be any BERT classification model from HuggingFace/transformers.
Note
When changing the backbone, make sure you pass in the same backbone to the TextClassifier and the TextClassificationData!
Next, we use the trained TextClassifier for inference.
Finally, we save the model.
Here’s the full example:
import torch
import flash
from flash.core.data.utils import download_data
from flash.text import TextClassificationData, TextClassifier
# 1. Create the DataModule
download_data("https://pl-flash-data.s3.amazonaws.com/imdb.zip", "./data/")
datamodule = TextClassificationData.from_csv(
"review",
"sentiment",
train_file="data/imdb/train.csv",
val_file="data/imdb/valid.csv",
batch_size=4,
)
# 2. Build the task
model = TextClassifier(backbone="prajjwal1/bert-medium", labels=datamodule.labels)
# 3. Create the trainer and finetune the model
trainer = flash.Trainer(max_epochs=3, gpus=torch.cuda.device_count())
trainer.finetune(model, datamodule=datamodule, strategy="freeze")
# 4. Classify a few sentences! How was the movie?
datamodule = TextClassificationData.from_lists(
predict_data=[
"Turgid dialogue, feeble characterization - Harvey Keitel a judge?.",
"The worst movie in the history of cinema.",
"I come from Bulgaria where it 's almost impossible to have a tornado.",
],
batch_size=4,
)
predictions = trainer.predict(model, datamodule=datamodule, output="labels")
print(predictions)
# 5. Save the model!
trainer.save_checkpoint("text_classification_model.pt")
To learn how to view the available backbones / heads for this task, see Backbones and Heads.
Flash Zero
The text classifier can be used directly from the command line with zero code using Flash Zero. You can run the above example with:
flash text_classification
To view configuration options and options for running the text classifier with your own data, use:
flash text_classification --help
Serving
The TextClassifier is servable.
This means you can call .serve to serve your Task.
Here’s an example:
from flash.text import TextClassifier
model = TextClassifier.load_from_checkpoint("https://flash-weights.s3.amazonaws.com/0.7.0/text_classification_model.pt")
model.serve()
You can now perform inference from your client like this:
import requests
text = "Best movie ever"
body = {"session": "UUID", "payload": {"inputs": {"data": text}}}
resp = requests.post("http://127.0.0.1:8000/predict", json=body)
print(resp.json())
Accelerate Training & Inference with Torch ORT
Torch ORT converts your model into an optimized ONNX graph, speeding up training & inference when using NVIDIA or AMD GPUs. Enabling Torch ORT requires a single flag passed to the TextClassifier once installed. See installation instructions here.
Note
Not all Transformer models are supported. See this table for supported models + branches containing fixes for certain models.
...
model = TextClassifier(backbone="facebook/bart-large", num_classes=datamodule.num_classes, enable_ort=True)
Multi-label Text Classification
The Task
Multi-label classification is the task of assigning a number of labels from a fixed set to each data point, which can be in any modality (text in this case).
Multi-label text classification is supported by the TextClassifier via the multi-label argument.
Example
Let’s look at the task of classifying comment toxicity. The data we will use in this example is from the kaggle toxic comment classification challenge by jigsaw: www.kaggle.com/c/jigsaw-toxic-comment-classification-challenge. The data is stored in CSV files with this structure:
"id","comment_text","toxic","severe_toxic","obscene","threat","insult","identity_hate"
"0000997932d777bf","...",0,0,0,0,0,0
"0002bcb3da6cb337","...",1,1,1,0,1,0
"0005c987bdfc9d4b","...",1,0,0,0,0,0
...
Once we’ve downloaded the data using download_data(), we create the TextClassificationData.
We select a pre-trained backbone to use for our TextClassifier and finetune on the toxic comments data.
The backbone can be any BERT classification model from HuggingFace/transformers.
Note
When changing the backbone, make sure you pass in the same backbone to the TextClassifier and the TextClassificationData!
Next, we use the trained TextClassifier for inference.
Finally, we save the model.
Here’s the full example:
import torch
import flash
from flash.core.data.utils import download_data
from flash.text import TextClassificationData, TextClassifier
# 1. Create the DataModule
# Data from the Kaggle Toxic Comment Classification Challenge:
# https://www.kaggle.com/c/jigsaw-toxic-comment-classification-challenge
download_data("https://pl-flash-data.s3.amazonaws.com/jigsaw_toxic_comments.zip", "./data")
datamodule = TextClassificationData.from_csv(
"comment_text",
["toxic", "severe_toxic", "obscene", "threat", "insult", "identity_hate"],
train_file="data/jigsaw_toxic_comments/train.csv",
val_split=0.1,
batch_size=4,
)
# 2. Build the task
model = TextClassifier(
backbone="unitary/toxic-bert",
labels=datamodule.labels,
multi_label=datamodule.multi_label,
)
# 3. Create the trainer and finetune the model
trainer = flash.Trainer(max_epochs=1, gpus=torch.cuda.device_count())
trainer.finetune(model, datamodule=datamodule, strategy="freeze")
# 4. Generate predictions for a few comments!
datamodule = TextClassificationData.from_lists(
predict_data=[
"No, he is an arrogant, self serving, immature idiot. Get it right.",
"U SUCK HANNAH MONTANA",
"Would you care to vote? Thx.",
],
batch_size=4,
)
predictions = trainer.predict(model, datamodule=datamodule, output="labels")
print(predictions)
# 5. Save the model!
trainer.save_checkpoint("text_classification_multi_label_model.pt")
To learn how to view the available backbones / heads for this task, see Backbones and Heads.
Flash Zero
The multi-label text classifier can be used directly from the command line with zero code using Flash Zero. You can run the above example with:
flash text_classification from_toxic
To view configuration options and options for running the text classifier with your own data, use:
flash text_classification --help
Serving
The TextClassifier is servable.
For more information, see Text Classification.
Question Answering
The Task
Question Answering is the task of being able to answer questions pertaining to some known context. For example, given a context about some historical figure, any question pertaininig to the context should be answerable. In our case the article would be our input context and question, and the answer would be the output sequence from the model.
Note
We currently only support Extractive Question Answering, like the task performed using the SQUAD like datasets.
Example
Let’s look at an example.
We’ll use the SQUAD 2.0 dataset, which contains train-v2.0.json and dev-v2.0.json.
Each JSON file looks like this:
{
"answers": {
"answer_start": [94, 87, 94, 94],
"text": ["10th and 11th centuries", "in the 10th and 11th centuries", "10th and 11th centuries", "10th and 11th centuries"]
},
"context": "\"The Normans (Norman: Nourmands; French: Normands; Latin: Normanni) were the people who in the 10th and 11th centuries gave thei...",
"id": "56ddde6b9a695914005b9629",
"question": "When were the Normans in Normandy?",
"title": "Normans"
}
...
In the above, the context key represents the context used for the question and answer, the question key represents the question being asked with respect to the context, the answer key stores the answer(s) for the question.
id and title are used for unique identification and grouping concepts together respectively.
Once we’ve downloaded the data using download_data(), we create the QuestionAnsweringData.
We select a pre-trained backbone to use for our QuestionAnsweringTask and finetune on the SQUAD 2.0 data.
The backbone can be any Question Answering model from HuggingFace/transformers.
Note
When changing the backbone, make sure you pass in the same backbone to the QuestionAnsweringData and the QuestionAnsweringTask!
Next, we use the trained QuestionAnsweringTask for inference.
Finally, we save the model.
Here’s the full example:
from flash import Trainer
from flash.core.data.utils import download_data
from flash.core.utilities.imports import example_requires
from flash.text import QuestionAnsweringData, QuestionAnsweringTask
example_requires("text")
import nltk # noqa: E402
nltk.download("punkt")
# 1. Create the DataModule
download_data("https://pl-flash-data.s3.amazonaws.com/squad_tiny.zip", "./data/")
datamodule = QuestionAnsweringData.from_squad_v2(
train_file="./data/squad_tiny/train.json",
val_file="./data/squad_tiny/val.json",
batch_size=4,
)
# 2. Build the task
model = QuestionAnsweringTask(backbone="distilbert-base-uncased")
# 3. Create the trainer and finetune the model
trainer = Trainer(max_epochs=3)
trainer.finetune(model, datamodule=datamodule)
# 4. Answer some Questions!
datamodule = QuestionAnsweringData.from_dicts(
predict_data={
"id": ["56ddde6b9a695914005b9629", "56ddde6b9a695914005b9628"],
"context": [
"""
The Normans (Norman: Nourmands; French: Normands; Latin: Normanni) were the people who in the 10th
and 11th centuries gave their name to Normandy, a region in France. They were descended from Norse
("Norman" comes from "Norseman") raiders and pirates from Denmark, Iceland and Norway who, under
their leader Rollo, agreed to swear fealty to King Charles III of West Francia. Through generations
of assimilation and mixing with the native Frankish and Roman-Gaulish populations, their
descendants would gradually merge with the Carolingian-based cultures of West Francia. The distinct
cultural and ethnic identity of the Normans emerged initially in the first half of the 10th
century, and it continued to evolve over the succeeding centuries.
""",
],
"question": ["When were the Normans in Normandy?", "In what country is Normandy located?"],
},
batch_size=4,
)
predictions = trainer.predict(model, datamodule=datamodule)
print(predictions)
# 5. Save the model!
trainer.save_checkpoint("question_answering_on_sqaud_v2.pt")
To learn how to view the available backbones / heads for this task, see Backbones and Heads.
Accelerate Training & Inference with Torch ORT
Torch ORT converts your model into an optimized ONNX graph, speeding up training & inference when using NVIDIA or AMD GPUs. Enabling Torch ORT requires a single flag passed to the QuestionAnsweringTask once installed. See installation instructions here.
Note
Not all Transformer models are supported. See this table for supported models + branches containing fixes for certain models.
...
model = QuestionAnsweringTask(backbone="distilbert-base-uncased", max_answer_length=30, enable_ort=True)
Summarization
The Task
Summarization is the task of summarizing text from a larger document/article into a short sentence/description. For example, taking a web article and describing the topic in a short sentence. This task is a subset of Sequence to Sequence tasks, which require the model to generate a variable length sequence given an input sequence. In our case the article would be our input sequence, and the short description/sentence would be the output sequence from the model.
Example
Let’s look at an example.
We’ll use the XSUM dataset, which contains a train.csv and valid.csv.
Each CSV file looks like this:
input,target
"The researchers have sequenced the genome of a strain of bacterium that causes the virulent infection...","A team of UK scientists hopes to shed light on the mysteries of bleeding canker, a disease that is threatening the nation's horse chestnut trees."
"Knight was shot in the leg by an unknown gunman at Miami's Shore Club where West was holding a pre-MTV Awards...",Hip hop star Kanye West is being sued by Death Row Records founder Suge Knight over a shooting at a beach party in August 2005.
...
In the above, the input column represents the long articles/documents, and the target is the short description used as the target.
Once we’ve downloaded the data using download_data(), we create the SummarizationData.
We select a pre-trained backbone to use for our SummarizationTask and finetune on the XSUM data.
The backbone can be any Seq2Seq summarization model from HuggingFace/transformers.
Note
When changing the backbone, make sure you pass in the same backbone to the SummarizationData and the SummarizationTask!
Next, we use the trained SummarizationTask for inference.
Finally, we save the model.
Here’s the full example:
from flash import Trainer
from flash.core.data.utils import download_data
from flash.text import SummarizationData, SummarizationTask
# 1. Create the DataModule
download_data("https://pl-flash-data.s3.amazonaws.com/xsum.zip", "./data/")
datamodule = SummarizationData.from_csv(
"input",
"target",
train_file="data/xsum/train.csv",
val_file="data/xsum/valid.csv",
batch_size=4,
)
# 2. Build the task
model = SummarizationTask()
# 3. Create the trainer and finetune the model
trainer = Trainer(max_epochs=3)
trainer.finetune(model, datamodule=datamodule, strategy="freeze")
# 4. Summarize some text!
datamodule = SummarizationData.from_lists(
predict_data=[
"""
Camilla bought a box of mangoes with a Brixton £10 note, introduced last year to try to keep the money of local
people within the community.The couple were surrounded by shoppers as they walked along Electric Avenue.
They came to Brixton to see work which has started to revitalise the borough.
It was Charles' first visit to the area since 1996, when he was accompanied by the former
South African president Nelson Mandela.Greengrocer Derek Chong, who has run a stall on Electric Avenue
for 20 years, said Camilla had been ""nice and pleasant"" when she purchased the fruit.
""She asked me what was nice, what would I recommend, and I said we've got some nice mangoes.
She asked me were they ripe and I said yes - they're from the Dominican Republic.""
Mr Chong is one of 170 local retailers who accept the Brixton Pound.
Customers exchange traditional pound coins for Brixton Pounds and then spend them at the market
or in participating shops.
During the visit, Prince Charles spent time talking to youth worker Marcus West, who works with children
nearby on an estate off Coldharbour Lane. Mr West said:
""He's on the level, really down-to-earth. They were very cheery. The prince is a lovely man.""
He added: ""I told him I was working with young kids and he said, 'Keep up all the good work.'""
Prince Charles also visited the Railway Hotel, at the invitation of his charity The Prince's Regeneration Trust.
The trust hopes to restore and refurbish the building,
where once Jimi Hendrix and The Clash played, as a new community and business centre."
""",
"""
"The problem is affecting people using the older versions of the PlayStation 3, called the ""Fat"" model. The
problem isn't affecting the newer PS3 Slim systems that have been on sale since September last year. Sony have
also said they are aiming to have the problem fixed shortly but is advising some users to avoid using their
console for the time being.""We hope to resolve this problem within the next 24 hours,"" a statement reads.
""In the meantime, if you have a model other than the new slim PS3, we advise that you do not use your PS3
system, as doing so may result in errors in some functionality, such as recording obtained trophies, and not
being able to restore certain data.""We believe we have identified that this problem is being caused by a bug
in the clock functionality incorporated in the system.""The PlayStation Network is used by millions of people
around the world.It allows users to play their friends at games like Fifa over the internet and also do things
like download software or visit online stores.",Sony has told owners of older models of its PlayStation 3
console to stop using the machine because of a problem with the PlayStation Network.
""",
],
batch_size=4,
)
predictions = trainer.predict(model, datamodule=datamodule)
print(predictions)
# 5. Save the model!
trainer.save_checkpoint("summarization_model_xsum.pt")
To learn how to view the available backbones / heads for this task, see Backbones and Heads.
Flash Zero
The summarization task can be used directly from the command line with zero code using Flash Zero. You can run the above example with:
flash summarization
To view configuration options and options for running the summarization task with your own data, use:
flash summarization --help
Serving
The SummarizationTask is servable.
This means you can call .serve to serve your Task.
Here’s an example:
from flash.text import SummarizationTask
model = SummarizationTask.load_from_checkpoint(
"https://flash-weights.s3.amazonaws.com/0.7.0/summarization_model_xsum.pt"
)
model.serve()
You can now perform inference from your client like this:
import requests
text = """
Camilla bought a box of mangoes with a Brixton £10 note, introduced last year to try to keep the money of local
people within the community.The couple were surrounded by shoppers as they walked along Electric Avenue.
They came to Brixton to see work which has started to revitalise the borough.
It was Charles' first visit to the area since 1996, when he was accompanied by the former
South African president Nelson Mandela.Greengrocer Derek Chong, who has run a stall on Electric Avenue
for 20 years, said Camilla had been ""nice and pleasant"" when she purchased the fruit.
""She asked me what was nice, what would I recommend, and I said we've got some nice mangoes.
She asked me were they ripe and I said yes - they're from the Dominican Republic.""
Mr Chong is one of 170 local retailers who accept the Brixton Pound.
Customers exchange traditional pound coins for Brixton Pounds and then spend them at the market
or in participating shops.
During the visit, Prince Charles spent time talking to youth worker Marcus West, who works with children
nearby on an estate off Coldharbour Lane. Mr West said:
""He's on the level, really down-to-earth. They were very cheery. The prince is a lovely man.""
He added: ""I told him I was working with young kids and he said, 'Keep up all the good work.'""
Prince Charles also visited the Railway Hotel, at the invitation of his charity The Prince's Regeneration Trust.
The trust hopes to restore and refurbish the building,
where once Jimi Hendrix and The Clash played, as a new community and business centre."
"""
body = {"session": "UUID", "payload": {"inputs": {"data": text}}}
resp = requests.post("http://127.0.0.1:8000/predict", json=body)
print(resp.json())
Accelerate Training & Inference with Torch ORT
Torch ORT converts your model into an optimized ONNX graph, speeding up training & inference when using NVIDIA or AMD GPUs. Enabling Torch ORT requires a single flag passed to the SummarizationTask once installed. See installation instructions here.
Note
Not all Transformer models are supported. See this table for supported models + branches containing fixes for certain models.
...
model = SummarizationTask(backbone="t5-large", num_classes=datamodule.num_classes, enable_ort=True)
Translation
The Task
Translation is the task of translating text from a source language to another, such as English to Romanian. This task is a subset of Sequence to Sequence tasks, which requires the model to generate a variable length sequence given an input sequence. In our case, the task will take an English sequence as input, and output the same sequence in Romanian.
Example
Let’s look at an example.
We’ll use WMT16 English/Romanian, a dataset of English to Romanian samples, based on the Europarl corpora.
The data set contains a train.csv and valid.csv.
Each CSV file looks like this:
input,target
"Written statements and oral questions (tabling): see Minutes","Declaraţii scrise şi întrebări orale (depunere): consultaţi procesul-verbal"
"Closure of sitting","Ridicarea şedinţei"
...
In the above the input/target columns represent the English and Romanian translation respectively.
Once we’ve downloaded the data using download_data(), we create the TranslationData.
We select a pre-trained backbone to use for our TranslationTask and finetune on the WMT16 data.
The backbone can be any Seq2Seq translation model from HuggingFace/transformers.
Note
When changing the backbone, make sure you pass in the same backbone to the TranslationData and the TranslationTask!
Next, we use the trained TranslationTask for inference.
Finally, we save the model.
Here’s the full example:
import torch
import flash
from flash.core.data.utils import download_data
from flash.text import TranslationData, TranslationTask
# 1. Create the DataModule
download_data("https://pl-flash-data.s3.amazonaws.com/wmt_en_ro.zip", "./data")
datamodule = TranslationData.from_csv(
"input",
"target",
train_file="data/wmt_en_ro/train.csv",
val_file="data/wmt_en_ro/valid.csv",
batch_size=4,
)
# 2. Build the task
model = TranslationTask(backbone="Helsinki-NLP/opus-mt-en-ro")
# 3. Create the trainer and finetune the model
trainer = flash.Trainer(max_epochs=3, gpus=torch.cuda.device_count())
trainer.finetune(model, datamodule=datamodule, strategy="freeze")
# 4. Translate something!
datamodule = TranslationData.from_lists(
predict_data=[
"BBC News went to meet one of the project's first graduates.",
"A recession has come as quickly as 11 months after the first rate hike and as long as 86 months.",
"Of course, it's still early in the election cycle.",
],
batch_size=4,
)
predictions = trainer.predict(model, datamodule=datamodule)
print(predictions)
# 5. Save the model!
trainer.save_checkpoint("translation_model_en_ro.pt")
To learn how to view the available backbones / heads for this task, see Backbones and Heads.
Flash Zero
The translation task can be used directly from the command line with zero code using Flash Zero. You can run the above example with:
flash translation
To view configuration options and options for running the translation task with your own data, use:
flash translation --help
Serving
The TranslationTask is servable.
This means you can call .serve to serve your Task.
Here’s an example:
from flash.text import TranslationTask
model = TranslationTask.load_from_checkpoint("https://flash-weights.s3.amazonaws.com/0.7.0/translation_model_en_ro.pt")
model.serve()
You can now perform inference from your client like this:
import requests
text = "Some English text"
body = {"session": "UUID", "payload": {"inputs": {"data": text}}}
resp = requests.post("http://127.0.0.1:8000/predict", json=body)
print(resp.json())
Accelerate Training & Inference with Torch ORT
Torch ORT converts your model into an optimized ONNX graph, speeding up training & inference when using NVIDIA or AMD GPUs. Enabling Torch ORT requires a single flag passed to the TranslationTask once installed. See installation instructions here.
Note
Not all Transformer models are supported. See this table for supported models + branches containing fixes for certain models.
...
model = TranslationTask(backbone="t5-large", num_classes=datamodule.num_classes, enable_ort=True)
Text Embedder
The Task
This task consists of creating a Sentence Embedding. That is, a vector of sentence representations which can be used for a downstream task.
The TextEmbedder implementation relies on components from sentence-transformers.
Example
Let’s look at an example of generating sentence embeddings.
We start by loading some sentences for prediction with the TextClassificationData class.
Next, we create our TextEmbedder with a pretrained backbone from the HuggingFace hub.
Finally, we create a Trainer and generate sentence embeddings.
Here’s the full example:
import torch
import flash
from flash.text import TextClassificationData, TextEmbedder
# 1. Create the DataModule
datamodule = TextClassificationData.from_lists(
predict_data=[
"Turgid dialogue, feeble characterization - Harvey Keitel a judge?.",
"The worst movie in the history of cinema.",
"I come from Bulgaria where it 's almost impossible to have a tornado.",
],
batch_size=4,
)
# 2. Load a previously trained TextEmbedder
model = TextEmbedder(backbone="sentence-transformers/all-MiniLM-L6-v2")
# 3. Generate embeddings for the first 3 graphs
trainer = flash.Trainer(gpus=torch.cuda.device_count())
predictions = trainer.predict(model, datamodule=datamodule)
print(predictions)
To learn how to view the available backbones / heads for this task, see Backbones and Heads.
Point Cloud Segmentation
The Task
A Point Cloud is a set of data points in space, usually describes by x, y and z coordinates.
PointCloud Segmentation is the task of performing classification at a point-level, meaning each point will associated to a given class. The current integration builds on top Open3D-ML.
Example
Let’s look at an example using a data set generated from the KITTI Vision Benchmark.
The data are a tiny subset of the original dataset and contains sequences of point clouds.
The data contains multiple folder, one for each sequence and a meta.yaml file describing the classes and their official associated color map.
A sequence should contain one folder for scans and one folder for labels, plus a pose.txt to re-align the sequence if required.
Here’s the structure:
data
├── meta.yaml
├── 00
│ ├── scans
| | ├── 00000.bin
| | ├── 00001.bin
| | ...
│ ├── labels
| | ├── 00000.label
| | ├── 00001.label
| | ...
| ├── pose.txt
│ ...
|
└── XX
├── scans
| ├── 00000.bin
| ├── 00001.bin
| ...
├── labels
| ├── 00000.label
| ├── 00001.label
| ...
├── pose.txt
Learn more: http://www.semantic-kitti.org/dataset.html
Once we’ve downloaded the data using download_data(), we create the PointCloudSegmentationData.
We select a pre-trained randlanet_semantic_kitti backbone for our PointCloudSegmentation task.
We then use the trained PointCloudSegmentation for inference.
Finally, we save the model.
Here’s the full example:
import torch
import flash
from flash.core.data.utils import download_data
from flash.pointcloud import PointCloudSegmentation, PointCloudSegmentationData
# 1. Create the DataModule
# Dataset Credit: http://www.semantic-kitti.org/
download_data("https://pl-flash-data.s3.amazonaws.com/SemanticKittiTiny.zip", "data/")
datamodule = PointCloudSegmentationData.from_folders(
train_folder="data/SemanticKittiTiny/train",
val_folder="data/SemanticKittiTiny/val",
batch_size=4,
)
# 2. Build the task
model = PointCloudSegmentation(backbone="randlanet_semantic_kitti", num_classes=datamodule.num_classes)
# 3. Create the trainer and finetune the model
trainer = flash.Trainer(
max_epochs=1, limit_train_batches=1, limit_val_batches=1, num_sanity_val_steps=0, gpus=torch.cuda.device_count()
)
trainer.fit(model, datamodule)
# 4. Predict what's within a few PointClouds?
datamodule = PointCloudSegmentationData.from_files(
predict_files=[
"data/SemanticKittiTiny/predict/000000.bin",
"data/SemanticKittiTiny/predict/000001.bin",
],
batch_size=4,
)
predictions = trainer.predict(model, datamodule=datamodule)
print(predictions)
# 5. Save the model!
trainer.save_checkpoint("pointcloud_segmentation_model.pt")
To learn how to view the available backbones / heads for this task, see Backbones and Heads.
Flash Zero
The point cloud segmentation task can be used directly from the command line with zero code using Flash Zero. You can run the above example with:
flash pointcloud_segmentation
To view configuration options and options for running the point cloud segmentation task with your own data, use:
flash pointcloud_segmentation --help
Point Cloud Object Detection
The Task
A Point Cloud is a set of data points in space, usually describes by x, y and z coordinates.
PointCloud Object Detection is the task of identifying 3D objects in point clouds and their associated classes and 3D bounding boxes.
The current integration builds on top Open3D-ML.
Example
Let’s look at an example using a data set generated from the KITTI Vision Benchmark. The data are a tiny subset of the original dataset and contains sequences of point clouds.
- The data contains:
one folder for scans
one folder for scan calibrations
one folder for labels
a meta.yaml file describing the classes and their official associated color map.
Here’s the structure:
data
├── meta.yaml
├── train
│ ├── scans
| | ├── 00000.bin
| | ├── 00001.bin
| | ...
│ ├── calibs
| | ├── 00000.txt
| | ├── 00001.txt
| | ...
│ ├── labels
| | ├── 00000.txt
| | ├── 00001.txt
│ ...
├── val
│ ...
├── predict
├── scans
| ├── 00000.bin
| ├── 00001.bin
|
├── calibs
| ├── 00000.txt
| ├── 00001.txt
├── meta.yaml
Learn more: http://www.semantic-kitti.org/dataset.html
Once we’ve downloaded the data using download_data(), we create the PointCloudObjectDetectorData.
We select a pre-trained randlanet_semantic_kitti backbone for our PointCloudObjectDetector task.
We then use the trained PointCloudObjectDetector for inference.
Finally, we save the model.
Here’s the full example:
import torch
import flash
from flash.core.data.utils import download_data
from flash.pointcloud import PointCloudObjectDetector, PointCloudObjectDetectorData
# 1. Create the DataModule
# Dataset Credit: http://www.semantic-kitti.org/
download_data("https://pl-flash-data.s3.amazonaws.com/KITTI_tiny.zip", "data/")
datamodule = PointCloudObjectDetectorData.from_folders(
train_folder="data/KITTI_Tiny/Kitti/train",
val_folder="data/KITTI_Tiny/Kitti/val",
batch_size=4,
)
# 2. Build the task
model = PointCloudObjectDetector(backbone="pointpillars_kitti", num_classes=datamodule.num_classes)
# 3. Create the trainer and finetune the model
trainer = flash.Trainer(
max_epochs=1, limit_train_batches=1, limit_val_batches=1, num_sanity_val_steps=0, gpus=torch.cuda.device_count()
)
trainer.fit(model, datamodule)
# 4. Predict what's within a few PointClouds?
datamodule = PointCloudObjectDetectorData.from_files(
predict_files=[
"data/KITTI_Tiny/Kitti/predict/scans/000000.bin",
"data/KITTI_Tiny/Kitti/predict/scans/000001.bin",
],
batch_size=4,
)
predictions = trainer.predict(model, datamodule=datamodule)
print(predictions)
# 5. Save the model!
trainer.save_checkpoint("pointcloud_detection_model.pt")
To learn how to view the available backbones / heads for this task, see Backbones and Heads.
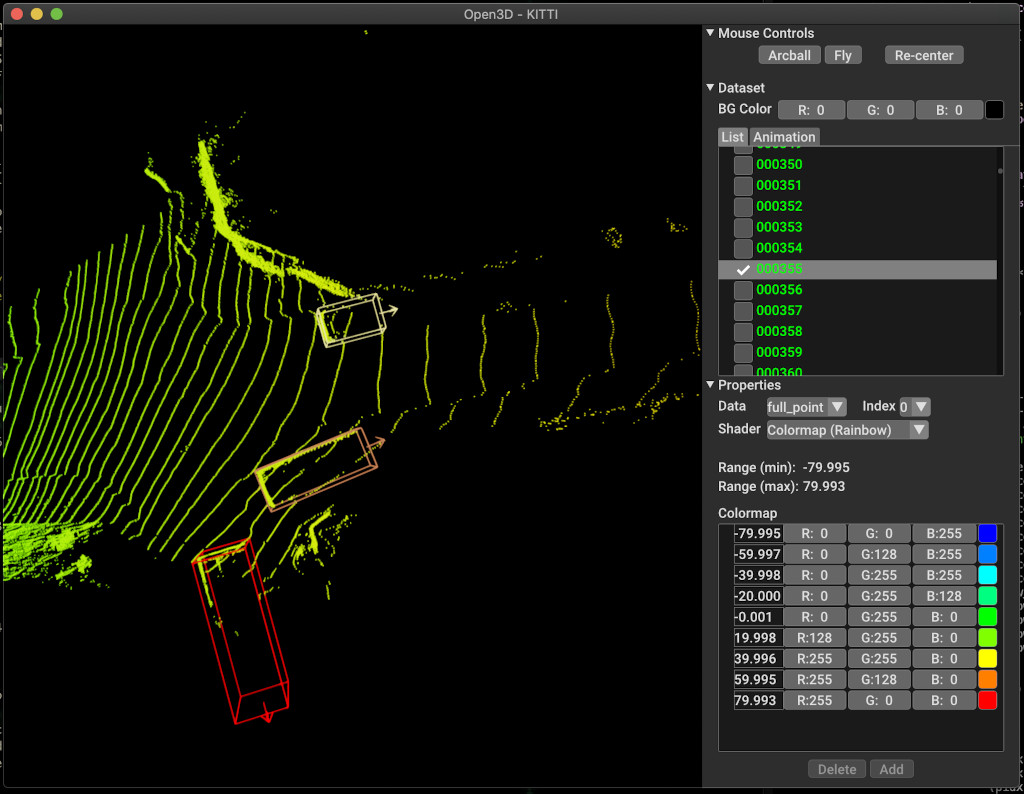
Flash Zero
The point cloud object detector can be used directly from the command line with zero code using Flash Zero. You can run the above example with:
flash pointcloud_detection
To view configuration options and options for running the point cloud object detector with your own data, use:
flash pointcloud_detection --help
Graph Classification
The Task
This task consist on classifying graphs. The task predicts which ‘class’ the graph belongs to. A class is a label that indicates the kind of graph. For example, a label may indicate whether one molecule interacts with another.
The GraphClassifier and GraphClassificationData classes internally rely on pytorch-geometric.
Example
Let’s look at the task of classifying graphs from the KKI data set from TU Dortmund University.
Once we’ve created the TUDataset, we create the GraphClassificationData.
We then create our GraphClassifier and train on the KKI data.
Next, we use the trained GraphClassifier for inference.
Finally, we save the model.
Here’s the full example:
import torch
import flash
from flash.core.utilities.imports import example_requires
from flash.graph import GraphClassificationData, GraphClassifier
example_requires("graph")
from torch_geometric.datasets import TUDataset # noqa: E402
# 1. Create the DataModule
dataset = TUDataset(root="data", name="KKI")
datamodule = GraphClassificationData.from_datasets(
train_dataset=dataset,
val_split=0.1,
batch_size=4,
)
# 2. Build the task
backbone_kwargs = {"hidden_channels": 512, "num_layers": 4}
model = GraphClassifier(
num_features=datamodule.num_features, num_classes=datamodule.num_classes, backbone_kwargs=backbone_kwargs
)
# 3. Create the trainer and fit the model
trainer = flash.Trainer(max_epochs=3, gpus=torch.cuda.device_count())
trainer.fit(model, datamodule=datamodule)
# 4. Classify some graphs!
datamodule = GraphClassificationData.from_datasets(
predict_dataset=dataset[:3],
batch_size=4,
)
predictions = trainer.predict(model, datamodule=datamodule, output="classes")
print(predictions)
# 5. Save the model!
trainer.save_checkpoint("graph_classification_model.pt")
To learn how to view the available backbones / heads for this task, see Backbones and Heads.
Flash Zero
The graph classifier can be used directly from the command line with zero code using Flash Zero. You can run the above example with:
flash graph_classification
To view configuration options and options for running the graph classifier with your own data, use:
flash graph_classification --help
Graph Embedder
The Task
This task consists of creating an embedding of a graph. That is, a vector of features which can be used for a downstream task.
The GraphEmbedder and GraphClassificationData classes internally rely on pytorch-geometric.
Example
Let’s look at generating embeddings of graphs from the KKI data set from TU Dortmund University.
We start by creating the TUDataset <https://pytorch-geometric.readthedocs.io/en/latest/_modules/torch_geometric/datasets/tu_dataset.html#TUDataset>.
Next, we load a trained GraphEmbedder (from a previously trained GraphClassifier).
Finally, we save the model.
Here’s the full example:
import torch
To learn how to view the available backbones / heads for this task, see Backbones and Heads.
Providers
Flash is a framework integrator. We rely on many open source frameworks for our tasks, visualizations and backbones. Here’s a list of some of the providers we use for backbones and heads within Flash (check them out and star their repos to spread the open source love!):
airctic/IceVision (https://github.com/airctic/icevision)
Facebook Research/dino (https://github.com/facebookresearch/dino)
Facebook Research/PyTorchVideo (https://github.com/facebookresearch/pytorchvideo)
Facebook Research/vissl (https://github.com/facebookresearch/vissl)
Hugging Face/transformers (https://github.com/huggingface/transformers)
Intelligent Systems Lab Org/Open3D-ML (https://github.com/isl-org/Open3D-ML)
jdb78/PyTorch-Forecasting (https://github.com/jdb78/pytorch-forecasting)
learnables/learn2learn (https://github.com/learnables/learn2learn)
manujosephv/PyTorch Tabular (https://github.com/manujosephv/pytorch_tabular)
OpenMMLab/MMDetection (https://github.com/open-mmlab/mmdetection)
PyG/PyTorch Geometric (https://github.com/pyg-team/pytorch_geometric)
pystiche/pystiche (https://github.com/pystiche/pystiche)
PyTorch/fairseq (https://github.com/pytorch/fairseq)
PyTorch/torchvision (https://github.com/pytorch/vision)
qubvel/segmentation_models.pytorch (https://github.com/qubvel/segmentation_models.pytorch)
rwightman/efficientdet-pytorch (https://github.com/rwightman/efficientdet-pytorch)
rwightman/pytorch-image-models (https://github.com/rwightman/pytorch-image-models)
UKPLab/sentence-transformers (https://github.com/UKPLab/sentence-transformers)
Ultralytics/YOLOV5 (https://github.com/ultralytics/yolov5)
voxel51/fiftyone (https://github.com/voxel51/fiftyone)
You can also read our guides for some of our larger integrations:
BaaL
The framework Bayesian Active Learning (BaaL) is an active learning library developed at ElementAI.
Active Learning is a sub-field in AI, focusing on adding a human in the learning loop. The most uncertain samples will be labelled by the human to accelerate the model training cycle.

Credit to ElementAI / Baal Team for creating this diagram flow
With its integration within Flash, the Active Learning process is simpler than ever before.
import torch
import flash
from flash.core.data.utils import download_data
from flash.image import ImageClassificationData, ImageClassifier
from flash.image.classification.integrations.baal import ActiveLearningDataModule, ActiveLearningLoop
# 1. Create the DataModule
download_data("https://pl-flash-data.s3.amazonaws.com/hymenoptera_data.zip", "./data")
# Implement the research use-case where we mask labels from labelled dataset.
datamodule = ActiveLearningDataModule(
ImageClassificationData.from_folders(train_folder="data/hymenoptera_data/train/", batch_size=2),
initial_num_labels=10,
)
# 2. Build the task
head = torch.nn.Sequential(
torch.nn.Dropout(p=0.1),
torch.nn.Linear(512, datamodule.num_classes),
)
model = ImageClassifier(backbone="resnet18", head=head, num_classes=datamodule.num_classes)
# 3.1 Create the trainer
trainer = flash.Trainer(max_epochs=3)
# 3.2 Create the active learning loop and connect it to the trainer
active_learning_loop = ActiveLearningLoop(label_epoch_frequency=1)
active_learning_loop.connect(trainer.fit_loop)
trainer.fit_loop = active_learning_loop
# 3.3 Finetune
trainer.finetune(model, datamodule=datamodule, strategy="freeze")
# 4. Predict what's on a few images! ants or bees?
datamodule = ImageClassificationData.from_files(
predict_files=["data/hymenoptera_data/val/bees/65038344_52a45d090d.jpg"],
batch_size=1,
)
predictions = trainer.predict(model, datamodule=datamodule, output="probabilities")
print(predictions)
# 5. Save the model!
trainer.save_checkpoint("image_classification_model.pt")
FiftyOne
We have collaborated with the team at Voxel51 to integrate their tool, FiftyOne, into Lightning Flash.
FiftyOne is an open-source tool for building high-quality datasets and computer vision models. The FiftyOne API and App enable you to visualize datasets and interpret models faster and more effectively.
This integration allows you to view predictions generated by your tasks in the FiftyOne App, as well as easily incorporate FiftyOne Datasets into your tasks. All image and video tasks are supported!
Installation
In order to utilize this integration, you will need to install FiftyOne:
pip install fiftyone
Visualizing Flash predictions
This section shows you how to augment your existing Lightning Flash workflows with a couple of lines of code that let you visualize predictions in FiftyOne. You can visualize predictions for classification, object detection, and semantic segmentation tasks. Doing so is as easy as updating your model to use one of the following outputs:
The visualize() function then lets you visualize
your predictions in the
FiftyOne App. This function accepts a list of
dictionaries containing FiftyOne Label objects
and filepaths, which is exactly the output of the FiftyOne outputs when the
return_filepath=True option is specified.
import torch
import flash
from flash.core.data.utils import download_data
from flash.core.integrations.fiftyone import visualize
from flash.image import ImageClassificationData, ImageClassifier
# 1 Download data
download_data("https://pl-flash-data.s3.amazonaws.com/hymenoptera_data.zip")
# 2 Load data
datamodule = ImageClassificationData.from_folders(
train_folder="data/hymenoptera_data/train/",
val_folder="data/hymenoptera_data/val/",
test_folder="data/hymenoptera_data/test/",
predict_folder="data/hymenoptera_data/predict/",
batch_size=16,
)
# 3 Fine tune a model
model = ImageClassifier(
backbone="resnet18",
labels=datamodule.labels,
)
trainer = flash.Trainer(
max_epochs=1,
gpus=torch.cuda.device_count(),
fast_dev_run=True,
)
trainer.finetune(
model,
datamodule=datamodule,
strategy=("freeze_unfreeze", 1),
)
trainer.save_checkpoint("image_classification_model.pt")
# 4 Predict from checkpoint
model = ImageClassifier.load_from_checkpoint("image_classification_model.pt")
predictions = trainer.predict(model, datamodule=datamodule, output="fiftyone") # output FiftyOne format
# 5 Visualize predictions in FiftyOne App
# Optional: pass `wait=True` to block execution until App is closed
session = visualize(predictions, wait=True)
The visualize() function can be used in
all of the following environments:
Local Python shell: The App will launch in a new tab in your default web browser
Remote Python shell: Pass the
remote=Trueoption and then follow the instructions printed to your remote shell to open the App in your browser on your local machineJupyter notebook: The App will launch in the output of your current cell
Google Colab: The App will launch in the output of your current cell
Python script: Pass the
wait=Trueoption to block execution of your script until the App is closed
See this page for more information about using the FiftyOne App in different environments.
Using FiftyOne datasets
The above workflow is great for visualizing model predictions. However, if you store your data in a FiftyOne Dataset initially, then you can also visualize ground truth annotations. This allows you to perform more complex analysis with views into your data and evaluation of your model results.
The
from_fiftyone()
method allows you to load your FiftyOne datasets directly into a
DataModule to be used for training,
testing, or inference.
from itertools import chain
import fiftyone as fo
import torch
import flash
from flash.core.classification import FiftyOneLabelsOutput
from flash.core.data.utils import download_data
from flash.image import ImageClassificationData, ImageClassifier
# 1 Download data
download_data("https://pl-flash-data.s3.amazonaws.com/hymenoptera_data.zip")
# 2 Load data into FiftyOne
train_dataset = fo.Dataset.from_dir(
dataset_dir="data/hymenoptera_data/train/",
dataset_type=fo.types.ImageClassificationDirectoryTree,
)
val_dataset = fo.Dataset.from_dir(
dataset_dir="data/hymenoptera_data/val/",
dataset_type=fo.types.ImageClassificationDirectoryTree,
)
test_dataset = fo.Dataset.from_dir(
dataset_dir="data/hymenoptera_data/test/",
dataset_type=fo.types.ImageClassificationDirectoryTree,
)
# 3 Load data into Flash
datamodule = ImageClassificationData.from_fiftyone(
train_dataset=train_dataset,
val_dataset=val_dataset,
test_dataset=test_dataset,
batch_size=4,
)
# 4 Fine tune model
model = ImageClassifier(
backbone="resnet18",
labels=datamodule.labels,
)
trainer = flash.Trainer(
max_epochs=1,
gpus=torch.cuda.device_count(),
limit_train_batches=1,
limit_val_batches=1,
)
trainer.finetune(
model,
datamodule=datamodule,
strategy=("freeze_unfreeze", 1),
)
trainer.save_checkpoint("image_classification_model.pt")
# 5 Predict from checkpoint on data with ground truth
model = ImageClassifier.load_from_checkpoint("image_classification_model.pt")
datamodule = ImageClassificationData.from_fiftyone(predict_dataset=test_dataset, batch_size=4)
predictions = trainer.predict(
model, datamodule=datamodule, output=FiftyOneLabelsOutput(model.labels, return_filepath=False)
) # output FiftyOne format
predictions = list(chain.from_iterable(predictions))
# 6 Add predictions to dataset
test_dataset.set_values("predictions", predictions)
# 7 Evaluate your model
results = test_dataset.evaluate_classifications("predictions", gt_field="ground_truth", eval_key="eval")
results.print_report()
plot = results.plot_confusion_matrix()
plot.show()
# 8 Visualize results in the App
session = fo.launch_app(test_dataset)
# Optional: block execution until App is closed
session.wait()
Visualizing embeddings
FiftyOne provides the methods for dimensionality reduction and interactive plotting. When combined with embedding tasks in Flash, you can accomplish powerful workflows like clustering, similarity search, pre-annotation, and more in only a few lines of code.
import fiftyone as fo
import fiftyone.brain as fob
import numpy as np
from flash.core.data.utils import download_data
from flash.image import ImageEmbedder
# 1 Download data
download_data("https://pl-flash-data.s3.amazonaws.com/hymenoptera_data.zip")
# 2 Load data into FiftyOne
dataset = fo.Dataset.from_dir(
"data/hymenoptera_data/test/",
fo.types.ImageClassificationDirectoryTree,
)
# 3 Load model
embedder = ImageEmbedder(backbone="resnet101")
# 4 Generate embeddings
filepaths = dataset.values("filepath")
embeddings = np.stack(embedder.predict(filepaths))
# 5 Visualize in FiftyOne App
results = fob.compute_visualization(dataset, embeddings=embeddings)
session = fo.launch_app(dataset)
plot = results.visualize(labels="ground_truth.label")
plot.show()
# Optional: block execution until App is closed
session.wait()
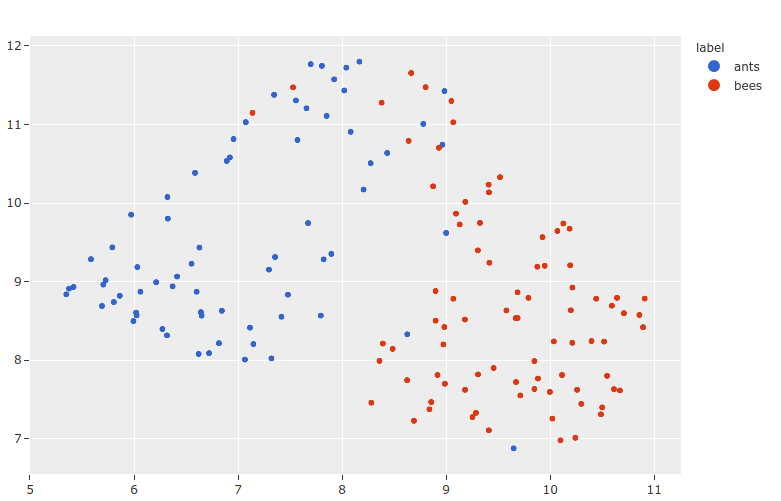
IceVision
IceVision from airctic is an awesome computer vision framework which offers a curated collection of hundreds of high-quality pre-trained models for: object detection, keypoint detection, and instance segmentation. In Flash, we’ve integrated the IceVision framework to provide: data loading, augmentation, backbones, and heads. We use IceVision components in our: object detection, instance segmentation, and keypoint detection tasks. Take a look at their documentation and star IceVision on GitHub to spread the open source love!
IceData
The IceData library is a community driven dataset hub for IceVision.
All of the datasets in IceData can be used out of the box with flash using our .from_folders methods and the parser argument.
Take a look at our Keypoint Detection page for an example.
Albumentations with IceVision and Flash
IceVision provides two utilities for using the albumentations library with their models:
- the Adapter helper class for adapting an any albumentations transform to work with IceVision records,
- the aug_tfms utility function that returns a standard augmentation recipe to get the most out of your model.
In Flash, we use the aug_tfms as default transforms for the: object detection, instance segmentation, and keypoint detection tasks.
You can also provide custom transforms from albumentations using the IceVisionTransformAdapter (which relies on the IceVision Adapter underneath).
Here’s an example:
import albumentations as A
from flash.core.integrations.icevision.transforms import IceVisionTransformAdapter
from flash.image import ObjectDetectionData
train_transform = {
"per_sample_transform": IceVisionTransformAdapter([A.HorizontalFlip(), A.Normalize()]),
}
datamodule = ObjectDetectionData.from_coco(
...,
train_transform=train_transform,
)
Learn2Learn
Learn2Learn is a software library for meta-learning research by Sébastien M. R. Arnold and al. (Aug 2020)

What is Meta-Learning and why you should care?
Humans can distinguish between new objects with little or no training data, However, machine learning models often require thousands, millions, billions of annotated data samples to achieve good performance while extrapolating their learned knowledge on unseen objects.
A machine learning model which could learn or learn to learn from only few new samples (K-shot learning) would have tremendous applications once deployed in production. In an extreme case, a model performing 1-shot or 0-shot learning could be the source of new kind of AI applications.
Meta-Learning is a sub-field of AI dedicated to the study of few-shot learning algorithms. This is often characterized as teaching deep learning models to learn with only a few labeled data. The goal is to repeatedly learn from K-shot examples during training that match the structure of the final K-shot used in production. It is important to note that the K-shot example seen in production are very likely to be completely out-of-distribution with new objects.
How does Meta-Learning work?
In meta-learning, the model is trained over multiple meta tasks. A meta task is the smallest unit of data and it represents the data available to the model once in its deployment environment. By doing so, we can optimise the model and get higher results.
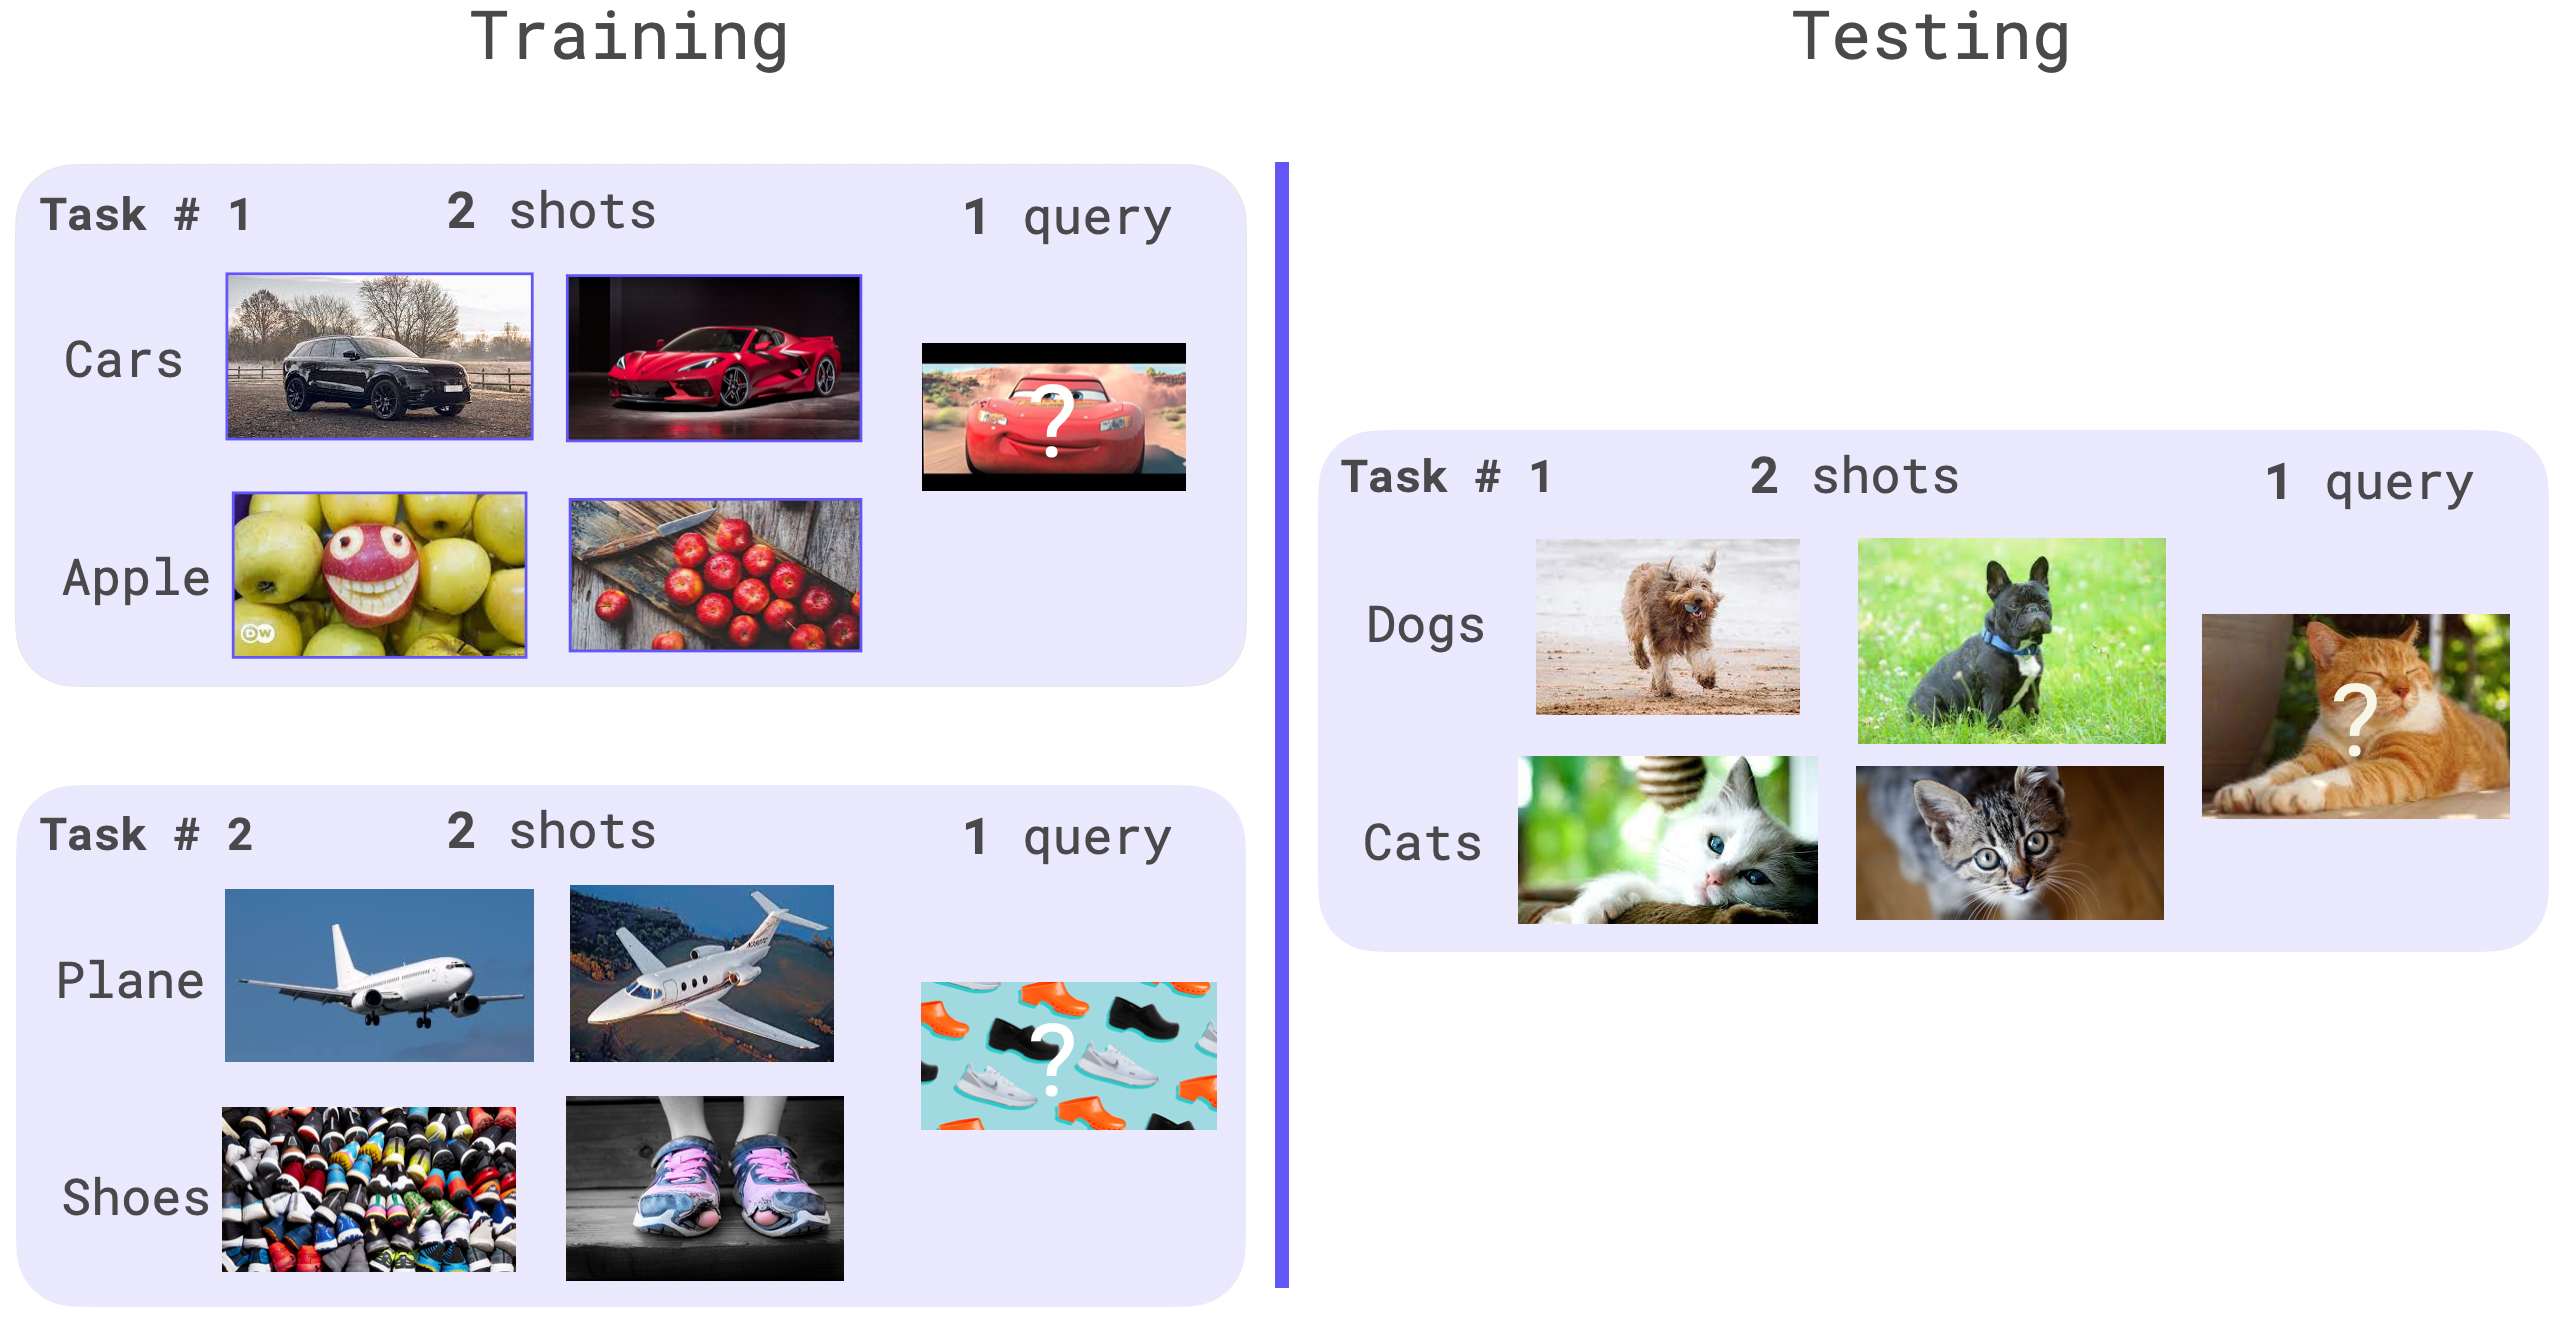
For image classification, a meta task is comprised of shot + query elements for each class. The shots samples are used to adapt the parameters and the queries ones to update the original model weights. The classes used in the validation and testing shouldn’t be present within the training dataset, as the goal is to optimise the model performance on out-of-distribution (OOD) data with little label data.
When training the model with the meta-learning algorithm, the model will average its gradients over meta_batch_size meta tasks before performing an optimizer step. Traditionally, an meta epoch is composed of multiple meta batch.
Use Meta-Learning with Flash
With its integration within Flash, Meta Learning has never been simpler. Flash takes care of all the hard work: the tasks sampling, meta optimizer update, distributed training, etc…
Note
The users requires to provide a training dataset and testing dataset with no overlapping classes. Flash doesn’t support this feature out-of-the box.
Once done, the users are left to play the hyper-parameters associated with the meta-learning algorithm.
Here is an example using miniImageNet dataset containing 100 classes divided into 64 training, 16 validation, and 20 test classes.
# adapted from https://github.com/learnables/learn2learn/blob/master/examples/vision/protonet_miniimagenet.py#L154
import warnings
import kornia.augmentation as Ka
import kornia.geometry as Kg
import learn2learn as l2l
import torch
import torchvision
from torch import nn
import flash
from flash.core.data.io.input import DataKeys
from flash.core.data.transforms import ApplyToKeys, kornia_collate
from flash.image import ImageClassificationData, ImageClassifier
warnings.simplefilter("ignore")
# download MiniImagenet
train_dataset = l2l.vision.datasets.MiniImagenet(root="data", mode="train", download=True)
val_dataset = l2l.vision.datasets.MiniImagenet(root="data", mode="validation", download=True)
train_transform = {
"per_sample_transform": nn.Sequential(
ApplyToKeys(
DataKeys.INPUT,
nn.Sequential(
torchvision.transforms.ToTensor(),
Kg.Resize((196, 196)),
# SPATIAL
Ka.RandomHorizontalFlip(p=0.25),
Ka.RandomRotation(degrees=90.0, p=0.25),
Ka.RandomAffine(degrees=1 * 5.0, shear=1 / 5, translate=1 / 20, p=0.25),
Ka.RandomPerspective(distortion_scale=1 / 25, p=0.25),
# PIXEL-LEVEL
Ka.ColorJitter(brightness=1 / 30, p=0.25), # brightness
Ka.ColorJitter(saturation=1 / 30, p=0.25), # saturation
Ka.ColorJitter(contrast=1 / 30, p=0.25), # contrast
Ka.ColorJitter(hue=1 / 30, p=0.25), # hue
Ka.RandomMotionBlur(kernel_size=2 * (4 // 3) + 1, angle=1, direction=1.0, p=0.25),
Ka.RandomErasing(scale=(1 / 100, 1 / 50), ratio=(1 / 20, 1), p=0.25),
),
),
ApplyToKeys(DataKeys.TARGET, torch.as_tensor),
),
"collate": kornia_collate,
"per_batch_transform_on_device": ApplyToKeys(
DataKeys.INPUT,
Ka.RandomHorizontalFlip(p=0.25),
),
}
# construct datamodule
datamodule = ImageClassificationData.from_tensors(
train_data=train_dataset.x,
train_targets=torch.from_numpy(train_dataset.y.astype(int)),
val_data=val_dataset.x,
val_targets=torch.from_numpy(val_dataset.y.astype(int)),
train_transform=train_transform,
)
model = ImageClassifier(
backbone="resnet18",
training_strategy="prototypicalnetworks",
training_strategy_kwargs={
"epoch_length": 10 * 16,
"meta_batch_size": 4,
"num_tasks": 200,
"test_num_tasks": 2000,
"ways": datamodule.num_classes,
"shots": 1,
"test_ways": 5,
"test_shots": 1,
"test_queries": 15,
},
optimizer=torch.optim.Adam,
learning_rate=0.001,
)
trainer = flash.Trainer(
max_epochs=200,
gpus=2,
accelerator="ddp_shared",
precision=16,
)
trainer.finetune(model, datamodule=datamodule, strategy="no_freeze")
You can read their paper Learn2Learn: A Library for Meta-Learning Research.
And don’t forget to cite Learn2Learn repository in your academic publications. Find their Biblex on their repository.
PyTorch Forecasting
PyTorch Forecasting provides the models and data loading for the Tabular Forecasting task in Flash.
As with all of our tasks, you won’t typically interact with the components from PyTorch Forecasting directly.
However, PyTorch Forecasting provides some built-in plotting and analysis methods that are different for each model which cannot be used directly with the TabularForecaster.
Instead, you can access the PyTorch Forecasting model object using the pytorch_forecasting_model attribute.
In addition, we provide the convert_predictions() utility to convert predictions from the Flash format into the expected format.
With these, you can train your model and perform inference using Flash but still make use of the plotting and analysis tools built in to PyTorch Forecasting.
Here’s an example, plotting the predictions and interpretation analysis from the NBeats model trained in the Tabular Forecasting documentation:
import torch
import flash
from flash.core.integrations.pytorch_forecasting import convert_predictions
from flash.core.utilities.imports import example_requires
from flash.tabular.forecasting import TabularForecaster, TabularForecastingData
example_requires(["tabular", "matplotlib"])
import matplotlib.pyplot as plt # noqa: E402
import pandas as pd # noqa: E402
from pytorch_forecasting.data import NaNLabelEncoder # noqa: E402
from pytorch_forecasting.data.examples import generate_ar_data # noqa: E402
# Example based on this tutorial: https://pytorch-forecasting.readthedocs.io/en/latest/tutorials/ar.html
# 1. Create the DataModule
data = generate_ar_data(seasonality=10.0, timesteps=400, n_series=100, seed=42)
data["date"] = pd.Timestamp("2020-01-01") + pd.to_timedelta(data.time_idx, "D")
max_prediction_length = 20
training_cutoff = data["time_idx"].max() - max_prediction_length
datamodule = TabularForecastingData.from_data_frame(
time_idx="time_idx",
target="value",
categorical_encoders={"series": NaNLabelEncoder().fit(data.series)},
group_ids=["series"],
# only unknown variable is "value" - and N-Beats can also not take any additional variables
time_varying_unknown_reals=["value"],
max_encoder_length=60,
max_prediction_length=max_prediction_length,
train_data_frame=data[lambda x: x.time_idx <= training_cutoff],
val_data_frame=data,
batch_size=32,
)
# 2. Build the task
model = TabularForecaster(
datamodule.parameters,
backbone="n_beats",
backbone_kwargs={"widths": [32, 512], "backcast_loss_ratio": 0.1},
)
# 3. Create the trainer and train the model
trainer = flash.Trainer(max_epochs=1, gpus=torch.cuda.device_count(), gradient_clip_val=0.01)
trainer.fit(model, datamodule=datamodule)
# 4. Generate predictions
datamodule = TabularForecastingData.from_data_frame(predict_data_frame=data, parameters=datamodule.parameters)
predictions = trainer.predict(model, datamodule=datamodule)
print(predictions)
# Plot with PyTorch Forecasting!
predictions, inputs = convert_predictions(predictions)
fig, axs = plt.subplots(2, 3, sharex="col")
for idx in range(3):
model.pytorch_forecasting_model.plot_interpretation(inputs, predictions, idx=idx, ax=[axs[0][idx], axs[1][idx]])
plt.show()
Here’s the visualization:
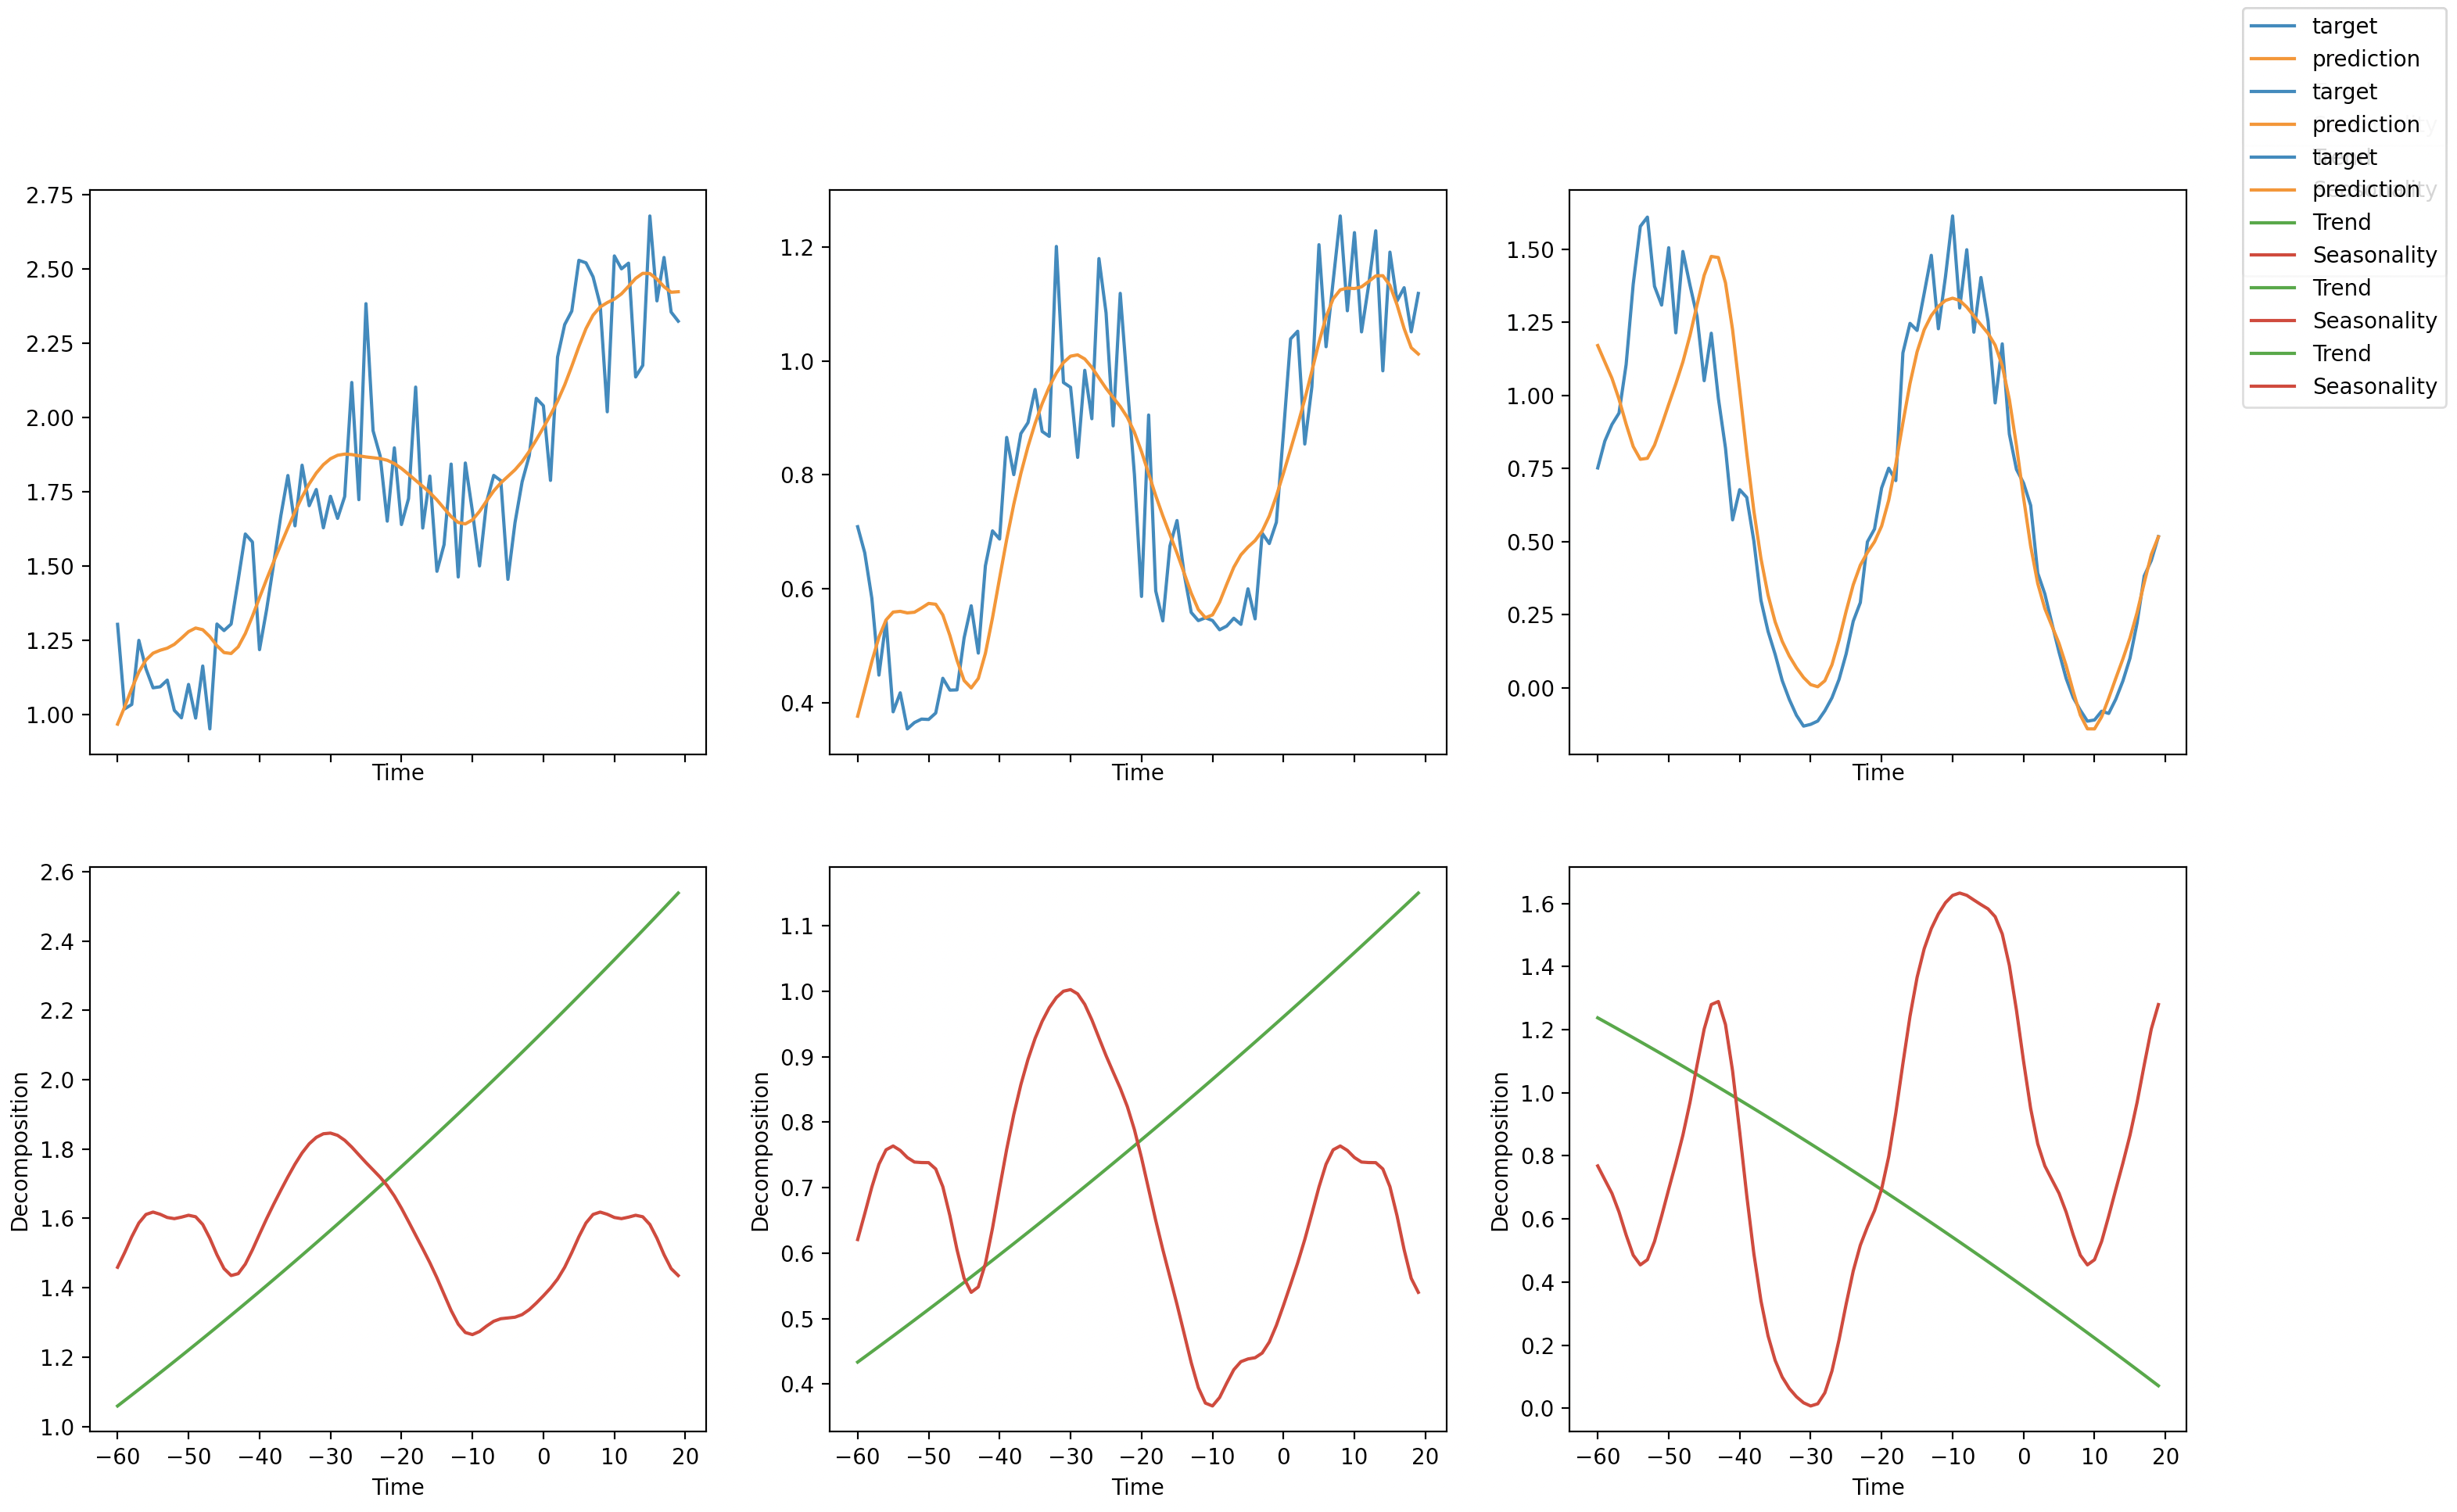
VISSL
VISSL is a library from Facebook AI Research for state-of-the-art self-supervised learning. We integrate VISSL models and algorithms into Flash with the image embedder task.
Using VISSL with Flash
The ImageEmbedder task in Flash can be configured with different backbones, projection heads, image transforms and loss functions so that you can train your feature extractor using a SOTA SSL method.
from flash.image import ImageEmbedder
embedder = ImageEmbedder(
backbone="resnet",
training_strategy="barlow_twins",
head="simclr_head",
pretraining_transform="barlow_twins_transform",
training_strategy_kwargs={"latent_embedding_dim": 256, "dims": [2048, 2048, 256]},
pretraining_transform_kwargs={"size_crops": [196]},
)
The user can pass arguments to the training strategy, image transforms and backbones using the optional dictionary arguments the ImageEmbedder task accepts.
The training strategies club together the projection head, the loss function as well as VISSL hooks for a particular algorithm and the arguments to customize these can passed via training_strategy_kwargs.
As an example, in the above code block, the latent_embedding_dim is an argument to the BarlowTwins loss function from VISSL, while the dims argument configures the projection head to output 256 dim vectors for the loss function.
If you find VISSL integration in Flash useful for your research, please don’t forget to cite us and the VISSL library. You can find our bibtex on Flash and VISSL’s bibxtex on their github page.
flash
A basic DataModule class for all Flash tasks. |
|
|
|
The |
|
An |
|
A general Task. |
|
flash.core
flash.core.adapter
The |
|
The |
flash.core.classification
A |
|
A base class for classification outputs. |
|
A |
|
A |
|
A |
|
A |
|
A |
flash.core.finetuning
FlashBaseFinetuning can be used to create a custom Flash Finetuning Callback. |
|
Hooks to be used in Task and FlashBaseTuning. |
|
flash.core.integrations.fiftyone
Visualizes predictions from a model with a FiftyOne Output in the FiftyOne App. |
flash.core.integrations.icevision
flash.core.integrations.pytorch_forecasting
flash.core.model
Specialized callback only used during testing Keeps track metrics during training. |
|
The |
|
The |
|
A general Task. |
flash.core.registry
This class is used to register function or |
|
The |
|
The |
flash.core.optimizers
Extends SGD in PyTorch with LARS scaling from the paper Large batch training of Convolutional Networks. |
|
Extends ADAM in pytorch to incorporate LAMB algorithm from the paper: Large batch optimization for deep learning: Training BERT in 76 minutes. |
|
Sets the learning rate of each parameter group to follow a linear warmup schedule between warmup_start_lr and base_lr followed by a cosine annealing schedule between base_lr and eta_min. |
Utilities
Modified version of |
|
|
|
flash.core.data
flash.core.data.base_viz
This Base Class is used to create visualization tool on top of |
flash.core.data.batch
This function is used to uncollate a batch into samples. |
flash.core.data.callback
This class is used to profile |
|
|
flash.core.data.data_module
A basic DataModule class for all Flash tasks. |
flash.core.data.utilities.classification
A |
|
A |
|
A |
|
A |
|
A |
|
A |
|
A |
|
A |
|
A |
|
Get the |
flash.core.data.properties
flash.core.data.splits
SplitDataset is used to create Dataset Subset using indices. |
flash.core.data.transforms
The |
|
The |
Kornia transforms add batch dimension which need to be removed. |
flash.core.data.utils
This class is used to wrap a callable within a nn.Module and apply the wrapped function in __call__ |
Download file with progressbar. |
flash.core.data.io.input
The |
|
The |
flash.core.data.io.classification_input
The |
flash.core.data.io.input_transform
flash.core.data.io.output
An |
flash.core.data.io.output_transform
The |
flash.core.serve
alias of |
|
Create a composition which define computations / endpoints to create & run. |
|
An endpoint maps a route and request/response payload to components. |
|
ModuleWrapperBase around a model object to enable serving at scale. |
|
Expose a function/method via a web API for serving model inference. |
flash.image
Classification
The |
|
The |
|
Process and show the image batch and its associated label using matplotlib. |
Object Detection
The |
|
The |
|
A |
Keypoint Detection
The |
|
The |
Instance Segmentation
The |
|
Embedding
The |
Segmentation
|
|
The |
|
Process and show the image batch and its associated label using matplotlib. |
|
A |
|
A |
Convert the target mask to long and remove the channel dimension. |
Style Transfer
|
|
The |
|
|
flash.image.data
flash.audio
Classification
The |
|
Speech Recognition
The |
|
The |
|
|
flash.pointcloud
Segmentation
The |
|
Object Detection
The |
|
|
flash.tabular
Classification
The |
|
The |
|
Regression
The |
|
The |
|
Forecasting
The |
|
flash.tabular.data
flash.text
Classification
The |
|
The |
|
Embedding
The |
Question Answering
The |
|
The |
|
|
Summarization
The |
|
The |
Translation
The |
|
The |
General Seq2Seq
General Task for Sequence2Sequence. |
|
flash.text.input
flash.video
Classification
Task that classifies videos. |
|
The |
|
|
|
|
int = 244, temporal_sub_sample: int = 8, mean: torch.Tensor = torch.tensor, std: torch.Tensor = torch.tensor, data_format: str = 'BCTHW', same_on_frame: bool = False) |
flash.graph
Classification
The |
|
The |
|
|
Embedding
The |
Introduction / Set-up
Welcome
Before you begin, we’d like to express our gratitude to you for wanting to add a task to Flash. With Flash our aim is to create a great user experience, enabling awesome advanced applications with just a few lines of code. We’re really pleased with what we’ve achieved with Flash and we hope you will be too. Now let’s dive in!
Set-up
The Task template is designed to guide you through contributing a task to Flash. It contains the code, tests, and examples for a task that performs classification with a multi-layer perceptron, intended for use with the classic data sets from scikit-learn. The Flash tasks are organized in folders by data-type (image, text, video, etc.), with sub-folders for different task types (classification, regression, etc.).
Copy the files in flash/template/classification to a new sub-directory under the relevant data-type.
If a data-type folder already exists for your task, then a task type sub-folder should be added containing the template files.
If a data-type folder doesn’t exist, then you will need to add that too.
You should also copy the files from tests/template/classification to the corresponding data-type, task type folder in tests.
For example, if you were adding an image classification task, you would do:
mkdir flash/image/classification
cp flash/template/classification/* flash/image/classification/
mkdir tests/image/classification
cp tests/template/classification/* tests/image/classification/
Tutorials
The tutorials in this section will walk you through all of the components you need to implement (or adapt from the template) for your custom task.
The Data: our first tutorial goes over the best practices for implementing everything you need to connect data to your task
The Backbones: the second tutorial shows you how to create an extensible backbone registry for your task
The Task: now that we have the data and the models, in this tutorial we create our custom task
Optional Extras: this tutorial covers some optional extras you can add if needed for your particular task
The Example: this tutorial guides you through creating some simple examples showing your task in action
The Tests: in this tutorial, we cover best practices for writing some tests for your new task
The Docs: in our final tutorial, we provide a template for you to create the docs page for your task
The Data
The first step to contributing a task is to implement the classes we need to load some data. Inside data.py you should implement:
some
Inputclasses (optional)a
BaseVisualization(optional)a
OutputTransform(optional)
Input
The Input class contains the logic for data loading from different sources such as folders, files, tensors, etc.
Every Flash DataModule can be instantiated with from_datasets().
For each additional way you want the user to be able to instantiate your DataModule, you’ll need to create a Input.
Each Input has 2 methods:
load_data()takes some dataset metadata (e.g. a folder name) as input and produces a sequence or iterable of samples or sample metadata.load_sample()then takes as input a single element from the output ofload_dataand returns a sample.
By default these methods just return their input, so you don’t need both a load_data() and a load_sample() to create a Input.
Where possible, you should override one of our existing Input classes.
Let’s start by implementing a TemplateNumpyClassificationInput, which overrides ClassificationInputMixin.
The main Input method that we have to implement is load_data().
ClassificationInputMixin provides utilities for handling targets within flash which need to be called from the load_data() and load_sample().
In this Input, we’ll also set the num_features attribute so that we can access it later.
Here’s the code for our TemplateNumpyClassificationInput.load_data method:
def load_data(
self,
examples: Collection[np.ndarray],
targets: Optional[Sequence[Any]] = None,
target_formatter: Optional[TargetFormatter] = None,
) -> Sequence[Dict[str, Any]]:
"""Sets the ``num_features`` attribute and calls ``super().load_data``.
Args:
examples: The ``np.ndarray`` (num_examples x num_features).
targets: Associated targets.
target_formatter: Optionally provide a ``TargetFormatter`` to control how targets are formatted.
Returns:
A sequence of samples / sample metadata.
"""
if not self.predicting and isinstance(examples, np.ndarray):
self.num_features = examples.shape[1]
if targets is not None:
self.load_target_metadata(targets, target_formatter=target_formatter)
return to_samples(examples, targets)
and here’s the code for the TemplateNumpyClassificationInput.load_sample method:
def load_sample(self, sample: Dict[str, Any]) -> Any:
if DataKeys.TARGET in sample:
sample[DataKeys.TARGET] = self.format_target(sample[DataKeys.TARGET])
return sample
Note
Later, when we add our DataModule implementation, we’ll make num_features available to the user.
For our template Task, it would be cool if the user could provide a scikit-learn Bunch as the data source.
To achieve this, we’ll add a TemplateSKLearnClassificationInput whose load_data expects a Bunch as input.
We override our TemplateNumpyClassificationInput so that we can call super with the data and targets extracted from the Bunch.
We perform two additional steps here to improve the user experience:
We set the
num_classesattribute on thedataset. Ifnum_classesis set, it is automatically made available as a property of theDataModule.We create and set a
ClassificationState. The labels provided here will be shared with theLabelsoutput, so the user doesn’t need to provide them.
Here’s the code for the TemplateSKLearnClassificationInput.load_data method:
def load_data(self, data: Bunch, target_formatter: Optional[TargetFormatter] = None) -> Sequence[Dict[str, Any]]:
"""Gets the ``data`` and ``target`` attributes from the ``Bunch`` and passes them to ``super().load_data``.
Args:
data: The scikit-learn data ``Bunch``.
target_formatter: Optionally provide a ``TargetFormatter`` to control how targets are formatted.
Returns:
A sequence of samples / sample metadata.
"""
return super().load_data(data.data, data.target, target_formatter=target_formatter)
We can customize the behaviour of our load_data() for different stages, by prepending train, val, test, or predict.
For our TemplateSKLearnClassificationInput, we don’t want to provide any targets to the model when predicting.
We can implement predict_load_data like this:
def predict_load_data(self, data: Bunch) -> Sequence[Dict[str, Any]]:
"""Avoid including targets when predicting.
Args:
data: The scikit-learn data ``Bunch``.
Returns:
A sequence of samples / sample metadata.
"""
return super().load_data(data.data)
InputTransform
The InputTransform object contains all the data transforms.
Internally we inject the InputTransform transforms at several points along the pipeline.
Defining the standard transforms (typically at least a per_sample_transform should be defined) for your InputTransform involves simply overriding the required hook to return a callable transform.
For our TemplateInputTransform, we’ll just configure an input_per_sample_transform and a target_per_sample_transform.
Let’s first define a to_tensor transform as a staticmethod:
@staticmethod
def input_to_tensor(input: np.ndarray):
"""Transform which creates a tensor from the given numpy ``ndarray`` and converts it to ``float``"""
return torch.from_numpy(input).float()
Now in our input_per_sample_transform hook, we return the transform:
def input_per_sample_transform(self) -> Callable:
return self.input_to_tensor
To convert the targets to a tensor we can simply use torch.as_tensor.
Here’s our target_per_sample_transform:
def target_per_sample_transform(self) -> Callable:
return self.target_to_tensor
DataModule
The DataModule is responsible for creating the DataLoader and injecting the transforms for each stage.
When the user calls a from_* method (such as from_numpy()), the following steps take place:
The
from_()method is called with the name of theInputto use and the inputs to provide toload_data()for each stage.The
InputTransformis created fromcls.input_transform_cls(if it wasn’t provided by the user) with any provided transforms.The
Inputof the provided name is retrieved from theInputTransform.A
BaseAutoDatasetis created from theInputfor each stage.The
DataModuleis instantiated with the data sets.
To create our TemplateData DataModule, we first need to attach our input transform class like this:
input_transform_cls = TemplateInputTransform
Since we provided a NUMPY Input in the TemplateInputTransform, from_numpy() will now work with our TemplateData.
If you’ve defined a fully custom Input (like our TemplateSKLearnClassificationInput), then you will need to write a from_* method for each.
Here’s the from_sklearn method for our TemplateData:
@classmethod
def from_sklearn(
cls,
train_bunch: Optional[Bunch] = None,
val_bunch: Optional[Bunch] = None,
test_bunch: Optional[Bunch] = None,
predict_bunch: Optional[Bunch] = None,
train_transform: INPUT_TRANSFORM_TYPE = TemplateInputTransform,
val_transform: INPUT_TRANSFORM_TYPE = TemplateInputTransform,
test_transform: INPUT_TRANSFORM_TYPE = TemplateInputTransform,
predict_transform: INPUT_TRANSFORM_TYPE = TemplateInputTransform,
input_cls: Type[Input] = TemplateSKLearnClassificationInput,
transform_kwargs: Optional[Dict] = None,
**data_module_kwargs: Any,
) -> "TemplateData":
"""This is our custom ``from_*`` method. It expects scikit-learn ``Bunch`` objects as input and creates the
``TemplateData`` with them.
Args:
train_bunch: The scikit-learn ``Bunch`` containing the train data.
val_bunch: The scikit-learn ``Bunch`` containing the validation data.
test_bunch: The scikit-learn ``Bunch`` containing the test data.
predict_bunch: The scikit-learn ``Bunch`` containing the predict data.
train_transform: The dictionary of transforms to use during training which maps
:class:`~flash.core.data.io.input_transform.InputTransform` hook names to callable transforms.
val_transform: The dictionary of transforms to use during validation which maps
:class:`~flash.core.data.io.input_transform.InputTransform` hook names to callable transforms.
test_transform: The dictionary of transforms to use during testing which maps
:class:`~flash.core.data.io.input_transform.InputTransform` hook names to callable transforms.
predict_transform: The dictionary of transforms to use during predicting which maps
:class:`~flash.core.data.io.input_transform.InputTransform` hook names to callable transforms.
Returns:
The constructed data module.
"""
ds_kw = dict(
transform_kwargs=transform_kwargs,
input_transforms_registry=cls.input_transforms_registry,
)
train_input = input_cls(RunningStage.TRAINING, train_bunch, transform=train_transform, **ds_kw)
target_formatter = getattr(train_input, "target_formatter", None)
return cls(
train_input,
input_cls(
RunningStage.VALIDATING,
val_bunch,
transform=val_transform,
target_formatter=target_formatter,
**ds_kw,
),
input_cls(
RunningStage.TESTING,
test_bunch,
transform=test_transform,
target_formatter=target_formatter,
**ds_kw,
),
input_cls(RunningStage.PREDICTING, predict_bunch, transform=predict_transform, **ds_kw),
**data_module_kwargs,
)
The final step is to implement the num_features property for our TemplateData.
This is just a convenience for the user that finds the num_features attribute on any of the data sets and returns it.
Here’s the code:
@property
def num_features(self) -> Optional[int]:
"""Tries to get the ``num_features`` from each dataset in turn and returns the output."""
n_fts_train = getattr(self.train_dataset, "num_features", None)
n_fts_val = getattr(self.val_dataset, "num_features", None)
n_fts_test = getattr(self.test_dataset, "num_features", None)
return n_fts_train or n_fts_val or n_fts_test
BaseVisualization
An optional step is to implement a BaseVisualization.
The BaseVisualization lets you control how data at various points in the pipeline can be visualized.
This is extremely useful for debugging purposes, allowing users to view their data and understand the impact of their transforms.
Note
Don’t worry about implementing it right away, you can always come back and add it later!
Here’s the code for our TemplateVisualization which just prints the data:
class TemplateVisualization(BaseVisualization):
"""The ``TemplateVisualization`` class is a :class:`~flash.core.data.callbacks.BaseVisualization` that just
prints the data.
If you want to provide a visualization with your task, you can override these hooks.
"""
def show_load_sample(self, samples: List[Any], running_stage: RunningStage):
print(samples)
def show_per_sample_transform(self, samples: List[Any], running_stage: RunningStage):
print(samples)
We can configure our custom visualization in the TemplateData using configure_data_fetcher() like this:
@staticmethod
def configure_data_fetcher(*args, **kwargs) -> BaseDataFetcher:
"""We can, *optionally*, provide a data visualization callback using the ``configure_data_fetcher``
method."""
return TemplateVisualization(*args, **kwargs)
OutputTransform
OutputTransform contains any transforms that need to be applied after the model.
You may want to use it for: converting tokens back into text, applying an inverse normalization to an output image, resizing a generated image back to the size of the input, etc.
As an example, here’s the SemanticSegmentationOutputTransform which decodes tokenized model outputs:
class SemanticSegmentationOutputTransform(OutputTransform):
def per_sample_transform(self, sample: Any) -> Any:
resize = K.geometry.Resize(sample[DataKeys.METADATA]["size"], interpolation="bilinear")
sample[DataKeys.PREDS] = resize(sample[DataKeys.PREDS])
sample[DataKeys.INPUT] = resize(sample[DataKeys.INPUT])
return super().per_sample_transform(sample)
In your Input or InputTransform, you can add metadata to the batch using the METADATA key.
Your OutputTransform can then use this metadata in its transforms.
You should use this approach if your postprocessing depends on the state of the input before the InputTransform transforms.
For example, if you want to resize the predictions to the original size of the inputs you should add the original image size in the METADATA.
Here’s an example from the SemanticSegmentationNumpyInput:
def load_sample(self, sample: Dict[str, Any]) -> Dict[str, Any]:
sample[DataKeys.INPUT] = torch.from_numpy(sample[DataKeys.INPUT])
if DataKeys.TARGET in sample:
sample[DataKeys.TARGET] = torch.from_numpy(sample[DataKeys.TARGET])
return super().load_sample(sample)
The METADATA can now be referenced in your OutputTransform.
For example, here’s the code for the per_sample_transform method of the SemanticSegmentationOutputTransform:
def per_sample_transform(self, sample: Any) -> Any:
resize = K.geometry.Resize(sample[DataKeys.METADATA]["size"], interpolation="bilinear")
sample[DataKeys.PREDS] = resize(sample[DataKeys.PREDS])
sample[DataKeys.INPUT] = resize(sample[DataKeys.INPUT])
return super().per_sample_transform(sample)
Now that you’ve got some data, it’s time to add some backbones for your task!
The Backbones
Now that you’ve got a way of loading data, you should implement some backbones to use with your Task.
Create a FlashRegistry to use with your Task in backbones.py.
The registry allows you to register backbones for your task that can be selected by the user.
The backbones can come from anywhere as long as you can register a function that loads the backbone.
Furthermore, the user can add their own models to the existing backbones, without having to write their own Task!
You can create a registry like this:
TEMPLATE_BACKBONES = FlashRegistry("backbones")
Let’s add a simple MLP backbone to our registry.
We need a function that creates the backbone and returns it along with the output size (so that we can create the model head in our Task).
You can use any name for the function, although we use load_{model name} by convention.
You also need to provide name and namespace of the backbone.
The standard for namespace is data_type/task_type, so for an image classification task the namespace will be image/classification.
Here’s the code:
@TEMPLATE_BACKBONES(name="mlp-128", namespace="template/classification")
def load_mlp_128(num_features, **_):
"""A simple MLP backbone with 128 hidden units."""
return (
nn.Sequential(
nn.Linear(num_features, 128),
nn.ReLU(True),
nn.BatchNorm1d(128),
),
128,
)
Here’s another example with a slightly more complex model:
@TEMPLATE_BACKBONES(name="mlp-128-256", namespace="template/classification")
def load_mlp_128_256(num_features, **_):
"""Two layer MLP backbone with 128 and 256 hidden units respectively."""
return (
nn.Sequential(
nn.Linear(num_features, 128),
nn.ReLU(True),
nn.BatchNorm1d(128),
nn.Linear(128, 256),
nn.ReLU(True),
nn.BatchNorm1d(256),
),
256,
)
Here’s a another example, which adds DINO pretrained model from PyTorch Hub to the IMAGE_CLASSIFIER_BACKBONES, from flash/image/classification/backbones/transformers.py:
def dino_vitb16(*_, **__):
backbone = torch.hub.load("facebookresearch/dino:main", "dino_vitb16")
return backbone, 768
Once you’ve got some data and some backbones, implement your task!
The Task
Once you’ve implemented a Flash DataModule and some backbones, you should implement your Task in model.py.
The Task is responsible for: setting up the backbone, performing the forward pass of the model, and calculating the loss and any metrics.
Remember that, under the hood, the Flash Task is simply a LightningModule with some helpful defaults.
To build your task, you can start by overriding the base Task or any of the existing Task implementations.
For example, in our scikit-learn example, we can just override ClassificationTask which provides good defaults for classification.
You should attach your backbones registry as a class attribute like this:
class TemplateSKLearnClassifier(ClassificationTask):
backbones: FlashRegistry = TEMPLATE_BACKBONES
Model architecture and hyper-parameters
In the __init__(), you will need to configure defaults for the:
loss function
optimizer
metrics
backbone / model
You will also need to create the backbone from the registry and create the model head. Here’s the code:
def __init__(
self,
num_features: int,
num_classes: Optional[int] = None,
labels: Optional[List[str]] = None,
backbone: Union[str, Tuple[nn.Module, int]] = "mlp-128",
backbone_kwargs: Optional[Dict] = None,
loss_fn: LOSS_FN_TYPE = None,
optimizer: OPTIMIZER_TYPE = "Adam",
lr_scheduler: LR_SCHEDULER_TYPE = None,
metrics: METRICS_TYPE = None,
learning_rate: Optional[float] = None,
multi_label: bool = False,
):
self.save_hyperparameters()
if labels is not None and num_classes is None:
num_classes = len(labels)
super().__init__(
model=None,
loss_fn=loss_fn,
optimizer=optimizer,
lr_scheduler=lr_scheduler,
metrics=metrics,
learning_rate=learning_rate,
multi_label=multi_label,
num_classes=num_classes,
labels=labels,
)
if not backbone_kwargs:
backbone_kwargs = {}
if isinstance(backbone, tuple):
self.backbone, out_features = backbone
else:
self.backbone, out_features = self.backbones.get(backbone)(num_features=num_features, **backbone_kwargs)
self.head = nn.Linear(out_features, num_classes)
Note
We call save_hyperparameters() to log the arguments to the __init__ as hyperparameters. Read more here.
Adding the model routines
You should override the {train,val,test,predict}_step methods.
The default {train,val,test,predict}_step implementations in Task expect a tuple containing the input (to be passed to the model) and target (to be used when computing the loss), and should be suitable for most applications.
In our template example, we just extract the input and target from the input mapping and forward them to the super methods.
Here’s the code for the training_step:
def training_step(self, batch: Any, batch_idx: int) -> Any:
"""For the training step, we just extract the :attr:`~flash.core.data.io.input.DataKeys.INPUT` and
:attr:`~flash.core.data.io.input.DataKeys.TARGET` keys from the input and forward them to the
:meth:`~flash.core.model.Task.training_step`."""
batch = (batch[DataKeys.INPUT], batch[DataKeys.TARGET])
return super().training_step(batch, batch_idx)
We use the same code for the validation_step and test_step.
For predict_step we don’t need the targets, so our code looks like this:
def predict_step(self, batch: Any, batch_idx: int, dataloader_idx: int = 0) -> Any:
"""For the predict step, we just extract the :attr:`~flash.core.data.io.input.DataKeys.INPUT` key from the
input and forward it to the :meth:`~flash.core.model.Task.predict_step`."""
batch = batch[DataKeys.INPUT]
return super().predict_step(batch, batch_idx, dataloader_idx=dataloader_idx)
Note
You can completely replace the {train,val,test,predict}_step methods (that is, without a call to super) if you need more custom behaviour for your Task at a particular stage.
Finally, we use our backbone and head in a custom forward pass:
def forward(self, x) -> torch.Tensor:
"""First call the backbone, then the model head."""
x = self.backbone(x)
return self.head(x)
Now that you’ve got your task, take a look at some optional advanced features you can add or go ahead and create some examples showing your task in action!
Optional Extras
Organize your transforms in transforms.py
It can be useful to define your InputTransform in an input_transform.py file.
Here’s an example from image/classification/input_transform.py:
@dataclass
class ImageClassificationInputTransform(InputTransform):
image_size: Tuple[int, int] = (196, 196)
mean: Union[float, Tuple[float, float, float]] = (0.485, 0.456, 0.406)
std: Union[float, Tuple[float, float, float]] = (0.229, 0.224, 0.225)
def input_per_sample_transform(self):
return T.Compose([T.ToTensor(), T.Resize(self.image_size), T.Normalize(self.mean, self.std)])
def train_input_per_sample_transform(self):
return T.Compose(
[T.ToTensor(), T.Resize(self.image_size), T.Normalize(self.mean, self.std), T.RandomHorizontalFlip()]
)
def target_per_sample_transform(self) -> Callable:
return torch.as_tensor
def collate(self) -> Callable:
# TODO: Remove kornia collate for default_collate
return kornia_collate
Add outputs to your Task
We recommend that you do most of the heavy lifting in the OutputTransform.
Specifically, it should include any formatting and transforms that should always be applied to the predictions.
If you want to support different use cases that require different prediction formats, you should add some Output implementations in an output.py file.
Some good examples are in flash/core/classification.py.
Here’s the ClassesOutput Output:
@CLASSIFICATION_OUTPUTS(name="classes")
class ClassesOutput(PredsClassificationOutput):
"""A :class:`.Output` which applies an argmax to the model outputs (either logits or probabilities) and
converts to a list.
Args:
multi_label: If true, treats outputs as multi label logits.
threshold: The threshold to use for multi_label classification.
"""
def __init__(self, multi_label: bool = False, threshold: float = 0.5):
super().__init__(multi_label)
self.threshold = threshold
def transform(self, sample: Any) -> Union[int, List[int]]:
sample = super().transform(sample)
if self.multi_label:
one_hot = (sample.sigmoid() > self.threshold).int().tolist()
result = []
for index, value in enumerate(one_hot):
if value == 1:
result.append(index)
return result
return torch.argmax(sample, -1).tolist()
Alternatively, here’s the LogitsOutput Output:
@CLASSIFICATION_OUTPUTS(name="logits")
class LogitsOutput(PredsClassificationOutput):
"""A :class:`.Output` which simply converts the model outputs (assumed to be logits) to a list."""
def transform(self, sample: Any) -> Any:
return super().transform(sample).tolist()
Take a look at Predictions (inference) to learn more.
Once you’ve added any optional extras, it’s time to create some examples showing your task in action!
The Example
Now you’ve implemented your task, it’s time to add an example showing how cool it is!
We usually provide one example in flash_examples/.
You can base these off of our template.py examples.
The example should:
download the data (we’ll add the example to our CI later on, so choose a dataset small enough that it runs in reasonable time)
load the data into a
DataModulecreate an instance of the
Taskcreate a
Trainercall
finetune()orfit()to train your modelgenerate predictions for a few examples
save the checkpoint
For our template example we don’t have a pretrained backbone, so we can just call fit() rather than finetune().
Here’s the full example (flash_examples/template.py):
import numpy as np
import torch
from sklearn import datasets
import flash
from flash.template import TemplateData, TemplateSKLearnClassifier
# 1. Create the DataModule
datamodule = TemplateData.from_sklearn(
train_bunch=datasets.load_iris(),
val_split=0.1,
batch_size=4,
)
# 2. Build the task
model = TemplateSKLearnClassifier(num_features=datamodule.num_features, num_classes=datamodule.num_classes)
# 3. Create the trainer and train the model
trainer = flash.Trainer(max_epochs=3, gpus=torch.cuda.device_count())
trainer.fit(model, datamodule=datamodule)
# 4. Classify a few examples
datamodule = TemplateData.from_numpy(
predict_data=[
np.array([4.9, 3.0, 1.4, 0.2]),
np.array([6.9, 3.2, 5.7, 2.3]),
np.array([7.2, 3.0, 5.8, 1.6]),
],
batch_size=4,
)
predictions = trainer.predict(model, datamodule=datamodule, output="classes")
print(predictions)
# 5. Save the model!
trainer.save_checkpoint("template_model.pt")
We get this output:
['setosa', 'virginica', 'versicolor']
Now that you’ve got an example showing your awesome task in action, it’s time to write some tests!
The Tests
Our next step is to create some tests for our Task.
For the TemplateSKLearnClassifier, we will just create some basic tests.
You should expand on these to include tests for any specific functionality you have in your Task.
Smoke tests
We use smoke tests, usually called test_smoke, throughout.
These just instantiate the class we are testing, to see that they can be created without raising any errors.
tests/examples/test_scripts.py
Before we write our custom tests, we should add out examples to the CI.
To do this, add a line for each example (finetuning and predict) to the annotation of test_example in tests/examples/test_scripts.py.
Here’s how those lines look for our template.py examples:
pytest.param(
"finetuning", "template.py", marks=pytest.mark.skipif(not _SKLEARN_AVAILABLE, reason="sklearn isn't installed")
),
...
pytest.param(
"predict", "template.py", marks=pytest.mark.skipif(not _SKLEARN_AVAILABLE, reason="sklearn isn't installed")
),
test_data.py
The most important tests in test_data.py check that the from_* methods work correctly.
In the class TestTemplateData, we have two of these: test_from_numpy and test_from_sklearn.
In general, there should be one test_from_* method for each input you have configured.
Here’s the code for test_from_numpy:
def test_from_numpy(self):
"""Tests that ``TemplateData`` is properly created when using the ``from_numpy`` method."""
data = np.random.rand(10, self.num_features)
targets = np.random.randint(0, self.num_classes, (10,))
# instantiate the data module
dm = TemplateData.from_numpy(
train_data=data,
train_targets=targets,
val_data=data,
val_targets=targets,
test_data=data,
test_targets=targets,
batch_size=2,
num_workers=0,
)
assert dm is not None
assert dm.train_dataloader() is not None
assert dm.val_dataloader() is not None
assert dm.test_dataloader() is not None
# check training data
data = next(iter(dm.train_dataloader()))
rows, targets = data[DataKeys.INPUT], data[DataKeys.TARGET]
assert rows.shape == (2, self.num_features)
assert targets.shape == (2,)
# check val data
data = next(iter(dm.val_dataloader()))
rows, targets = data[DataKeys.INPUT], data[DataKeys.TARGET]
assert rows.shape == (2, self.num_features)
assert targets.shape == (2,)
# check test data
data = next(iter(dm.test_dataloader()))
rows, targets = data[DataKeys.INPUT], data[DataKeys.TARGET]
assert rows.shape == (2, self.num_features)
assert targets.shape == (2,)
test_model.py
In test_model.py, we first have test_forward and test_train.
These test that tensors can be passed to the forward and that the Task can be trained.
Here’s the code for test_forward and test_train:
@pytest.mark.skipif(not _SKLEARN_AVAILABLE, reason="sklearn isn't installed")
@pytest.mark.parametrize("num_classes", [4, 256])
@pytest.mark.parametrize("shape", [(1, 3), (2, 128)])
def test_forward(num_classes, shape):
"""Tests that a tensor can be given to the model forward and gives the correct output size."""
model = TemplateSKLearnClassifier(
num_features=shape[1],
num_classes=num_classes,
)
model.eval()
row = torch.rand(*shape)
out = model(row)
assert out.shape == (shape[0], num_classes)
@pytest.mark.skipif(not _SKLEARN_AVAILABLE, reason="sklearn isn't installed")
def test_train(tmpdir):
"""Tests that the model can be trained on our ``DummyDataset``."""
model = TemplateSKLearnClassifier(num_features=DummyDataset.num_features, num_classes=DummyDataset.num_classes)
train_dl = torch.utils.data.DataLoader(DummyDataset(), batch_size=4)
trainer = Trainer(default_root_dir=tmpdir, fast_dev_run=True)
trainer.fit(model, train_dl)
We also include tests for validating and testing: test_val, and test_test.
These tests are very similar to test_train, but here they are for completeness:
@pytest.mark.skipif(not _SKLEARN_AVAILABLE, reason="sklearn isn't installed")
def test_val(tmpdir):
"""Tests that the model can be validated on our ``DummyDataset``."""
model = TemplateSKLearnClassifier(num_features=DummyDataset.num_features, num_classes=DummyDataset.num_classes)
val_dl = torch.utils.data.DataLoader(DummyDataset(), batch_size=4)
trainer = Trainer(default_root_dir=tmpdir, fast_dev_run=True)
trainer.validate(model, val_dl)
@pytest.mark.skipif(not _SKLEARN_AVAILABLE, reason="sklearn isn't installed")
def test_test(tmpdir):
"""Tests that the model can be tested on our ``DummyDataset``."""
model = TemplateSKLearnClassifier(num_features=DummyDataset.num_features, num_classes=DummyDataset.num_classes)
test_dl = torch.utils.data.DataLoader(DummyDataset(), batch_size=4)
trainer = Trainer(default_root_dir=tmpdir, fast_dev_run=True)
trainer.test(model, test_dl)
We also include tests for prediction named test_predict_* for each of our data sources.
In our case, we have test_predict_numpy and test_predict_sklearn.
These tests should load the data with a DataModule and generate predictions with Trainer.predict.
Here’s test_predict_sklearn as an example:
@pytest.mark.skipif(not _SKLEARN_AVAILABLE, reason="sklearn isn't installed")
def test_predict_sklearn():
"""Tests that we can generate predictions from a scikit-learn ``Bunch``."""
bunch = datasets.load_iris()
model = TemplateSKLearnClassifier(num_features=DummyDataset.num_features, num_classes=DummyDataset.num_classes)
datamodule = TemplateData.from_sklearn(predict_bunch=bunch, batch_size=1)
trainer = Trainer()
out = trainer.predict(model, datamodule=datamodule, output="classes")
assert isinstance(out[0][0], int)
Now that you’ve written the tests, it’s time to add some docs!
The Docs
The final step is to add some docs.
For each Task in Flash, we have a docs page in docs/source/reference.
You should create a .rst file there with the following:
a brief description of the task
the predict example
the finetuning example
any relevant API reference
Here are the contents of docs/source/reference/template.rst which breaks down each of these steps:
.. _template:
########
Template
########
********
The Task
********
Here you should add a description of your task. For example:
Classification is the task of assigning one of a number of classes to each data point.
------
*******
Example
*******
.. note::
Here you should add a short intro to your example, and then use ``literalinclude`` to add it.
To make it simple, you can fill in this template.
Let's look at the task of <describe the task> using the <data set used in the example>.
The dataset contains <describe the data>.
Here's an outline:
.. code-block::
<present the folder structure of the data or some data samples here>
Once we've downloaded the data using :func:`~flash.core.data.download_data`, we create the <link to the DataModule with ``:class:``>.
We select a pre-trained backbone to use for our <link to the Task with ``:class:``> and finetune on the <name of the data set> data.
We then use the trained <link to the Task with ``:class:``> for inference.
Finally, we save the model.
Here's the full example:
<include the example with ``literalinclude``>
.. literalinclude:: ../../../flash_examples/template.py
:language: python
:lines: 14-
Once the docs are done, it’s finally time to open a PR and wait for some reviews!
Congratulations on adding your first Task to Flash, we hope to see you again soon!
Flash Governance | Persons of interest
Leads
Ethan Harris (ethanwharris)
Thomas Chaton (tchaton)
William Falcon (williamFalcon)
Core Maintainers
Jirka Borovec (Borda)
Kaushik Bokka (kaushikb11)
Justus Schock (justusschock)
Carlos Mocholí (carmocca)
Sean Narenthiran (SeanNaren)
Akihiro Nitta (akihironitta)
Aniket Maurya (aniketmaurya)
Ananya Harsh Jha (ananyahjha93)
Sivaraman Karthik Rangasai (karthikrangasai)
Pietro Lesci (pietrolesci)
Contributing
Welcome to the PyTorch Lightning community! We’re building the most advanced research platform on the planet to implement the latest, best practices that the amazing PyTorch team rolls out!
Flash Design Principles
We encourage all sorts of contributions you’re interested in adding! When coding for Flash, please follow these principles.
Simple Internal Code
It’s useful for users to look at the code and understand very quickly what’s happening. Many users won’t be engineers. Thus we need to value clear, simple code over condensed ninja moves. While that’s super cool, this isn’t the project for that :)
Force User Decisions To Best Practices
There are 1,000 ways to do something. However, eventually one popular solution becomes standard practice, and everyone follows. We try to find the best way to solve a particular problem, and then force our users to use it for readability and simplicity.
When something becomes a best practice, we add it to the framework. This is usually something like bits of code in utils or in the model file that everyone keeps adding over and over again across projects. When this happens, bring that code inside the trainer and add a flag for it.
Backward-compatible API
We all hate updating our deep learning packages because we don’t want to refactor a bunch of stuff. In Flash, we make sure every change we make which could break an API is backward compatible with good deprecation warnings.
Gain User Trust
As a researcher, you can’t have any part of your code going wrong. So, make thorough tests to ensure that every implementation of a new trick or subtle change is correct.
Interoperability
PyTorch Lightning Flash is highly interoperable with PyTorch Lightning and PyTorch.
Contribution Types
We are always looking for help implementing new features or fixing bugs.
A lot of good work has already been done in project mechanics (requirements.txt, setup.py, pep8, badges, ci, etc…) so we’re in a good state there thanks to all the early contributors (even pre-beta release)!
Bug Fixes:
If you find a bug please submit a GitHub issue.
Make sure the title explains the issue.
Describe your setup, what you are trying to do, expected vs. actual behaviour. Please add configs and code samples.
Add details on how to reproduce the issue - a minimal test case is always best, colab is also great. Note, that the sample code shall be minimal and if needed with publicly available data.
Try to fix it or recommend a solution. We highly recommend to use test-driven approach:
Convert your minimal code example to a unit/integration test with assert on expected results.
Start by debugging the issue… You can run just this particular test in your IDE and draft a fix.
Verify that your test case fails on the master branch and only passes with the fix applied.
Submit a PR!
Note, even if you do not find the solution, sending a PR with a test covering the issue is a valid contribution and we can help you or finish it with you :]
New Features:
Submit a GitHub issue - describe what is the motivation of such feature (adding the use case or an example is helpful).
Let’s discuss to determine the feature scope.
Submit a PR! We recommend test driven approach to adding new features as well:
Write a test for the functionality you want to add.
Write the functional code until the test passes.
Add/update the relevant tests!
This PR is a good example for adding a new metric, and this one for a new logger.
New Tasks:
Flash is a framework of tasks for fast prototyping, baselining, finetuning and solving business and scientific problems with deep learning. Following are general guidelines for adding new tasks.
Models which are standard baselines
Whose results are reproduced properly either by us or by authors.
Top models which are not SOTA but highly cited for production usage / for other uses. (E.g. Mobile BERT, MobileNets, FBNets).
Do not reinvent the wheel, natively support torchvision, torchtext, torchaudio models.
Use open source licensed models.
Please raise an issue before adding a new task. Please let us know why the particular task is important for Flash.
Test cases:
Want to keep Lightning Flash healthy? Love seeing those green tests? So do we! How to we keep it that way? We write tests! We value tests contribution even more than new features.
Tests are written using pytest.
Have a look at sample tests here.
After you have added the respective tests, you can run the tests locally with make script:
make test
Want to add a new test case and not sure how? Talk to us!
Guidelines
For this section, we refer to read the parent PL guidelines
Reminder
All added or edited code shall be the own original work of the particular contributor.
If you use some third-party implementation, all such blocks/functions/modules shall be properly referred and if possible also agreed by code’s author. For example - This code is inspired from http://....
In case you adding new dependencies, make sure that they are compatible with the actual PyTorch Lightning license (ie. dependencies should be at least as permissive as the PyTorch Lightning license).
How to rebase my PR?
We recommend creating a PR in a separate branch other than master, especially if you plan to submit several changes and do not want to wait until the first one is resolved (we can work on them in parallel).
First, make sure you have set upstream by running:
git remote add upstream https://github.com/PyTorchLightning/lightning-flash.git
You’ll know its set up right if you run git remote -v and see something similar to this:
origin https://github.com/{YOUR_USERNAME}/lightning-flash.git (fetch)
origin https://github.com/{YOUR_USERNAME}/lightning-flash.git (push)
upstream https://github.com/PyTorchLightning/lightning-flash.git (fetch)
upstream https://github.com/PyTorchLightning/lightning-flash.git (push)
Checkout your feature branch and rebase it with upstream’s master before pushing up your feature branch:
git fetch --all --prune
git rebase upstream/master
# follow git instructions to resolve conflicts
git push -f
Question & Answer
How can I help/contribute?
All help is extremely welcome - reporting bugs, fixing documentation, adding test cases, solving issues and preparing bug fixes. To solve some issues you can start with label good first issue or chose something close to your domain with label help wanted. Before you start to implement anything check that the issue description that it is clear and self-assign the task to you (if it is not possible, just comment that you take it and we assign it to you…).
Is there a recommendation for branch names?
We do not rely on the name convention so far you are working with your own fork. Anyway it would be nice to follow this convention
<type>/<issue-id>_<short-name>where the types are:bugfix,feature,docs,tests, …I have a model in other framework than PyTorch, how do I add it here?
Since PyTorch Lightning is written on top of PyTorch. We need models in PyTorch only. Also, we would need same or equivalent results with PyTorch Lightning after converting the models from other frameworks.
Changelog
All notable changes to this project will be documented in this file.
The format is based on Keep a Changelog.
[0.7.4] - 2022-04-27
[0.7.4] - Fixed
Fixed a bug where LR schedulers from HuggingFace could not be used with newer versions of PyTorch Lightning (#1307)
Fixed a bug where the default Flash zero configurations for
ObjectDetector,InstanceSegmentation, andKeypointDetectorwould error with the latest version of some requirements (#1306)Fixed plain
LightningModulesupport for Flash data modules. (#1281)
[0.7.3] - 2022-04-13
[0.7.3] - Fixed
Fixed a bug where some backbones were incorrectly listed as available for the
ObjectDetector,InstanceSegmentation, andKeypointDetector(#1267)Fixed a bug where the backbone would not be frozen when finetuning the
SpeechRecognitiontask (#1275)Fixed a bug where the backbone would not be frozen when finetuning the
QuestionAnsweringtask with certain model types (#1275)
[0.7.2] - 2022-03-30
[0.7.2] - Fixed
Fixed examples (question answering), where NLTK’s
punktmodule needs to be downloaded first. (#1215)Fixed normalizing inputs to video classification (#1213)
Fixed a bug where
pretraining_transformsin theImageEmbedderwas never called. (1196)Fixed a bug where
BASE_MODEL_NAMEwas not in the dict for dino and moco strategies. (1196)Fixed support for
torch==1.11.0(#1234)Fixed DDP spawn support for
ObjectDetector,InstanceSegmentation, andKeypointDetector(#1222)Fixed a bug where
InstanceSegmentationwould fail if samples had an inconsistent number of bboxes, labels, and masks (these will now be treated as negative samples) (#1222)Fixed a bug where collate functions were never called in the
ImageEmbedderclass. (#1217)Fixed a bug where
ObjectDetector,InstanceSegmentation, andKeypointDetectorwould log train and validation metrics with the same name (#1252)Fixed a bug where using
ReduceLROnPlateauwould raise an error (#1251)Fixed GPU support for self-supervised training with the
ImageEmbedder(#1256)
[0.7.1] - 2022-03-01
[0.7.1] - Added
[0.7.1] - Fixed
[0.7.0] - 2022-02-15
[0.7.0] - Added
Added support for multi-label, space delimited, targets (#1076)
Added support for tabular classification / regression backbones from PyTorch Tabular (#1098)
Added Flash zero support for tabular regression (#1098)
Added support for COCO annotations with non-default keypoint labels to
KeypointDetectionData.from_coco(#1102)Added support for
from_csvandfrom_data_frametoVideoClassificationData(#1117)Added support for
SemanticSegmentationData.from_folderswhere mask files have different extensions to the image files (#1130)Added
FlashRegistryof Available Heads forflash.image.ImageClassifier(#1152)Added support for
ObjectDetectionData.from_files(#1154)Added support for passing the
Outputobject (or a string e.g."labels") to theflash.Trainer.predictmethod (#1157)Added support for passing the
TargetFormatterobject tofrom_*methods for classification to override target handling (#1171)
[0.7.0] - Changed
[0.7.0] - Fixed
Fixed a bug when not explicitly passing
embedding_sizesto theTabularClassifierandTabularRegressortasks (#1067)Fixed a bug where under some circumstances transforms would not get called (#1072)
Fixed a bug where prediction would sometimes give the wrong number of outputs (#1077)
Fixed a bug where passing the
val_splitto theDataModulewould not have the desired effect (#1079)Fixed a bug where passing
predict_data_frametoImageClassificationData.from_data_frameraised an error (#1088)Fixed a bug where segmentation files / masks were loaded with an inconsistent ordering (#1094)
Fixed a bug with
AudioClassificationData.from_numpy(#1096)Fixed a bug when using
SpeechRecognitionData.from_filesfor training / validating / testing (#1097)Fixed a bug when using
SpeechRecognitionData.from_csvorfrom_jsonwhen predicting without targets (#1097)Fixed a bug where
SpeechRecognitionData.from_datasetsdid not work as expected (#1097)Fixed a bug where loading data for prediction with
SemanticSegmentationData.from_foldersraised an error (#1101)Fixed a bug when passing a
predict_folderargument tofrom_coco/from_voc/from_viain IceVision tasks (#1102)Fixed
ObjectDetectionData.from_vocandObjectDetectionData.from_via(#1102)Fixed a bug where
InstanceSegmentationData.from_cocowould raise an error if not using file-based masks (#1102)Fixed
InstanceSegmentationData.from_voc(#1102)Fixed a bug when loading tabular data for prediction without a target field / column (#1114)
Fixed a bug when loading prediction data for graph classification without targets (#1121)
Fixed a bug where loading Seq2Seq data for prediction would not work if the target field was not present (#1128)
Fixed a bug where
from_fiftyoneclassmethods did not work correctly with apredict_dataset(#1136)Fixed a bug where the
labelsproperty would returnNonewhen usingObjectDetectionData.from_fiftyone(#1136)Fixed a bug where
TabularDatawould not work correctly with no categorical variables (#1144)Fixed a bug where loading
TabularForecastingDatafor prediction would only yield a single sample per series (#1149)Fixed a bug where backbones for the
ObjectDetector,KeypointDetector, andInstanceSegmentationtasks were not always frozen correctly when finetuning (#1163)Fixed a bug where
DataModule.multi_labelwould sometimes beNonewhen it had been inferred to beFalse(#1165)
[0.7.0] - Removed
[0.6.0] - 2021-13-12
[0.6.0] - Added
Added
TextEmbeddertask (#996)Added predict_kwargs in
ObjectDetector,InstanceSegmentation,KeypointDetector(#990)Added backbones for
GraphClassifier(#592)Added
GraphEmbeddertask (#592)Added support for comma delimited multi-label targets to the
ImageClassifier(#997)Added
datapipeline_stateon dataset creation within thefrom_*methods from theDataModule(#1018)
[0.6.0] - Changed
Changed
DataSourcetoInput(#929)Changed
PreprocesstoInputTransform(#951)Changed classes named
*Serializerand properties / variables namedserializerto be*Outputandoutputrespectively (#927)Changed
PostprocesstoOutputTransform(#942)Changed loading of RGBA images to drop alpha channel by default (#946)
Updated
FlashFinetuningcallback to use separate hooks that lets users use the freezing logic provided out-of-the-box from flash, route FlashFinetuning through a registry. (#830)Changed the
SpeechRecognitiontask to useAutoModelForCTCrather than justWav2Vec2ForCTC(#874)Changed the
Deserializerto subclassServeInput(#1013)Added
Outputsuffix toPreds,FiftyOneDetectionLabels,SegmentationLabels,FiftyOneDetectionLabels,DetectionLabels,Classes,FiftyOneLabels,Labels,Logits,Probabilities(#1011)Changed
from_filesandfrom_foldersfromObjectDetectionData,InstanceSegmentationData,KeypointDetectionDatato support only thepredictingstage (#1018)Changed
Image Classification Taskto use the new DataModule API (#1025)
[0.6.0] - Deprecated
Deprecated
flash.core.data.process.Serializerin favour offlash.core.data.io.output.Output(#927)Deprecated
Task.serializerin favour ofTask.output(#927)Deprecated
flash.text.seq2seq.core.metricsin favour oftorchmetrics[text](#648)Deprecated
flash.core.data.data_source.DefaultDataKeysin favour offlash.DataKeys(#929)Deprecated
data_sourceargument toflash.Task.predictin favour ofinput(#929)
[0.6.0] - Fixed
Fixed a bug where using image classification with DDP spawn would trigger an infinite recursion (#969)
Fixed a bug where Flash could not be used with IceVision 0.11.0 (#989)
Fixed a bug where backbone weights were sometimes not frozen correctly (#992)
Fixed a bug where translation metrics were not computed correctly (#992)
Fixed a bug where additional
DataModulekeyword arguments could not be configured with Flash Zero for some tasks (#994)Fixed a bug where the TabularForecaster would not work with some versions of pandas (#995)
[0.6.0] - Removed
Removed
OutputMapping(#939)Removed
Output.enableandOutput.disable(#939)Removed
OutputTransform.save_sampleandsave_datahooks (#948)Removed InputTransform
pre_tensor_transform,to_tensor_transform,post_tensor_transformhooks in favour ofper_sample_transform(#1010)Removed
Task.predict, useTrainer.predictinstead (#1030)Removed the
backboneargument fromTextClassificationData, it is now sufficient to only provide abackboneargument to theTextClassifier(#1022)Removed support for the
serve_sanity_checkargument inflash.Trainer(#1062)
[0.5.2] - 2021-11-05
[0.5.2] - Added
[0.5.2] - Fixed
Fixed a bug where test metrics were not logged correctly with active learning (#879)
Fixed a bug where validation metrics could be aggregated together with test metrics in some cases (#900)
Fixed a bug where the latest versions of torchmetrics and Lightning Flash could not be installed together (#902)
Fixed compatibility with PyTorch-Lightning 1.5 (#933)
[0.5.1] - 2021-10-26
[0.5.1] - Added
Added
LabelStudiointegration (#554)Added support
learn2learntraining_strategy forImageClassifier(#737)Added
vissltraining_strategies forImageEmbedder(#682)Added support for
from_data_frametoTextClassificationData(#785)Added
FastFaceintegration (#606)Added support for
from_liststoTextClassificationData(#805)
[0.5.1] - Changed
[0.5.1] - Fixed
[0.5.0] - 2021-09-07
[0.5.0] - Added
Added support for (input, target) style datasets (e.g. torchvision) to the from_datasets method (#552)
Added support for
from_csvandfrom_data_frametoImageClassificationData(#556)Added SimCLR, SwAV, Barlow-twins pretrained weights for resnet50 backbone in ImageClassifier task (#560)
Added support for Semantic Segmentation backbones and heads from
segmentation-models.pytorch(#562)Added support for nesting of
Taskobjects (#575)Added
PointCloudSegmentationTask (#566)Added
PointCloudObjectDetectionTask (#600)Added a
GraphClassifiertask (#73)Added the option to pass
pretrainedas a string toSemanticSegmentationto change pretrained weights to load fromsegmentation-models.pytorch(#587)Added support for
fieldparameter for loadng JSON based datasets in text tasks. (#585)Added
AudioClassificationDataand an example for classifying audio spectrograms (#594)Added a
SpeechRecognitiontask for speech to text using Wav2Vec (#586)Added Flash Zero, a zero code command line ML platform built with flash (#611)
Added support for
.npyand.npzfiles toImageClassificationDataandAudioClassificationData(#651)Added support for
from_csvto theAudioClassificationData(#651)Added option to pass a
resolverto thefrom_csvandfrom_pandasmethods ofImageClassificationData, which is used to resolve filenames given IDs (#651)Added integration with IceVision for the
ObjectDetector(#608)Added keypoint detection task (#608)
Added instance segmentation task (#608)
Added Torch ORT support to Transformer based tasks (#667)
Added support for flash zero with the
InstanceSegmentationandKeypointDetectortasks (#672)Added support for
in_chansargument to the flash ResNet to control the expected number of input channels (#673)Added a
QuestionAnsweringtask for extractive question answering (#607)Added automatic unwrapping of IceVision prediction objects (#727)
Added support for the
ObjectDetectorwith FiftyOne (#727)Added support for MP3 files to the
SpeechRecognitiontask with librosa (#726)Added support for
from_numpyandfrom_tensorstoAudioClassificationData(#745)
[0.5.0] - Changed
Changed how pretrained flag works for loading weights for ImageClassifier task (#560)
Removed bolts pretrained weights for SSL from ImageClassifier task (#560)
Changed the behaviour of the
samplerargument of theDataModuleto take aSamplertype rather than instantiated object (#651)Changed arguments to
ObjectDetector, useheadinstead ofmodeland append_fpnto the backbone name instead of thefpnargument (#608)
[0.5.0] - Fixed
Fixed a bug where serve sanity checking would not be triggered using the latest PyTorchLightning version (#493)
Fixed a bug where train and validation metrics weren’t being correctly computed (#559)
Fixed a bug where an uncaught ValueError could be raised when checking if a module is available (#615)
Fixed a bug where some tasks were not compatible with PyTorch 1.7 due to use of
torch.jit.isinstance(#611)Fixed a bug where custom samplers would not be properly forwarded to the data loader (#651)
Fixed a bug where it was not possible to pass no metrics to the
ImageClassifierorTestClassifier(#660)Fixed a bug where
drop_lastwould be set to True during prediction and testing (#671)Fixed a bug where flash was not compatible with pytorch-lightning >= 1.4.3 (#690)
[0.4.0] - 2021-06-22
[0.4.0] - Added
Added integration with FiftyOne (#360)
Added
flash.serve(#399)Added support for
torch.jitto tasks where possible and documented task JIT compatibility (#389)Added option to provide a
Samplerto theDataModuleto use when creating aDataLoader(#390)Added support for multi-label text classification and toxic comments example (#401)
Added a sanity checking feature to flash.serve (#423)
[0.4.0] - Changed
Split
backboneargument toSemanticSegmentationintobackboneandheadarguments (#412)
[0.4.0] - Fixed
[0.3.2] - 2021-06-08
[0.3.2] - Fixed
Fixed a bug where
flash.Trainer.from_argparse_args+finetunewould not work (#382)
[0.3.1] - 2021-06-08
[0.3.1] - Added
Added
deeplabv3,lraspp, andunetbackbones for theSemanticSegmentationtask (#370)
[0.3.1] - Changed
[0.3.1] - Deprecated
Deprecated
SemanticSegmentationbackbone namestorchvision/fcn_resnet50andtorchvision/fcn_resnet101, usefc_resnet50andfcn_resnet101instead (#370)
[0.3.1] - Fixed
Fixed
flash.Trainer.add_argparse_argsnot adding any arguments (#343)Fixed a bug where the translation task wasn’t decoding tokens properly (#332)
Fixed a bug where huggingface tokenizers were sometimes being pickled (#332)
Fixed issue with
KorniaParallelTransformsto assure to share the random state between transforms (#351)Fixed a bug where using
val_splitwithoverfit_batcheswould give an infinite recursion (#375)Fixed a bug where some timm models were mistakenly given a
global_poolargument (#377)Fixed
flash.Trainer.from_argparse_argsnot passing arguments correctly (#380)
[0.3.0] - 2021-05-20
[0.3.0] - Added
Added timm integration (#196)
Added BaseViz Callback (#201)
Added backbone API (#204)
Added support for Iterable auto dataset (#227)
Added multi label support (#230)
Added support for schedulers (#232)
Added visualisation callback for image classification (#228)
Added Video Classification task (#216)
Added Dino backbone for image classification (#259)
Refactor preprocess_cls to preprocess, add Serializer, add DataPipelineState (#229)
Added Object detection prediction example (#283)
Added Style Transfer task and accompanying finetuning and prediction examples (#262)
Added a Template task and tutorials showing how to contribute a task to flash (#306)
[0.3.0] - Changed
[0.3.0] - Fixed
[0.2.3] - 2021-04-17
[0.2.3] - Added
Added TIMM integration as backbones (#196)
[0.2.3] - Fixed
Fixed nltk.download (#210)
[0.2.2] - 2021-04-05
[0.2.2] - Changed
[0.2.2] - Fixed
[0.2.1] - 2021-3-06
[0.2.1] - Added
[0.2.1] - Changed
Set inputs as optional (#109)
[0.2.1] - Fixed
[0.2.0] - 2021-02-12
[0.2.0] - Added
[0.2.0] - Changed
[0.2.0] - Fixed
[0.2.0] - Removed
[0.1.0] - 2021-02-02
[0.1.0] - Added
Template
The Task
Here you should add a description of your task. For example: Classification is the task of assigning one of a number of classes to each data point.
Example
Note
Here you should add a short intro to your example, and then use literalinclude to add it.
To make it simple, you can fill in this template.
Let’s look at the task of <describe the task> using the <data set used in the example>. The dataset contains <describe the data>. Here’s an outline:
<present the folder structure of the data or some data samples here>
Once we’ve downloaded the data using download_data(), we create the <link to the DataModule with :class:>.
We select a pre-trained backbone to use for our <link to the Task with :class:> and finetune on the <name of the data set> data.
We then use the trained <link to the Task with :class:> for inference.
Finally, we save the model.
Here’s the full example:
<include the example with literalinclude>
import numpy as np
import torch
from sklearn import datasets
import flash
from flash.template import TemplateData, TemplateSKLearnClassifier
# 1. Create the DataModule
datamodule = TemplateData.from_sklearn(
train_bunch=datasets.load_iris(),
val_split=0.1,
batch_size=4,
)
# 2. Build the task
model = TemplateSKLearnClassifier(num_features=datamodule.num_features, num_classes=datamodule.num_classes)
# 3. Create the trainer and train the model
trainer = flash.Trainer(max_epochs=3, gpus=torch.cuda.device_count())
trainer.fit(model, datamodule=datamodule)
# 4. Classify a few examples
datamodule = TemplateData.from_numpy(
predict_data=[
np.array([4.9, 3.0, 1.4, 0.2]),
np.array([6.9, 3.2, 5.7, 2.3]),
np.array([7.2, 3.0, 5.8, 1.6]),
],
batch_size=4,
)
predictions = trainer.predict(model, datamodule=datamodule, output="classes")
print(predictions)
# 5. Save the model!
trainer.save_checkpoint("template_model.pt")
